이 포스팅에서는 Python 및 Arduino UNO 보드를 사용하여 저비용 다중 채널 데이터 로깅 시스템을 구축하여 디스크의 CSV(쉼표로 구분된 값) 파일에 데이터를 기록하고 저장합니다. 본 포스팅 참고자료는 맨 아래 참고를 확인하세요.
시스템은 동시에 4개의 독립적인 소스에서 온도 데이터를 모니터링 하고 데이터를 파일에 기록할 수 있습니다.
이 시스템은 Arduino와 LM324 opamp를 기반으로 하는 아날로그 프런트 엔드를 사용하여 4개의 LM35 온도 센서에서 온도를 측정합니다 . 아날로그 값은 Arduino UNO(ATmega328P)의 10비트 ADC에 의해 디지털화되어 Virtual Serial Port 통신을 사용하여 PC 또는 MAC으로 전송합니다. 전송한 데이터는 PC에서 실행되는 Python 3.xx 스크립트에서 데이터를 수신하고 타임 스탬프 데이터를 CSV 파일에 기록합니다.
본 포스팅을 이해하기 위해서는 아래 두 가지 사항에 대해 이해하고 있어야 합니다.
● 데이터 로깅 소프트웨어의 프로그램 흐름을 제어하는 Python Signal SIGINT
● 데이터 로거와 연결하기 위한 Pyserial 기반 Python 직렬 포트 프로그래밍
소스코드를 링크로 연결합니다.
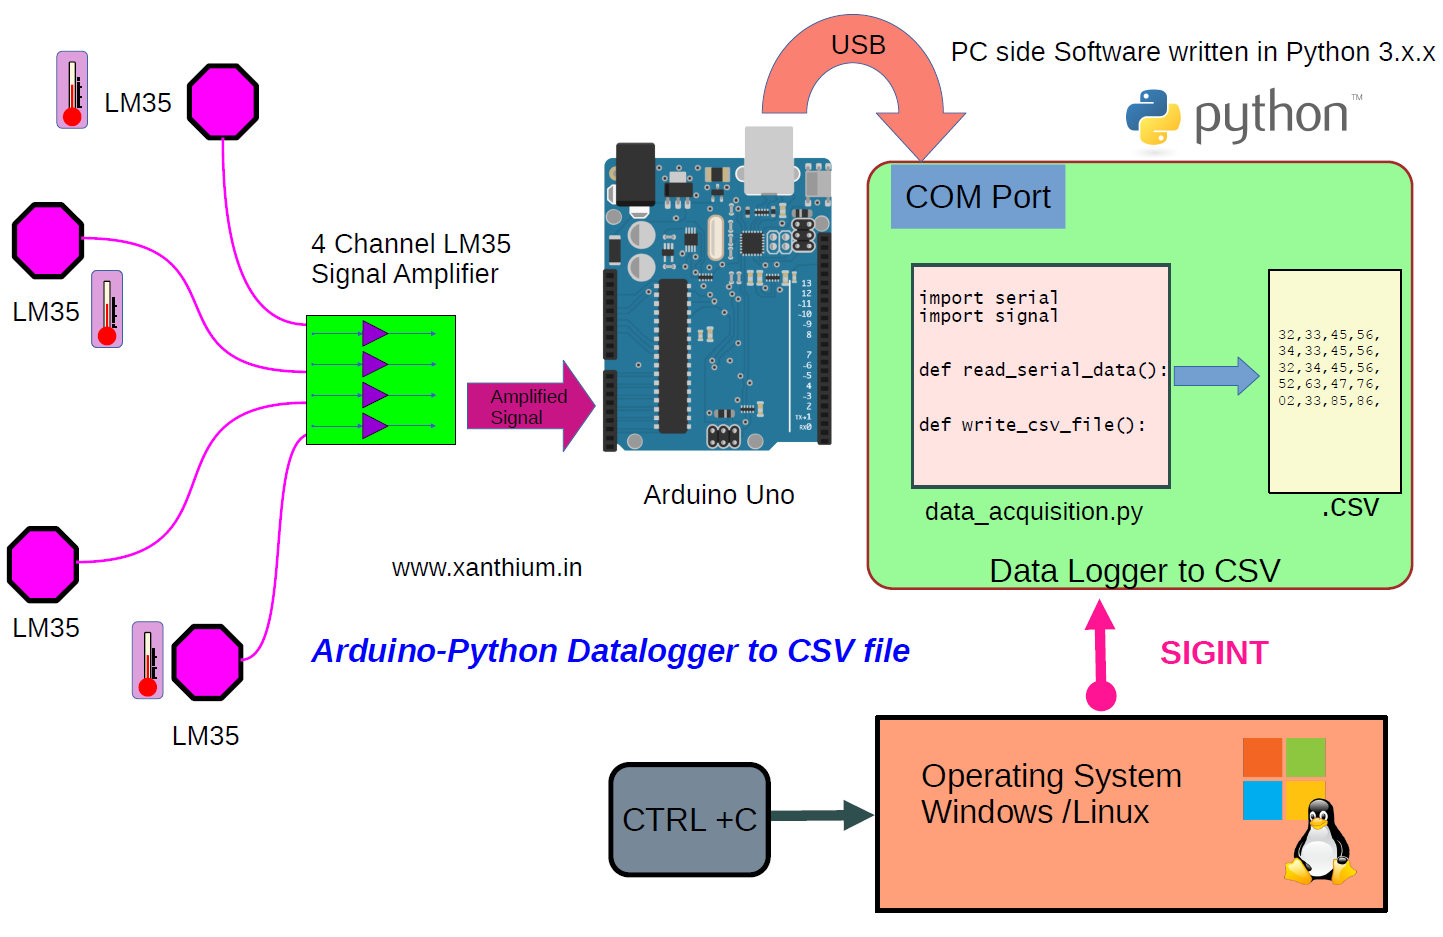
Arduino Python Datalogger 시스템의 블록 다이어그램

이 시스템은 Arduino 보드의 아날로그 프런트 엔드 역할을 하는 LM324 증폭기 보드에 연결된 4개의 LM35 온도 센서로 구성됩니다. 증폭기 보드의 아날로그 신호는 Arduino의 ADC에 의해 디지털화되어 PC MAC 또는 Linux 컴퓨터로 전송합니다. PC에서 실행되는 Python 스크립트는 직렬 포트를 모니터링하고 Arduino에서 온도 값을 수신합니다. 스크립트는 받은 값을 CSV 파일에 씁니다. CTRL + C 키보드 조합을 사용하여 스크립트를 종료할 수 있습니다.
하드웨어 연결과 구성을 아래에 나타냅니다.
- 4개의 LM35 온도 프로브
- 4 채널 LM35 신호 opamp 증폭기 보드
- 아두이노 우노 보드
- Windows/Linux OS 시스템을 실행하는 노트북 PC
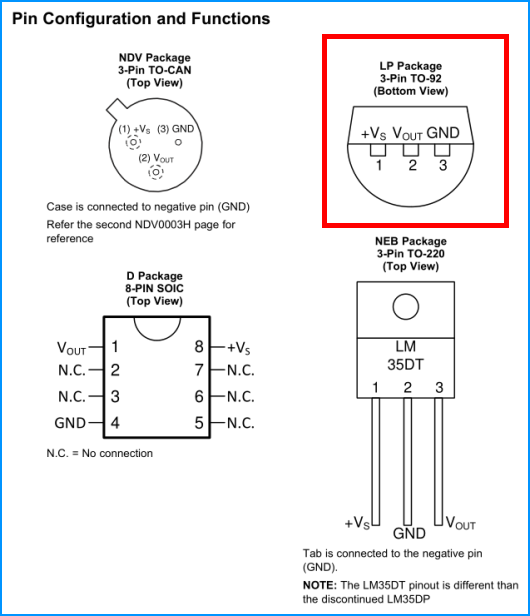
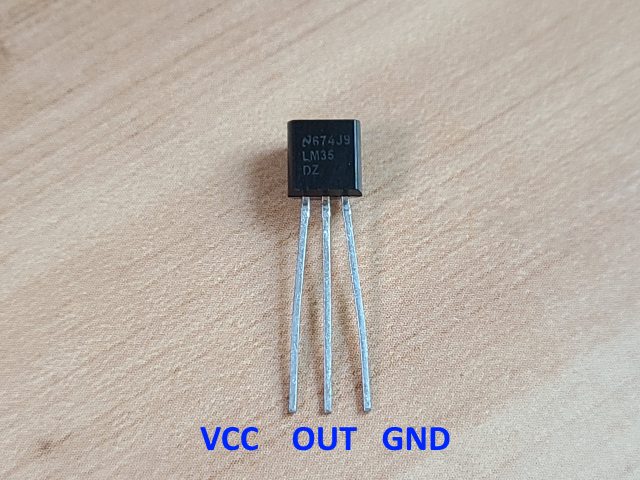
여기에서 아두이노 온도센서 LM35에 대해 간단하게 알아봅시다. opamp를 달아서 LM35 온도센서에서 나오는 신호를 증폭하여 아두이노 아날로그 입력으로 연결해도 되는데 여기에서는 증폭회로를 구현하지 않고 직접 연결하여 테스트 하는 것으로 한다.
참고: LM35 데이터를 SSD1306 OLED로 디스플레이하는 예제
SSD1306 OLED 로 LM35 온도센서 값을 디스플레이
아두이노에서 온도 습도와 같은 데이터를 ssd1306 oled에 디스플레이하기 위한 소스코드를 보려고 찾아서 코드를 올려둡니다. 아래 참고 사이트에 기록된 사이트를 번역하여 올려둔 내용임을 알립
fishpoint.tistory.com
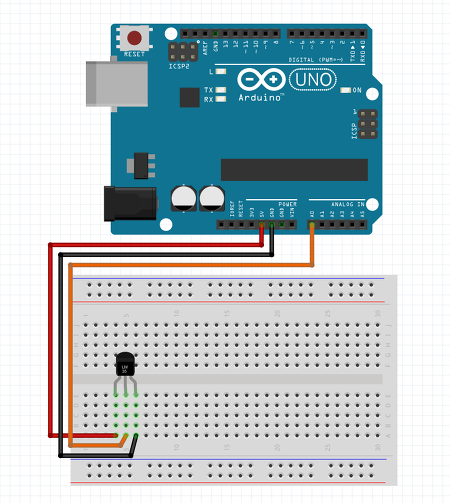
아날로그 온도센서 LM35를 사용하여 온도를 측정하는 방법을 알아보자. LM35는 0도~100도까지 측정가능 하고 빠른 온도 변화에는 적합하지 않은 센서라고 한다. 아래의 예제로 사용방법을 테스트 해 보자. 아래 이미지의 순서대로 점퍼선을 연결하면 센서가 작동한다.


온도를 측정하여 시리얼 모니터에 출력하는 예제이다
float temperature;
int reading;
int lm35Pin = A0;

void setup()
{
    analogReference(INTERNAL);
    Serial.begin(9600);
}

void loop()
{
    reading = analogRead(lm35Pin);
    temperature = reading / 9.31;

    Serial.println(temperature);
    delay(1000);
}
테스트 결과는 아래와 같다.

자 이어서 계속 공부를 합시다. ^^
4개의 LM35 온도센서는 차례대로 A0 부터 A1, A2, A3 에 연결합니다.
데이터 로거용 CSV 파일 구조 데이터는 파이썬 코드에 의해 CSV 파일에 저장됩니다. 여기서는 , (쉼표)를 구분 기호로 사용합니다 . 데이터는 다음 순서로 저장됩니다.
번호, 날짜, 시간, AN1, AN2, AN3, AN4
.csv 파일 의 파일 이름은 프로그램 실행 시점의 현재 날짜 및 시간 정보를 사용하여 자동 생성됩니다.
파이선 데이터 로고 파일 구조와 실행 블럭도

Python 데이터 로거 코드는 지정된 직렬 포트에 연결하고 연결된 Arduino에 온도 값을 쿼리합니다. Python 코드는 Arduino에 문자 '$'를 보냅니다. Arduino는 Temp1-Temp2-Temp3-Temp4 형식의 4가지 온도 값으로 응답합니다 . 그런 다음 Python 코드는 직렬 포트에서 이러한 값을 읽고 CSV 파일에 씁니다. 아래 의사 코드는 전체 코드( Python-Arduino-CSV-Logger.py )가 어떻게 작동하는지 보여줍니다. 파이선 코드를 아래에 나타냅니다. Github 저장소 링크 참고
파이선 코드는 3개로 구성되어 있는데
1번은 데이터를 수집해서 화면에 나타내주는 파이선 코드
2번은 데이터 수집 후 파일로 기록하는 코드 - 시그널 인터럽트 핸들러 코드가 없는 것
3번은 2번에 시스널 인터럽트 핸들러 코드가 포함된 최종 코드이다.
1번 파이선 코드 Python-Arduino-Simple-Query.py
# Displays the Temperature values on Python Command line >>>
# No logging to file just Display

# Sends the $ character to the Arduino,
# Arduino sends back the temperature values from all the 4 sensors at atime
# The Python script uses a while loop to query the arduino continously
# Use CTRL + C to stop execution of the Script

# No Sinal Handler code for catching SIGINT interrupt

import serial #PySerial needs to be installed in your system
import time   # for Time

#COM 4 may change with system
SerialObj = serial.Serial('COM4',9600) # COMxx   format on Windows
                                        # /dev/ttyUSBx format on Linux
                                        #
                                        # Eg /dev/ttyUSB0
                                        # SerialObj = serial.Serial('/dev/ttyUSB0')

time.sleep(3)   # Only needed for Arduino,For AVR/PIC/MSP430 & other Micros not needed
                # opening the serial port from Python will reset the Arduino.
                # Both Arduino and Python code are sharing Com11 here.
                # 3 second delay allows the Arduino to settle down.
while 1:
    BytesWritten = SerialObj.write(b'$') #transmit $,to get temperture values from Arduino,
    time.sleep(0.10)
    ReceivedString = SerialObj.readline()       # Change to receive  mode to get the data from arduino,Arduino sends \n to terminate
    ReceivedString = str(ReceivedString,'utf-8')# Convert bytes to string of encoding utf8
    tempvalueslist = ReceivedString.split('-')  # Split the string into 4 values at '-'
    print(f'AN1={tempvalueslist[0]} AN2={tempvalueslist[1]} AN3={tempvalueslist[2]} AN4={tempvalueslist[3]}')
    time.sleep(1) #change this delay to change sensing interval

SerialObj.close()          # Close the port
2번 코드
# Logs the Temperature values in a CSV file
# CSV file name generated from current time and date

# No Sinal Handler code for catching SIGINT interrupt


# Sends the $ character to the Arduino,
# Arduino sends back the temperature values from all the 4 sensors at atime
# The Python script uses a while loop to query the arduino continously

# logs No,Date,time  ,4 analog channels temp values
# Eg "10,22 April 2022,09:01:06,34.87,33.55,34.63,34.07"

# Use CTRL + C to stop execution of the Script


import serial #PySerial needs to be installed in your system
import time   # for Time


# Generate file name using Current Date and Time

current_local_time = time.localtime() #Get Current date time
filename           = time.strftime("%d_%B_%Y_%Hh_%Mm_%Ss",current_local_time)# 24hour clock format
filename           = 'ard_'+ filename + '_daq_log.csv'
print(f'Created Log File -> {filename}')


#Create a csv File header

with open(filename,'w+') as csvFile:
    csvFile.write('No,Date,Time,AN1,AN2,AN3,AN4\n')

log_count = 1

#COM 4 may change with system
SerialObj = serial.Serial('COM4',9600) # COMxx   format on Windows
                                        # /dev/ttyUSBx format on Linux
                                        #
                                        # Eg /dev/ttyUSB0
                                        # SerialObj = serial.Serial('/dev/ttyUSB0')

time.sleep(3)   # Only needed for Arduino,For AVR/PIC/MSP430 & other Micros not needed
                # opening the serial port from Python will reset the Arduino.
                # Both Arduino and Python code are sharing Com11 here.
                # 3 second delay allows the Arduino to settle down.

#Log continously to a file by querying the arduino
while 1:
    BytesWritten = SerialObj.write(b'$') #transmit $,to get temperture values from Arduino,
    time.sleep(0.10) # 10ms delay
    ReceivedString = SerialObj.readline()       # Change to receive  mode to get the data from arduino,Arduino sends \n to terminate
    ReceivedString = str(ReceivedString,'utf-8')# Convert bytes to string of encoding utf8
    tempvalueslist = ReceivedString.split('-')  # Split the string into 4 values at '-'
    #print(f'AN1={tempvalueslist[0]} AN2={tempvalueslist[1]} AN3={tempvalueslist[2]} AN4={tempvalueslist[3]}')

    seperator = ','

    log_time_date = time.localtime() #Get log date time from PC
    log_time = time.strftime("%H:%M:%S",log_time_date) #hh:mm:ss
    log_date = time.strftime("%d %B %Y",log_time_date) #dd MonthName Year
    #print(log_time)
    #print(log_date)

    # create a string to write into the file
    log_file_text1 = str(log_count) + seperator + log_date + seperator + log_time + seperator
    log_file_text2 = tempvalueslist[0] + seperator + tempvalueslist[1] + seperator +tempvalueslist[2]+ seperator+tempvalueslist[3]
    log_file_text3 =  log_file_text1 +  log_file_text2 + '\n'

    # write to file .csv
    with open(filename,'a') as LogFileObj:
        LogFileObj.write(log_file_text3)

    print(log_file_text3)
    log_count = log_count + 1 #increment no of logs taken

    time.sleep(10) #change this delay to change sensing interval

SerialObj.close()          # Close the port
3번 최종 코드 - 데이터 수집 파일에 기록, ctrl-c 시그널 인터럽트 핸들러 코드 포함
# Logs the Temperature values in a CSV file
# CSV file name generated from current time and date
# uses SIGINT signal to stop the script

# Sends the $ character to the Arduino,
# Arduino sends back the temperature values from all the 4 sensors at atime
# The Python script uses a while loop to query the arduino continously

# logs No,Date,time  ,4 analog channels temp values
# Eg "10,22 April 2022,09:01:06,34.87,33.55,34.63,34.07"

# Use CTRL + C to stop execution of the Script


import serial   # PySerial needs to be installed in your system
import time     # for Time
import signal   # Import signal module using the import keyword
import platform

log_count = 1
logging_interval_seconds = 1
Baudrate  = 9600
COMport   = 'COM4'


sentry = True # used to control the While loop querying the Arduino and writing to file

# Print Info about the Program
print('+----------------------------------------------------------------+')
print('|  Arduino Python Serial Port Data Logging to CSV file Software  |')
print('+----------------------------------------------------------------+')
print('| Requires Pyserial installed on your System                     |')
print('| use CTRL + C to exit from the software                         |')
print('| log file name created using date and time                      |')
print('| (c) www.xanthium.in                                            |')
print('+----------------------------------------------------------------+\n')

print('OS full name           -> ' + platform.system() + '-' + platform.release()) # Which OS,Which OS Version
print('Python Implementation  -> ' + platform.python_implementation() +' Version ' + platform.python_version()) # Which Python,Which Version

# Enter the Serial port number or Baud rate here
print('[Windows - COMxx or Linux - /dev/ttyUSBx]')
COMport = input('Enter Serial Port Number ->')
print('\nPort Selected ->',COMport.upper() )
print('Baud Rate     ->',Baudrate )

# Generate file name using Current Date and Time

current_local_time = time.localtime() #Get Current date time
filename           = time.strftime("%d_%B_%Y_%Hh_%Mm_%Ss",current_local_time)# 24hour clock format
filename           = 'ard_'+ filename + '_daq_log.csv'
print(f'\nCreated Log File -> {filename}')

print(f'\nLogging interval = {logging_interval_seconds} Seconds\n')

#Create a csv File header

with open(filename,'w+') as csvFile:
    csvFile.write('No,Date,Time,AN1,AN2,AN3,AN4\n')


#Open the Serial Port using Pyserial
SerialObj = serial.Serial(COMport,Baudrate) # COMxx   format on Windows
                                            # /dev/ttyUSBx format on Linux
                                            #
                                            # Eg /dev/ttyUSB0
                                            # SerialObj = serial.Serial('/dev/ttyUSB0')

print('3 sec Delay for Arduino Reset')
time.sleep(3)   # Only needed for Arduino,For AVR/PIC/MSP430 & other Micros not needed
                # opening the serial port from Python will reset the Arduino.
                # Both Arduino and Python code are sharing Com11 here.
                # 3 second delay allows the Arduino to settle down.

#Signal
# Create a Signal Handler for Signals.SIGINT:  CTRL + C
def SignalHandler_SIGINT(SignalNumber,Frame):
    print ('CTR+C Pressed,Signal Caught')
    global sentry  # Global required since we want to modify sentry from inside the function
    sentry = False #Turn sentry into false so it exits the while loop
    print ('sentry = ',sentry)

signal.signal(signal.SIGINT,SignalHandler_SIGINT) #register the Signal Handler


# infinite loop that querie the arduino for data by sending $ character
while sentry:
    #print(sentry) #debugging only
    BytesWritten = SerialObj.write(b'$') #transmit $,to get temperture values from Arduino,
    #print('$ transmitted to Arduino')
    time.sleep(0.10)
    ReceivedString = SerialObj.readline()       # Change to receive  mode to get the data from arduino,Arduino sends \n to terminate
    ReceivedString = str(ReceivedString,'utf-8')# Convert bytes to string of encoding utf8
    tempvalueslist = ReceivedString.split('-')  # Split the string into 4 values at '-'
    #print(f'AN1={tempvalueslist[0]} AN2={tempvalueslist[1]} AN3={tempvalueslist[2]} AN4={tempvalueslist[3]}')

    seperator = ','

    log_time_date = time.localtime() #Get log date time from PC
    log_time = time.strftime("%H:%M:%S",log_time_date) #hh:mm:ss
    log_date = time.strftime("%d %B %Y",log_time_date) #dd MonthName Year
    #print(log_time)
    #print(log_date)

    # create a string to write into the file
    log_file_text1 = str(log_count) + seperator + log_date + seperator + log_time + seperator
    log_file_text2 = tempvalueslist[0] + seperator + tempvalueslist[1] + seperator +tempvalueslist[2]+ seperator+tempvalueslist[3]
    log_file_text3 = log_file_text1 +  log_file_text2 + '\n'

    # write to file .csv
    with open(filename,'a') as LogFileObj:
        LogFileObj.write(log_file_text3)

    print(log_file_text3)
    log_count = log_count + 1 #increment no of logs taken

    time.sleep(logging_interval_seconds) #change logging_interval_seconds to change sensing interval

#exit from the loop and close the Serial port when sentry = False
SerialObj.close()          # Close the port

print('Data logging Terminated')
print('====================================')
아두이노 코드
// Arduino based 4 channel DAQ system
// $ character starts the conversion
// This sketch will read the temperature from all the 4 channels and convert it to equivalent temperatures
// https://www.xanthium.in/lm-35-four-channel-arduino-data-acquisition-system-temperature-sensing
// Average Gain of LM35 amplifier board is 3.44


int AnalogPin_AN1 = A0;    // select the input pin for lm35
int AnalogPin_AN2 = A1;    // select the input pin for lm35
int AnalogPin_AN3 = A2;    // select the input pin for lm35
int AnalogPin_AN4 = A3;    // select the input pin for lm35

void setup()
{
   Serial.begin(9600); //Data will be send to PC @9600bps

}

void loop()
{
   char ReceivedByte  = "0"; //

   float temp1,temp2,temp3,temp4 = 0.0;

   if (Serial.available() > 0) //Wait for data reception
   {
     ReceivedByte = Serial.read();//Read data from Arduino Serial UART buffer

     if (ReceivedByte == '$')//Check received byte is $
     {
      temp1 = ReadAnalogChannel(AnalogPin_AN1);
      temp2 = ReadAnalogChannel(AnalogPin_AN2);
      temp3 = ReadAnalogChannel(AnalogPin_AN3);
      temp4 = ReadAnalogChannel(AnalogPin_AN4);

      Serial.print(temp1);
      Serial.print('-');
      Serial.print(temp2);
      Serial.print('-');
      Serial.print(temp3);
      Serial.print('-');
      Serial.print(temp4);
      Serial.print('-');
      Serial.println();

     } //end of if
     else
     {
       Serial.println("INVALID");
       Serial.println("use $ to start conversion");
     }
   }

}

// float ReadAnalogChannel(int analogpin)
// Read's value from the specified Analog pin (int analogpin),
// Each pin read three times in aloop to an array and averages the temperature value
// returns the temperature value in a float variable.

float ReadAnalogChannel(int analogpin)
{
  float SensorValue[3] = {0.0,0.0,0.0}; // Array to store 3 consecutive values
  float AvgSensorValue = 0.0;           // Variable to store the average of 3 consecutive analog  values
  float temperature = 0.0;              // Variable to store temperature in Celsius

  // Make three consecutivereadings from the specified analog pin
  for(int i =0;i<3;i++)
  {
    SensorValue[i] = analogRead(analogpin); //Read 3 consecutive analog  values and store it in array
    delay(10);
  }

  //Calculate the average of three sensor values
  AvgSensorValue = ((SensorValue[0] + SensorValue[1] + SensorValue[2]) /3);

  //Convert the average ADC value to temperature in Celsius
  temperature = AvgSensorValue * (5.0/1024.0);// 10 bit adc,1024 divisons,
  temperature = temperature/3.44;
  temperature = temperature *100;

  return temperature; //return calculated temperature in celsius,float variable
}
Build your own Data Acquisition System (.csv file) using Python and Arduino
트위터: PerenialDeveloper @PerenialDev
'개발자 > Arduino' 카테고리의 다른 글
| 0부터 1023 까지 숫자를 12시간중 어떤 구간인지 알아내는 코드 (1) | 2023.10.05 |
|---|---|
| PIR 센서를 이용한 보안 경보 시스템 (0) | 2023.08.28 |
| 아두이노 ADC 모듈 ADS1115 ADS1015 (0) | 2023.05.02 |
| 전류 전압 컨버터 4~20mA 전류 측정 (0) | 2023.05.02 |
| 아두이노 라이브러리 설치 안될 때 access is denied 오류 해결 (0) | 2023.04.13 |
| mkdir c:\program files\arduino ide\libraries: access is denied. 해결 (0) | 2023.04.11 |
| ADXL335 Accelerometer Module Arduino (0) | 2023.04.11 |
| 아두이노 압력센서 FSR 406 Solder Tabs (1) | 2022.12.12 |
취업, 창업의 막막함, 외주 관리, 제품 부재!
당신의 고민은 무엇입니까? 현실과 동떨어진 교육, 실패만 반복하는 외주 계약,
아이디어는 있지만 구현할 기술이 없는 막막함.
우리는 알고 있습니다. 문제의 원인은 '명확한 학습, 실전 경험과 신뢰할 수 있는 기술력의 부재'에서 시작됩니다.
이제 고민을 멈추고, 캐어랩을 만나세요!
코딩(펌웨어), 전자부품과 디지털 회로설계, PCB 설계 제작, 고객(시장/수출) 발굴과 마케팅 전략으로 당신을 지원합니다.
제품 설계의 고수는 성공이 만든 게 아니라 실패가 만듭니다. 아이디어를 양산 가능한 제품으로!
귀사의 제품을 만드세요. 교육과 개발 실적으로 신뢰할 수 있는 파트너를 확보하세요.
지난 30년 여정, 캐어랩이 얻은 모든 것을 함께 나누고 싶습니다.
귀사가 성공하기까지의 긴 고난의 시간을 캐어랩과 함께 하세요.
캐어랩


