DS1302 아두이노 RTC모듈 사용법
정확한 시간 측정을 위한 DS1302 RTC 모듈 기능 DS1302 실시간 시계 모듈은 다양한 프로젝트에 사용할 수 있는 정확도가 높은 저렴한 모듈입니다. 이 RTC 모듈은 초, 분, 시간, 요일, 날짜, 월, 연도 정보를 제공합니다. 이 모듈에서 날짜는 월이 29일, 30일 또는 31일인지 여부와 윤년인지 여부에 따라 자동으로 설정됩니다. (이는 2100년까지만 유효합니다.)
참고: 이 모듈은 I2C 통신을 사용하지 않는다는 점에 유의하세요. DS1302와 마이크로 컨트롤러의 인터페이스는 동기식 3선 직렬 통신을 사용하여 수행됩니다.

이번에 함께 다룰 아두이노 부품은 DS1302 RTC 모듈 입니다. DS1302칩을 사용하는 RTC(Real Time Clock) 모듈은 아두이노에서 시계와 같이 시간 관련 프로젝트를 진행할때 많이 사용하는 모듈이며, 이러한 제품들중 저렴하며 라이브러리 및 예제소스가 많기 때문에 쉽게 사용할수 있습니다.
DS1302 RTC 모듈의 핀 맵은 VCC , GND , CLK(Clock Enable) , DAT(DATA) , RST(Reset) 입니다.
회로 연결도
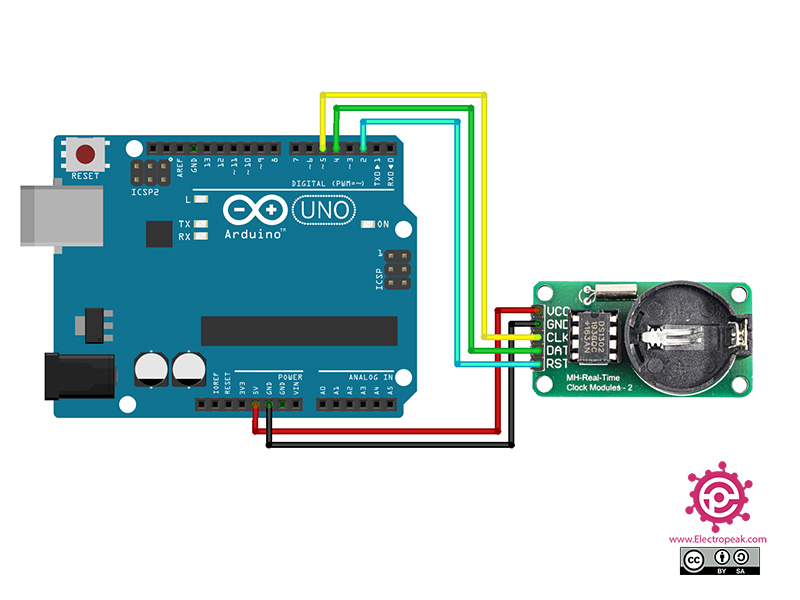
VCC - 5v GND - GND CLK - PIN 5번 DAT - PIN 6번 RST - PIN 7번 으로 연결했습니다.
라이브러리 설치
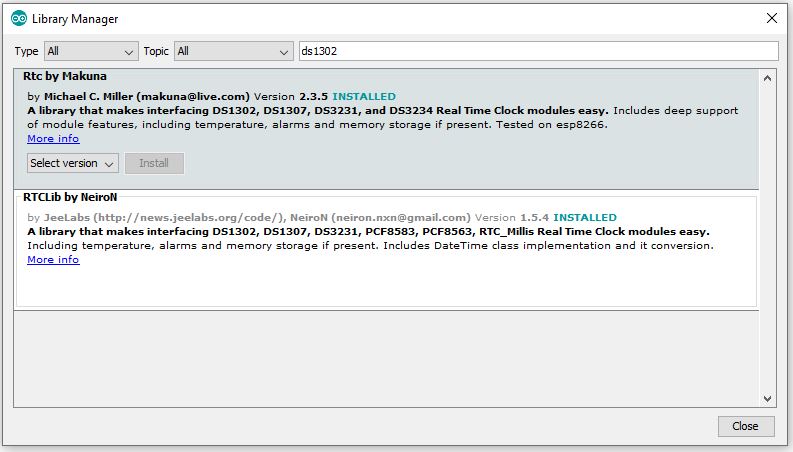
DS1302RTC 모듈을 동작하기 위해 라이브러리가 설치 되어야 합니다. 라이브러리 관리자로 이동하여 Makuna의 Rtc 라이브러리를 설치합니다.
팁: Arduino에 라이브러리를 설치하는 데 도움이 더 필요한 경우 이 튜토리얼을 참조하세요:
전체 예제 코드를 아래에 올리고 코드 설명을 추가합니다.
    /*
Modified on Nov 25, 2020
Modified by MehranMaleki from Arduino Examples
Home
*/


// CONNECTIONS:
// DS1302 CLK/SCLK --> 5
// DS1302 DAT/IO --> 4
// DS1302 RST/CE --> 2
// DS1302 VCC --> 3.3v - 5v
// DS1302 GND --> GND

#include <ThreeWire.h>
#include <RtcDS1302.h>

ThreeWire myWire(4,5,2); // IO, SCLK, CE
RtcDS1302<ThreeWire> Rtc(myWire);

void setup ()
{
    Serial.begin(9600);

    Serial.print("compiled: ");
    Serial.print(__DATE__);
    Serial.println(__TIME__);

    Rtc.Begin();

    RtcDateTime compiled = RtcDateTime(__DATE__, __TIME__);
    printDateTime(compiled);
    Serial.println();

    if (!Rtc.IsDateTimeValid())
    {
        // Common Causes:
        //    1) first time you ran and the device wasn't running yet
        //    2) the battery on the device is low or even missing

        Serial.println("RTC lost confidence in the DateTime!");
        Rtc.SetDateTime(compiled);
    }

    if (Rtc.GetIsWriteProtected())
    {
        Serial.println("RTC was write protected, enabling writing now");
        Rtc.SetIsWriteProtected(false);
    }

    if (!Rtc.GetIsRunning())
    {
        Serial.println("RTC was not actively running, starting now");
        Rtc.SetIsRunning(true);
    }

    RtcDateTime now = Rtc.GetDateTime();
    if (now < compiled)
    {
        Serial.println("RTC is older than compile time!  (Updating DateTime)");
        Rtc.SetDateTime(compiled);
    }
    else if (now > compiled)
    {
        Serial.println("RTC is newer than compile time. (this is expected)");
    }
    else if (now == compiled)
    {
        Serial.println("RTC is the same as compile time! (not expected but all is fine)");
    }
}

void loop ()
{
    RtcDateTime now = Rtc.GetDateTime();

    printDateTime(now);
    Serial.println();

    if (!now.IsValid())
    {
        // Common Causes:
        //    1) the battery on the device is low or even missing and the power line was disconnected
        Serial.println("RTC lost confidence in the DateTime!");
    }

    delay(5000); // five seconds
}

#define countof(a) (sizeof(a) / sizeof(a[0]))

void printDateTime(const RtcDateTime& dt)
{
    char datestring[20];

    snprintf_P(datestring,
            countof(datestring),
            PSTR("%02u/%02u/%04u %02u:%02u:%02u"),
            dt.Month(),
            dt.Day(),
            dt.Year(),
            dt.Hour(),
            dt.Minute(),
            dt.Second() );
    Serial.print(datestring);
}
코드 설명 - 다음 강의 목차를 참고하세요.
1. 초기화 및 라이브러리 포함
참고 라이브러리를 설치하려면 Arduino 라이브러리 관리자를 사용하여 "Rtc by Makuna"를 검색하여 설치하세요.
여기에는 DS1302 RTC 모듈에 필요한 라이브러리가 포함되어 있습니다.
#include <ThreeWire.h>
#include <RtcDS1302.h>
2. 핀 정의 및 RTC 인스턴스 생성 통신을 위한 핀을 정의하고 RTC 인스턴스를 생성합니다.
const int IO = 4;    // DAT
const int SCLK = 5;  // CLK
const int CE = 2;    // RST

ThreeWire myWire(4, 5, 2);  // IO, SCLK, CE
RtcDS1302<ThreeWire> Rtc(myWire);
3. setup() 함수 직렬 통신을 초기화하고 RTC 모듈을 설정하는 함수입니다. RTC가 올바르게 실행되고 있는지 확인하기 위해 다양한 검사가 수행됩니다.
void setup() {
  Serial.begin(9600);

  Serial.print("compiled: ");
  Serial.print(__DATE__);
  Serial.println(__TIME__);

  Rtc.Begin();

  RtcDateTime compiled = RtcDateTime(__DATE__, __TIME__);
  printDateTime(compiled);
  Serial.println();

  if (!Rtc.IsDateTimeValid()) {
    // Common Causes:
    //    1) first time you ran and the device wasn't running yet
    //    2) the battery on the device is low or even missing

    Serial.println("RTC lost confidence in the DateTime!");
    Rtc.SetDateTime(compiled);
  }

  if (Rtc.GetIsWriteProtected()) {
    Serial.println("RTC was write protected, enabling writing now");
    Rtc.SetIsWriteProtected(false);
  }

  if (!Rtc.GetIsRunning()) {
    Serial.println("RTC was not actively running, starting now");
    Rtc.SetIsRunning(true);
  }

  RtcDateTime now = Rtc.GetDateTime();
  if (now < compiled) {
    Serial.println("RTC is older than compile time!  (Updating DateTime)");
    Rtc.SetDateTime(compiled);
  } else if (now > compiled) {
    Serial.println("RTC is newer than compile time. (this is expected)");
  } else if (now == compiled) {
    Serial.println("RTC is the same as compile time! (not expected but all is fine)");
  }
}
4. loop() 함수 이 함수는 주기적으로 RTC에서 현재 날짜와 시간을 가져와 직렬 모니터에 출력합니다. 또한 RTC가 여전히 유효한 날짜와 시간을 유지하고 있는지 확인합니다.
void loop() {
  RtcDateTime now = Rtc.GetDateTime();

  printDateTime(now);
  Serial.println();

  if (!now.IsValid()) {
    // Common Causes:
    //    1) the battery on the device is low or even missing and the power line was disconnected
    Serial.println("RTC lost confidence in the DateTime!");
  }

  delay(5000);  // five seconds
}
5. 날짜 및 시간 인쇄 기능 RtcDateTime 객체를 받아 형식이 지정된 날짜와 시간을 직렬 모니터에 인쇄하는 헬퍼 함수입니다.
void printDateTime(const RtcDateTime& dt) {
  char datestring[20];

  snprintf_P(datestring,
             countof(datestring),
             PSTR("%02u/%02u/%04u %02u:%02u:%02u"),
             dt.Month(),
             dt.Day(),
             dt.Year(),
             dt.Hour(),
             dt.Minute(),
             dt.Second());
  Serial.print(datestring);
}
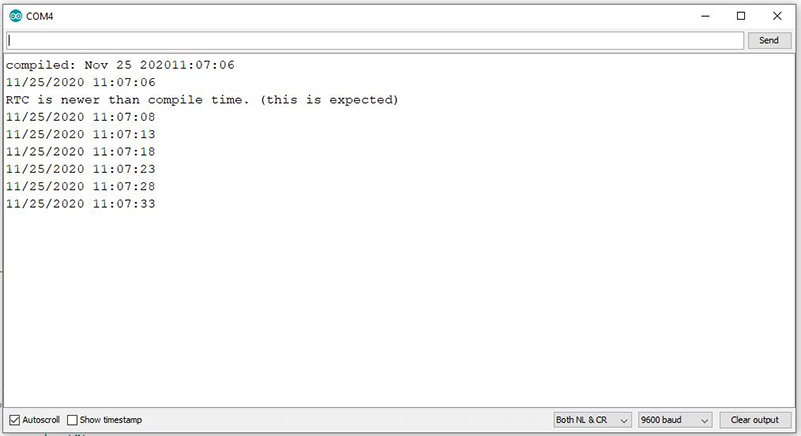
이 코드에서는 처음에는 시간 정보가 모듈에 시작점으로 제공됩니다. 그런 다음 모듈이 작동을 시작하고 5초마다 업데이트된 시간이 직렬 모니터에 표시됩니다. 예상되는 출력은 다음과 같습니다:
이 단계를 따르면 DS1302 RTC 모듈을 Arduino와 성공적으로 인터페이스하고 프로젝트에서 정확한 시간 기록을 달성할 수 있습니다. Arduino 및 기타 관련 주제에 대한 자세한 정보와 튜토리얼은 웹사이트 를 참조하세요.
더욱 좋은 정보를 제공하겠습니다.~ ^^
'아두이노우노 R4' 카테고리의 다른 글
| 아두이노 푸시 버튼 - 전체 자습서 (1) | 2024.08.05 |
|---|---|
| Nano 33 IoT BLE Scanner 코드 (1) | 2024.08.05 |
| 아두이노 나노, PM2008 미세먼지 SSD1306 Oled Display (1) | 2024.07.29 |
| i2c 충돌나면 풀업저항 다는 게 제일 먼저 할 일 (1) | 2024.07.28 |
| 아두이노 0.96인치 OLED 디스플레이(SSD1306) 실습 (0) | 2024.07.04 |
| UNO R4 WiFi BLE ② LPS22의 BLE 주변기기 (1) | 2024.06.18 |
| UNO R4 WiFi BLE ① 기압 센서 LPS22 연결 (1) | 2024.06.17 |
| Arduino Mega의 PWM 주파수를 변경하는 방법 (0) | 2024.05.23 |


