이번 레슨에서는 아두이노 우노 보드를 프로그래밍하여 조이스틱의 상태를 수집하고 시리얼 통신을 통해 데이터를 처리 장치에 전송합니다.
원리
실험은 두 부분으로 구성됩니다: 첫째, 아두이노에서 데이터를 수집하고 둘째, 데이터를 처리합니다. 여기서는 아두이노 UNO 보드를 사용하여 조이스틱 상태의 데이터를 수집하고 직렬 포트를 통해 컴퓨터로 데이터를 업로드합니다. 데이터는 프로세싱을 통해 처리되어 3D 이미지로 표시됩니다.
참고:
1. 이 실험에서는 아두이노 UNO 보드를 컴퓨터 포트 COM9에 연결했습니다. 하지만 여러분의 경우에는 다를 수 있습니다. 따라서 실제 상황에 맞게 조정해 주세요.
2. 처리가 정상적으로 실행되지 않는 경우 관련 함수 라이브러리를 설치해야 할 수 있습니다.
연결도

일단 아두이노 우노 R4 미니마에서는 아래 코드를 실행한다.
중요: 아두이노 IDE 환경에서 Serial Monitor를 열지 않는다. Processing 과 공시에 시리얼 포트를 가져가면 3D 모델링이 실행하지 않는다.
/***********************************************************
File name:   35_PS2Joystick_Processing.ino
Description: Arduino and processing interactive
             The Joystiak data which Arduino collected send
             the processing software to display.
Website: www.adeept.com
E-mail: support@adeept.com
Author: Tom
Date: 2015/05/02
***********************************************************/
int xpotPin = 0; // Define UNO board A0 pin connect the Ioystick x
int ypotPin = 1; // Define UNO board A1 pin connect the Ioystick y
int swPin = 9;   // Define UNO board digital 9 pin connect the Ioystick sw

int xval = 0;
int yval = 0;
int swval= 0;

void setup() {
  // Start the serial port, baud rate to 9600
  Serial.begin(9600);
  pinMode(swPin,INPUT_PULLUP);//Set swPin inputand pull up
}

void loop() {
  // Read the Joystick x y sw information
  int xval = analogRead(xpotPin);
  int yval = analogRead(ypotPin);
  int swval = digitalRead(swPin);

  Serial.print(xval);//Dend xval value
  Serial.print(',');
  Serial.print(yval);//Dend yval value
  Serial.print(',');
  Serial.print(swval);//Dend swval value
  Serial.println(',');
  delay(100);
}
아래는 Processing 코드
코드에서 수정할 부분은 27 라인의 COM 포트를 제대로 지정해야 하고, 30 라인의 LOGO11.png 파일을 만들어야 한다. 대충 사각형 그림으로 그려서 넣어주면 된다. 파일은 압축해서 올려둔다.
/***************************************************************
File name: Processing_PS2Joystick.pde
Description: Arduino and processing interactive
The Joystiak data which Arduino collected send
the processing software to display.
Website: www.adeept.com
E-mail: support@adeept.com
Author: Tom
Date: 2015/05/02
*****************************************************************/
import processing.opengl.*; //Transferred to the 3D library
import processing.serial.*; //Transferred to the serial library
Serial myPort;//Create Serial objects myPort
PFont font;//Create font Variables
int Rw[] = new int[3];
byte inBuffer[] = new byte[100];
PImage img;
void setup() {
// set the canvas size is 600 x 600
size(600,600,OPENGL); //Set the size of 3D canvas
// Open the serial port and set the baud rate to 9600
// This experiment arduino board is connected to COM26, here please
// adjust according to actual situation.
myPort = new Serial(this,"COM9",9600);
noSmooth();
font = createFont("Arial",48,true);//Loading system font
img = loadImage("LOGO11.png");
}
void draw() {
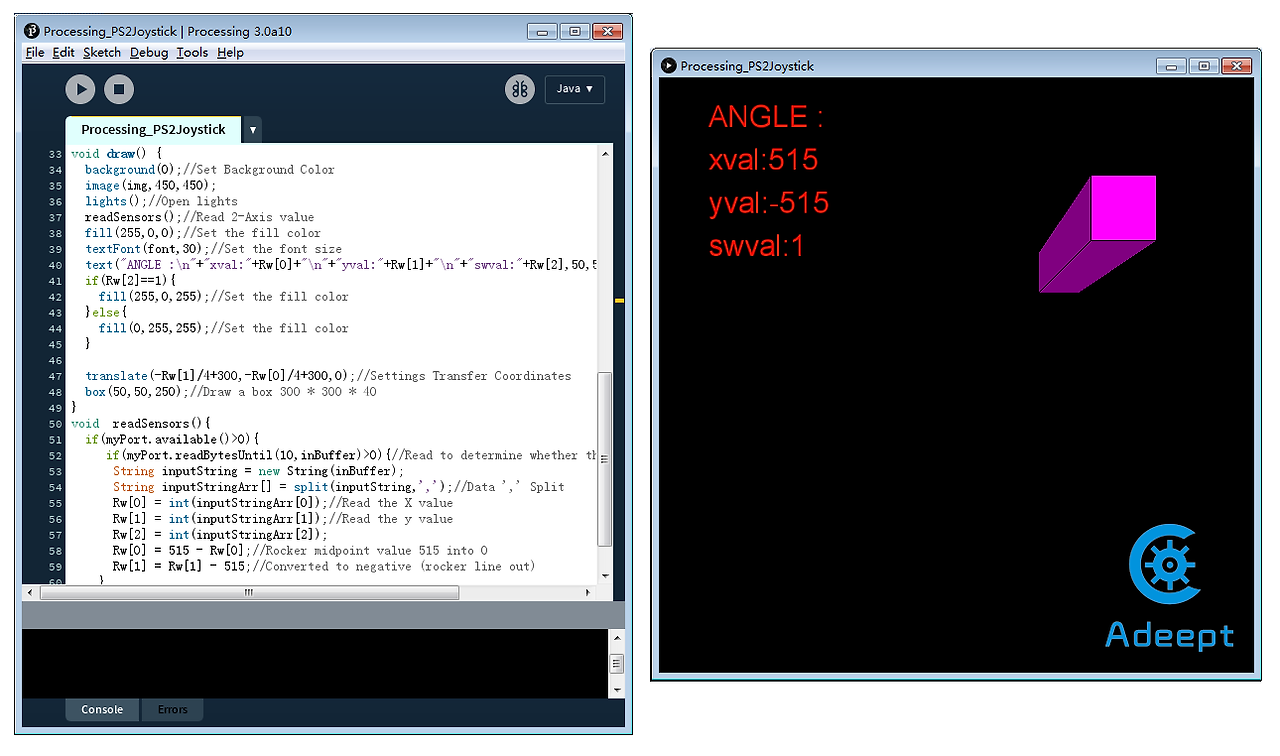
background(0);//Set Background Color
image(img,450,450);
lights();//Open lights
readSensors();//Read 2-Axis value
fill(255,0,0);//Set the fill color
textFont(font,30);//Set the font size
text("ANGLE :\n"+"xval:"+Rw[0]+"\n"+"yval:"+Rw[1]+"\n"+"swval:"+Rw[2],50,50);//Read the value displayed
if(Rw[2]==1){
fill(255,0,255);//Set the fill color
}else{
fill(0,255,255);//Set the fill color
}
translate(-Rw[1]/4+300,-Rw[0]/4+300,0);//Settings Transfer Coordinates
box(50,50,250);//Draw a box 300 * 300 * 40
}
void readSensors(){
if(myPort.available()>0){
if(myPort.readBytesUntil(10,inBuffer)>0){//Read to determine whether the wrap 10BYTE
String inputString = new String(inBuffer);
String inputStringArr[] = split(inputString,',');//Data ',' Split
Rw[0] = int(inputStringArr[0]);//Read the X value
Rw[1] = int(inputStringArr[1]);//Read the y value
Rw[2] = int(inputStringArr[2]);
Rw[0] = 515 - Rw[0];//Rocker midpoint value 515 into 0
Rw[1] = Rw[1] - 515;//Converted to negative (rocker line out)
}
}
}
아래롸 같이 아름답게 실행한다.
'아두이노우노 R4' 카테고리의 다른 글
| 아두이노 온도 표시 문자 표현 (1) | 2024.09.05 |
|---|---|
| 아두이노 SH1106 OLED 동작 (4) | 2024.09.04 |
| DY-HL50T MP3 음성 음악 방송 모듈 동작 코드 (2) | 2024.09.03 |
| 아두이노 우노 R4 WiFi 홈 오토메이션. (3) | 2024.08.27 |
| 아두이노 우노 R4 Minima 4x4 16key 멤브레인 매트릭스 키패드 스위치 HAM2913 (1) | 2024.08.16 |
| TTP223B 터치 센서와 아두이노를 연동하는 방법 (1) | 2024.08.12 |
| 아두이노 나노 33 IoT 기반 NTP 세계 시계 사용 (1) | 2024.08.07 |
| 아두이노 푸시 버튼 - 전체 자습서 (2) | 2024.08.05 |
취업, 창업의 막막함, 외주 관리, 제품 부재!
당신의 고민은 무엇입니까? 현실과 동떨어진 교육, 실패만 반복하는 외주 계약,
아이디어는 있지만 구현할 기술이 없는 막막함.
우리는 알고 있습니다. 문제의 원인은 '명확한 학습, 실전 경험과 신뢰할 수 있는 기술력의 부재'에서 시작됩니다.
이제 고민을 멈추고, 캐어랩을 만나세요!
코딩(펌웨어), 전자부품과 디지털 회로설계, PCB 설계 제작, 고객(시장/수출) 발굴과 마케팅 전략으로 당신을 지원합니다.
제품 설계의 고수는 성공이 만든 게 아니라 실패가 만듭니다. 아이디어를 양산 가능한 제품으로!
귀사의 제품을 만드세요. 교육과 개발 실적으로 신뢰할 수 있는 파트너를 확보하세요.
캐어랩


