Arduino Uno, DFPlayer Mini 및 푸시 버튼을 사용하여 미리 선택된 오디오 재생
이 흥미진진한 튜토리얼에서는 아두이노 우노와 DF플레이어 미니를 사용하여 맞춤형 사운드보드를 제작함으로써 DIY 전자제품의 세계로 뛰어들게 됩니다. 초보자든 숙련된 제작자든 이 프로젝트는 여러분에게 완벽합니다!
아두이노 우노와 DFPlayer 미니 모듈을 연결하고 푸시 버튼을 통합하여 좋아하는 사운드를 트리거하는 단계별 과정을 안내해 드립니다. 사운드보드에 생명을 불어넣는 필수 코딩 기술과 배선 팁을 배우게 됩니다.
배울 내용:
- Arduino Uno 및 DFPlayer Mini 설정 방법
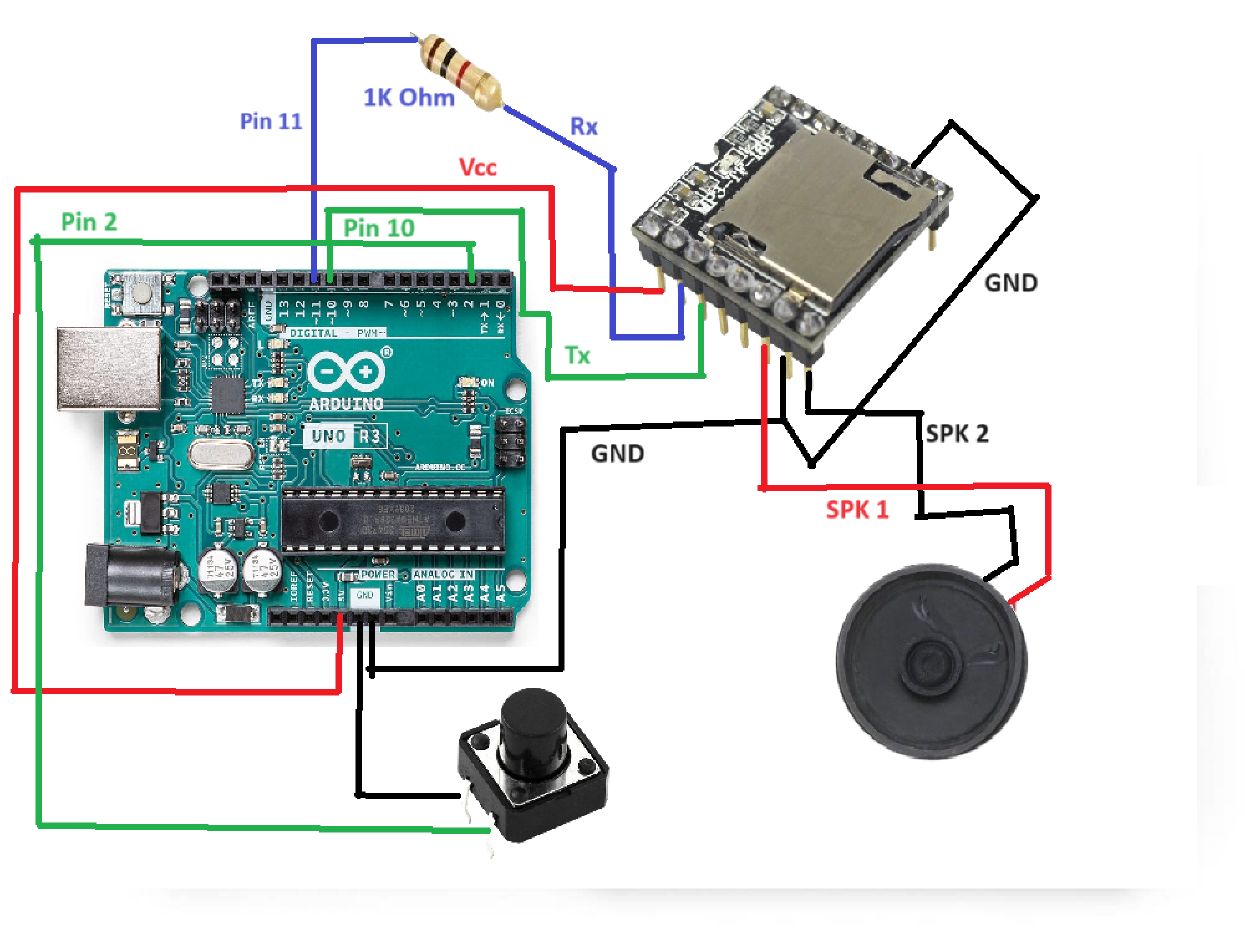
- 원활한 설정을 위한 배선도 및 회로 연결
- 사운드 재생을 제어하기 위한 Arduino 프로그래밍
- 사운드 보드용 사운드 파일 사용자 지정
- 일반적인 문제 해결을 위한 팁
준비물
- 아두이노 우노
- DFPlayer 미니 MP3 플레이어 모듈
- 푸시 버튼
- 스피커
- 점퍼 와이어
- 저항
- 브레드보드 (옵션)
연결도
Arduino Code
/*
To create audio: https://ttsmaker.com/
DFPlayer module supports up to 3W.
SD card: 2GB ~ 32GB formatted with FAT or FAT32.
MP3 / WAV - audio files.
*/

#include "SoftwareSerial.h"         // Include the SoftwareSerial library for serial communication
#include "DFRobotDFPlayerMini.h"    // Include the DFRobotDFPlayerMini library for the DFPlayer Mini module

SoftwareSerial mySoftwareSerial(10, 11); // Create a software serial connection on pins 10 (RX) and 11 (TX)
DFRobotDFPlayerMini myDFPlayer;          // Create a DFPlayerMini object

const int pushButtonPin = 2;        // Define the pin number for the push button
bool buttonState;                   // Variable to store the state of the button
bool wasButtonPressed = false;      // Flag to track whether the button was previously pressed

void setup() {
  mySoftwareSerial.begin(9600);     // Start software serial communication at 9600 baud rate
  Serial.begin(115200);             // Start serial communication at 115200 baud rate
  pinMode(pushButtonPin, INPUT_PULLUP); // Set push button pin as input with internal pull-up resistor

  if (!myDFPlayer.begin(mySoftwareSerial)) { // Initialize the DFPlayer Mini module
    Serial.println(F("Not initialized:"));
    Serial.println(F("1. Check the DFPlayer Mini connections"));
    Serial.println(F("2. Insert an SD card"));
    while (true);                  // If initialization fails, print error messages and halt the program
  }

  Serial.println();
  Serial.println(F("DFPlayer Mini module initialized!")); // Print initialization success message
  myDFPlayer.setTimeOut(500);       // Set the timeout value for serial communication
  myDFPlayer.volume(30);            // Set the volume level (0 to 30)
  myDFPlayer.EQ(0);                 // Set the equalizer setting (0: Normal, 1: Pop, 2: Rock, 3: Jazz, 4: Classic, 5: Bass)
}

void loop() {
  buttonState = digitalRead(pushButtonPin); // Read the state of the button

  if (buttonState == LOW) {          // If the button is pressed (assuming pull-up configuration)
    if (!wasButtonPressed) {         // If the button was not previously pressed
      Serial.println("Playing song 1");
      myDFPlayer.play(3);            // Play the third audio file on the SD card
      delay(2000);                   // Delay for 2 seconds

      wasButtonPressed = true;       // Set the flag to true to indicate that the button was pressed
    }
  } else {                           // If the button is not pressed
    Serial.println("Push button not pressed");
    wasButtonPressed = false;        // Reset the flag when the button is released
  }
}
'아두이노우노 R4' 카테고리의 다른 글
| UNO R4 WiFi BLE ③ LPS22의 BLE 주변기기와 연결되는 센트럴 (2) | 2024.10.11 |
|---|---|
| Arduino를 사용한 스마트 주차 시스템 (7) | 2024.10.04 |
| ADXL345 가속도계와 아두이노 UNO 연동하기 (5) | 2024.09.11 |
| 아두이노 가속도계 ADXL356, ADXL345, ADXL335 (5) | 2024.09.11 |
| 손가락 수를 이용한 아두이노 LED 제어 (1) | 2024.09.10 |
| 아두이노 온도 표시 문자 표현 (1) | 2024.09.05 |
| 아두이노 SH1106 OLED 동작 (4) | 2024.09.04 |
| DY-HL50T MP3 음성 음악 방송 모듈 동작 코드 (2) | 2024.09.03 |
취업, 창업의 막막함, 외주 관리, 제품 부재!
당신의 고민은 무엇입니까? 현실과 동떨어진 교육, 실패만 반복하는 외주 계약,
아이디어는 있지만 구현할 기술이 없는 막막함.
우리는 알고 있습니다. 문제의 원인은 '명확한 학습, 실전 경험과 신뢰할 수 있는 기술력의 부재'에서 시작됩니다.
이제 고민을 멈추고, 캐어랩을 만나세요!
코딩(펌웨어), 전자부품과 디지털 회로설계, PCB 설계 제작, 고객(시장/수출) 발굴과 마케팅 전략으로 당신을 지원합니다.
제품 설계의 고수는 성공이 만든 게 아니라 실패가 만듭니다. 아이디어를 양산 가능한 제품으로!
귀사의 제품을 만드세요. 교육과 개발 실적으로 신뢰할 수 있는 파트너를 확보하세요.
캐어랩


