OpenCV를 사용하여 이미지를 자르는 방법을 직접 확인해 보세요. 먼저, 자르는 이유는 무엇일까요? 자르기는 이미지에서 원하지 않는 모든 객체나 영역을 제거하기 위해 수행됩니다. 또는 이미지의 특정 부분을 강조하기 위해 수행되기도 합니다.
OpenCV를 사용하여 자르는 데 필요한 특정 함수는 없으며, NumPy 배열 슬라이싱을 통해 이를 수행합니다. 읽어온 모든 이미지는 각 색상 채널에 대해 2차원 배열에 저장됩니다. 자를 영역의 높이와 너비(픽셀 단위)를 지정하기만 하면 됩니다. 그러면 끝입니다!

Table of Contents
- OpenCV를 사용하여 자르기
- 이미지를 작은 패치로 분할하기
- 흥미로운 응용 프로그램
- 요약
다음 코드 조각은 Python과 C++를 모두 사용하여 이미지를 자르는 방법을 보여줍니다. 이 글의 후반부에서 이에 대해 자세히 알아보겠습니다.
파이썬
# Import packages
import cv2
import numpy as np

img = cv2.imread('test.jpg')
print(img.shape) # Print image shape
cv2.imshow("original", img)

# Cropping an image
cropped_image = img[80:280, 150:330]

# Display cropped image
cv2.imshow("cropped", cropped_image)

# Save the cropped image
cv2.imwrite("Cropped Image.jpg", cropped_image)

cv2.waitKey(0)
cv2.destroyAllWindows()
C++
// Include Libraries
#include<opencv2/opencv.hpp>
#include<iostream>

// Namespace nullifies the use of cv::function();
using namespace std;
using namespace cv;

int main()
{
 // Read image
 Mat img = imread("test.jpg");
 cout << "Width : " << img.size().width << endl;
 cout << "Height: " << img.size().height << endl;
 cout<<"Channels: :"<< img.channels() << endl;
 // Crop image
 Mat cropped_image = img(Range(80,280), Range(150,330));

 //display image
 imshow(" Original Image", img);
 imshow("Cropped Image", cropped_image);

 //Save the cropped Image
 imwrite("Cropped Image.jpg", cropped_image);

 // 0 means loop infinitely
 waitKey(0);
 destroyAllWindows();
 return 0;
}
시스템에 이미 OpenCV가 설치되어 있다고 가정합니다. OpenCV를 설치해야 하는 경우 아래 관련 링크를 방문하세요.
Windows에 OpenCV 설치
MacOS에 OpenCV 설치
Ubuntu에 OpenCV 설치
파이썬
# Importing the cv2 library
import cv2
C++
#include<opencv2/opencv.hpp>
#include<iostream>

// Namespace nullifies the use of cv::function();
using namespace std;
using namespace cv;
위 코드는 각각 Python과 C++로 OpenCV 라이브러리를 가져옵니다.
OpenCV를 사용한 자르기

이 게시물의 자르기 목적으로 사용할 이미지입니다.
파이썬:
img=cv2.imread('test.png')

# Prints Dimensions of the image
print(img.shape)

# Display the image
cv2.imshow("original", img)
cv2.waitKey(0)
cv2.destroyAllWindows()
C++
Mat img = imread("test.jpg");

//Print the height and width of the image
cout << "Width : " << img.size().width << endl;
cout << "Height: " << img.size().height << endl;
cout << "Channels: " << img.channels() << endl;

// Display image
imshow("Image", img);
waitKey(0);
destroyAllWindows();
위 코드는 이미지와 그 크기를 읽고 표시합니다. 크기에는 2차원 행렬의 너비와 높이뿐만 아니라 채널 수도 포함됩니다(예: RGB 이미지는 빨간색, 초록색, 파란색의 세 가지 채널을 가집니다).
꽃이 포함된 이미지 부분을 잘라보겠습니다.
파이썬
cropped_image = img[80:280, 150:330] # Slicing to crop the image

# Display the cropped image
cv2.imshow("cropped", cropped_image)
cv2.waitKey(0)
cv2.destroyAllWindows()
C++
Mat crop = img(Range(80,280),Range(150,330)); // Slicing to crop the image

// Display the cropped image
imshow("Cropped Image", crop);

waitKey(0);
destroyAllWindows();
return 0;
잘린 이미지 결과를 보여주는 그림

잘린 이미지 결과
Python에서는 NumPy 배열 슬라이싱과 동일한 방식으로 이미지를 자릅니다. 배열을 슬라이싱하려면 첫 번째 차원과 두 번째 차원의 시작 및 끝 인덱스를 지정해야 합니다.
- 첫 번째 차원은 항상 행의 수 또는 이미지의 높이입니다.
- 두 번째 차원은 열의 수 또는 이미지의 너비입니다.
2차원 배열의 첫 번째 차원은 배열의 행을 나타내는 관례에 따라 각 행은 이미지의 y 좌표를 나타냅니다. NumPy 배열을 어떻게 슬라이스할까요? 다음 예제의 구문을 확인해 보세요.
cropped = img[start_row:end_row, start_col:end_col]
C++에서는 Range()이미지를 자르는 데 함수를 사용합니다.
- Python과 마찬가지로 슬라이싱을 적용합니다.
- 여기에서도 이미지는 위에서 설명한 것과 동일한 규칙에 따라 2D 행렬로 읽힙니다.
이미지를 자르는 C++ 구문은 다음과 같습니다.
img(Range(start_row, end_row), Range(start_col, end_col))
자르기를 사용하여 이미지를 작은 패치로 나누기
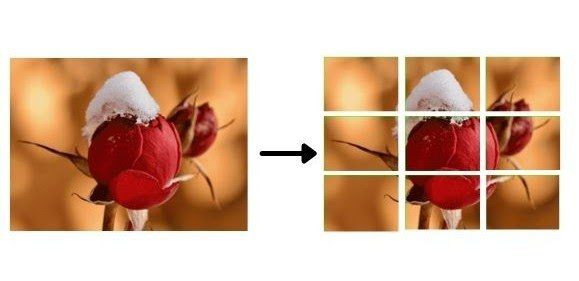
OpenCV에서 자르기의 실용적인 응용 프로그램 중 하나는 이미지를 더 작은 패치로 나누는 것입니다. 루프를 사용하여 이미지에서 조각을 잘라냅니다. 먼저 이미지 모양에서 필요한 패치의 높이와 너비를 구합니다.
파이썬
img =  cv2.imread("test_cropped.jpg")
image_copy = img.copy()
imgheight=img.shape[0]
imgwidth=img.shape[1]
C++
Mat img = imread("test_cropped.jpg");
Mat image_copy = img.clone();
int imgheight = img.rows;
int imgwidth = img.cols;
높이와 너비를 로드하여 작은 패치를 잘라낼 범위를 지정합니다. 이를 위해 range()Python 함수를 사용합니다. 이제 두 개의 for루프를 사용하여 잘라냅니다.
- 폭 범위에 대한 하나
- 기타 높이 범위
높이와 너비가 각각 76픽셀과 104픽셀인 패치를 사용합니다. 안쪽 루프와 바깥쪽 루프의 스트라이드(이미지를 이동하는 픽셀 수)는 고려 중인 패치의 너비와 높이와 같습니다.
파이썬
M = 76
N = 104
x1 = 0
y1 = 0

for y in range(0, imgheight, M):
    for x in range(0, imgwidth, N):
        if (imgheight - y) < M or (imgwidth - x) < N:
            break

        y1 = y + M
        x1 = x + N

        # check whether the patch width or height exceeds the image width or height
        if x1 >= imgwidth and y1 >= imgheight:
            x1 = imgwidth - 1
            y1 = imgheight - 1
            #Crop into patches of size MxN
            tiles = image_copy[y:y+M, x:x+N]
            #Save each patch into file directory
            cv2.imwrite('saved_patches/'+'tile'+str(x)+'_'+str(y)+'.jpg', tiles)
            cv2.rectangle(img, (x, y), (x1, y1), (0, 255, 0), 1)
        elif y1 >= imgheight: # when patch height exceeds the image height
            y1 = imgheight - 1
            #Crop into patches of size MxN
            tiles = image_copy[y:y+M, x:x+N]
            #Save each patch into file directory
            cv2.imwrite('saved_patches/'+'tile'+str(x)+'_'+str(y)+'.jpg', tiles)
            cv2.rectangle(img, (x, y), (x1, y1), (0, 255, 0), 1)
        elif x1 >= imgwidth: # when patch width exceeds the image width
            x1 = imgwidth - 1
            #Crop into patches of size MxN
            tiles = image_copy[y:y+M, x:x+N]
            #Save each patch into file directory
            cv2.imwrite('saved_patches/'+'tile'+str(x)+'_'+str(y)+'.jpg', tiles)
            cv2.rectangle(img, (x, y), (x1, y1), (0, 255, 0), 1)
        else:
            #Crop into patches of size MxN
            tiles = image_copy[y:y+M, x:x+N]
            #Save each patch into file directory
            cv2.imwrite('saved_patches/'+'tile'+str(x)+'_'+str(y)+'.jpg', tiles)
            cv2.rectangle(img, (x, y), (x1, y1), (0, 255, 0), 1)
C++
int M = 76;
int N = 104;

int x1 = 0;
int y1 = 0;
for (int y = 0; y<imgheight; y=y+M)
{
    for (int x = 0; x<imgwidth; x=x+N)
    {
        if ((imgheight - y) < M || (imgwidth - x) < N)
        {
            break;
        }
        y1 = y + M;
        x1 = x + N;
        string a = to_string(x);
        string b = to_string(y);

        if (x1 >= imgwidth && y1 >= imgheight)
        {
            x = imgwidth - 1;
            y = imgheight - 1;
            x1 = imgwidth - 1;
            y1 = imgheight - 1;

            // crop the patches of size MxN
            Mat tiles = image_copy(Range(y, imgheight), Range(x, imgwidth));
            //save each patches into file directory
            imwrite("saved_patches/tile" + a + '_' + b + ".jpg", tiles);
            rectangle(img, Point(x,y), Point(x1,y1), Scalar(0,255,0), 1);
        }
        else if (y1 >= imgheight)
        {
            y = imgheight - 1;
            y1 = imgheight - 1;

            // crop the patches of size MxN
            Mat tiles = image_copy(Range(y, imgheight), Range(x, x+N));
            //save each patches into file directory
            imwrite("saved_patches/tile" + a + '_' + b + ".jpg", tiles);
            rectangle(img, Point(x,y), Point(x1,y1), Scalar(0,255,0), 1);
        }
        else if (x1 >= imgwidth)
        {
            x = imgwidth - 1;
            x1 = imgwidth - 1;

            // crop the patches of size MxN
            Mat tiles = image_copy(Range(y, y+M), Range(x, imgwidth));
            //save each patches into file directory
            imwrite("saved_patches/tile" + a + '_' + b + ".jpg", tiles);
            rectangle(img, Point(x,y), Point(x1,y1), Scalar(0,255,0), 1);
        }
        else
        {
            // crop the patches of size MxN
            Mat tiles = image_copy(Range(y, y+M), Range(x, x+N));
            //save each patches into file directory
            imwrite("saved_patches/tile" + a + '_' + b + ".jpg", tiles);
            rectangle(img, Point(x,y), Point(x1,y1), Scalar(0,255,0), 1);
        }
    }
}
다음으로, 함수를 사용하여 이미지 패치를 표시합니다 imshow(). 함수를 사용하여 파일 디렉터리에 저장합니다 imwrite().
파이썬
#Save full image into file directory
cv2.imshow("Patched Image",img)
cv2.imwrite("patched.jpg",img)

cv2.waitKey()
cv2.destroyAllWindows()
C++
imshow("Patched Image", img);
imwrite("patched.jpg",img);
waitKey();
destroyAllWindows();
아래 GIF는 이미지를 패치로 나누는 코드를 실행하는 과정을 보여줍니다.

이미지를 패치로 나누는 코드를 실행하는 과정을 보여주는 GIF입니다.
직사각형 패치가 겹쳐진 최종 이미지는 다음과 같습니다.

패치로 나눈 후의 꽃 이미지를 보여주는 그림입니다.
다음 이미지는 디스크에 저장된 별도의 이미지 패치를 보여줍니다. 원본 이미지와 디스크에 저장된 패치를 보여주는 그림입니다.

원본 이미지와 이미지 패치가 디스크에 저장됩니다.
자르기를 활용한 흥미로운 응용 프로그램
- 자르기를 사용하면 이미지에서 관심 있는 영역만 추출하고 나머지 필요 없는 부분은 삭제할 수 있습니다.
- 이미지에서 패치를 추출하여 패치 기반 신경망을 훈련할 수 있습니다.
흥미로운 Streamlit 웹 애플리케이션
Streamlit을 사용한 자르기 응용 프로그램:
- 앱을 사용하여 파일 디렉토리에서 잘라야 할 이미지를 업로드하세요.
- 그런 다음 이미지의 크기를 지정하여 이미지를 자릅니다.
Streamlit 웹앱을 여기에서 사용해 보세요. 예제들 ㅇ링크가 전부 깨져있네.
요약
이 블로그에서는 C++와 Python에서 이미지를 자르는 기본 구문에 대해 살펴보았습니다. 자르기 작업은 슬라이싱을 사용하여 수행됩니다. 즉, 이미지 행렬의 차원으로 자를 높이와 너비 또는 영역을 지정합니다. 결과 이미지는 새 행렬에 저장하거나 기존 행렬을 업데이트하여 저장할 수 있습니다. 이 행렬은 OpenCV imshow()함수를 사용하여 이미지로 표시하거나 OpenCV 함수를 사용하여 디스크에 파일로 저장할 수 있습니다 imwrite(). 또한 이미지를 더 작은 패치로 나누는 방법과 이를 활용한 몇 가지 응용 프로그램도 살펴보았습니다.
위에서 설명한 모든 코드는 이 링크에서 확인할 수 있습니다 → Colab Notebook .
'OpenCV' 카테고리의 다른 글
| OpenCV 블롭 탐지 Python, C++ (0) | 2025.09.10 |
|---|---|
| OpenCV 이미지 임계값 처리 Thresholding (0) | 2025.09.10 |
| OpenCV 색 공간 C++, Python (1) | 2025.09.10 |
| OpenCV 이미지 변환 및 회전 (0) | 2025.09.09 |
| OpenCV 이미지 크기 조정 (0) | 2025.09.09 |
| OpenCV 초보자는 여기서 시작하세요. (0) | 2025.09.08 |
| OpenCV를 사용하여 비디오 읽기 및 쓰기 (0) | 2025.09.08 |
| OpenCV를 사용하여 이미지 읽기, 표시 및 쓰기 - 시리즈 (2) | 2025.09.04 |
취업, 창업의 막막함, 외주 관리, 제품 부재!
당신의 고민은 무엇입니까? 현실과 동떨어진 교육, 실패만 반복하는 외주 계약,
아이디어는 있지만 구현할 기술이 없는 막막함.
우리는 알고 있습니다. 문제의 원인은 '명확한 학습, 실전 경험과 신뢰할 수 있는 기술력의 부재'에서 시작됩니다.
이제 고민을 멈추고, 캐어랩을 만나세요!
코딩(펌웨어), 전자부품과 디지털 회로설계, PCB 설계 제작, 고객(시장/수출) 발굴과 마케팅 전략으로 당신을 지원합니다.
제품 설계의 고수는 성공이 만든 게 아니라 실패가 만듭니다. 아이디어를 양산 가능한 제품으로!
귀사의 제품을 만드세요. 교육과 개발 실적으로 신뢰할 수 있는 파트너를 확보하세요.
지난 30년 여정, 캐어랩이 얻은 모든 것을 함께 나누고 싶습니다.
귀사가 성공하기까지의 긴 고난의 시간을 캐어랩과 함께 하세요.
캐어랩


