아두이노 프로젝트의 핀 수가 제한되어 있다는 문제에 직면하는 경우가 많은데, 16*2 LCD 디스플레이를 연결하면 이 문제는 더욱 심각해집니다. 다시 말하지만 단일 16*2 LCD 디스플레이는 사용자에게 정보를 표시할 공간이 많지 않습니다.
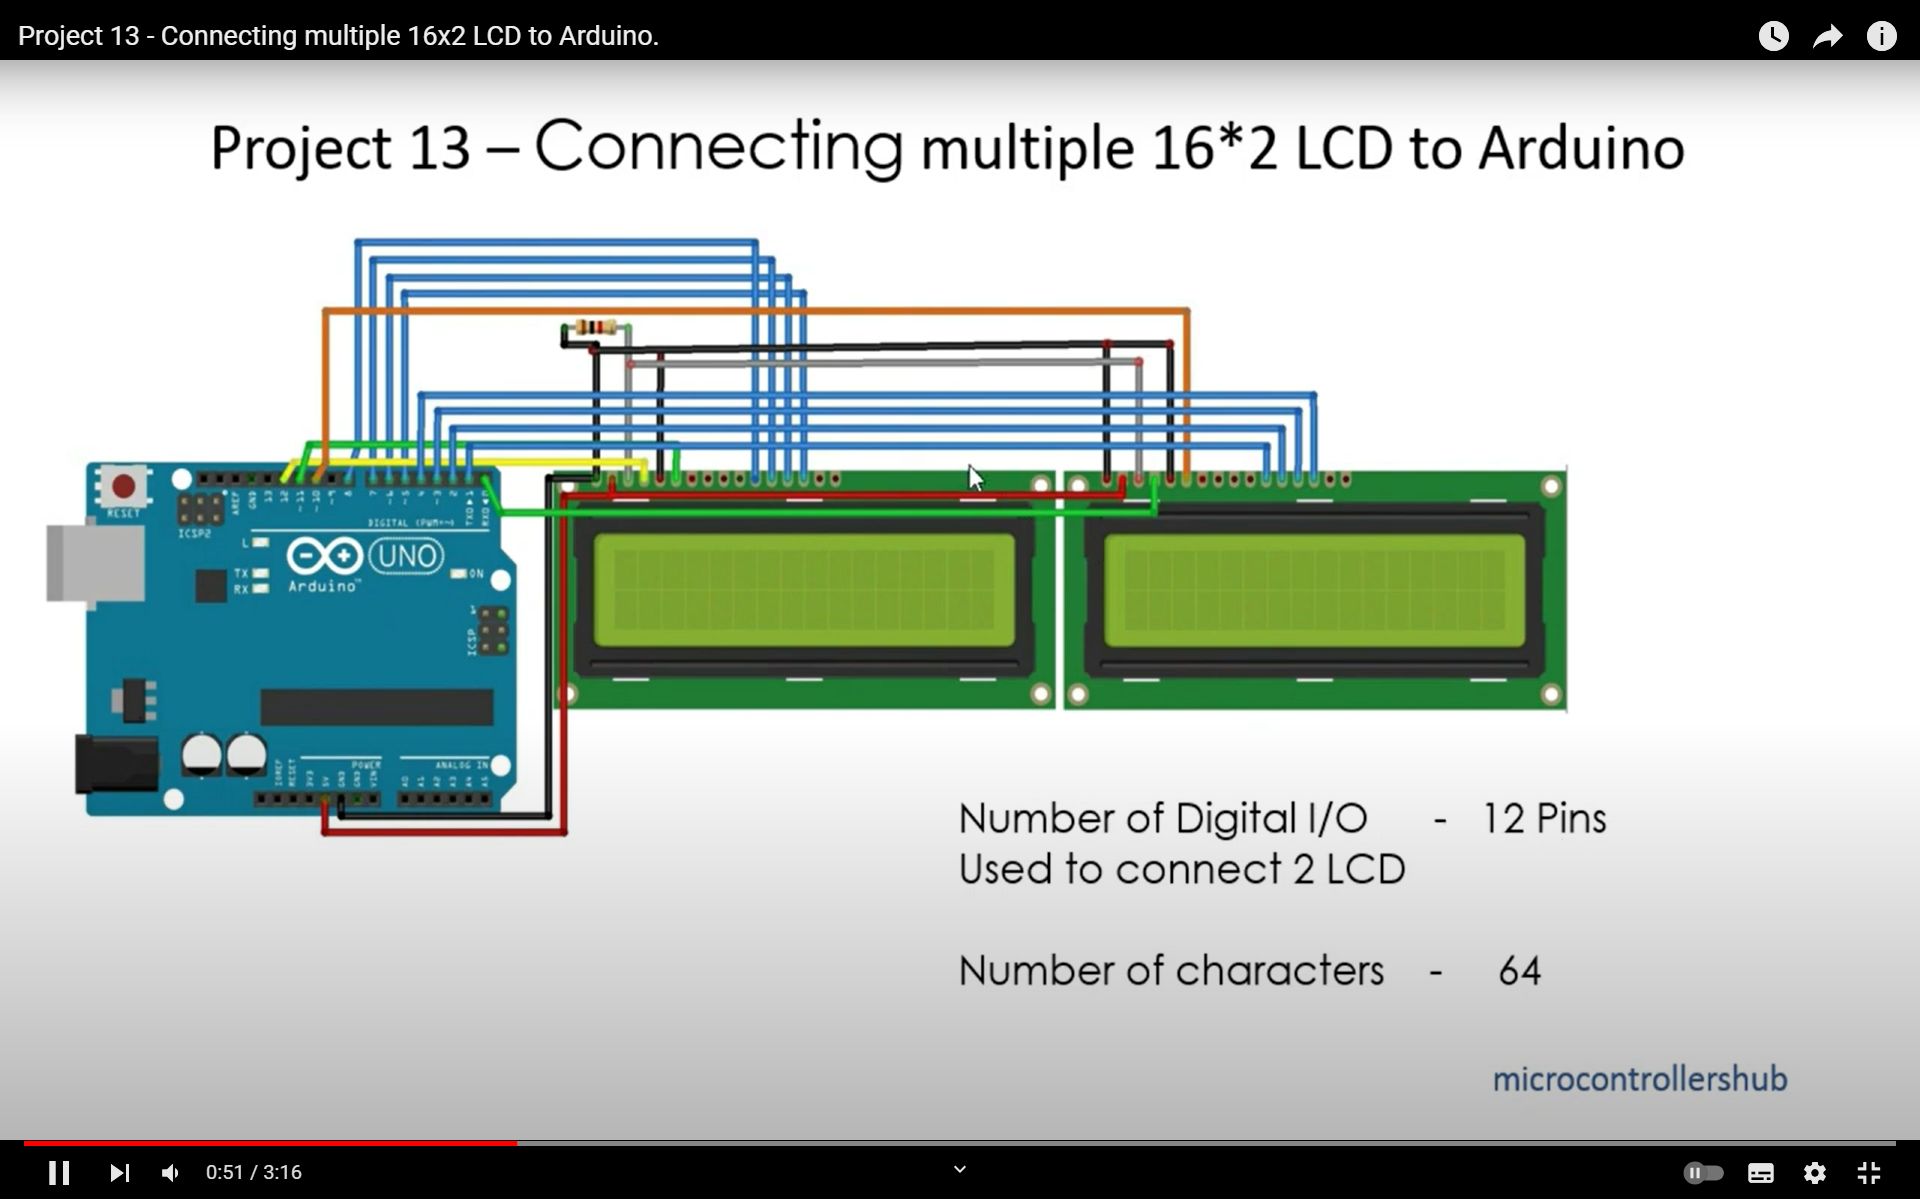
여기에서 7개의 디지털 입출력 핀으로 2개의 LCD 디스플레이를 아두이노 보드에 연결하는 방법을 살펴볼 것입니다. 이와 함께 이 2개의 LCD 디스플레이에서 텍스트를 스크롤하는 코드를 살펴봅니다.
아쉽게도 원래 제작자의 사이트는 사라져서 도메인은 판매 중이고, 남아 있는 영상과 코드를 사용해 작성했다. 모든 사라지는 것들은 빨리 사라진다. 다행인 것은 유튜브 사이트에 재미있는 프로젝트가 많이 남아 있다.
회로 연결도


코드
// Connecting multiple 16*2 LCD Display to Arduino
// by Varad Kulkarni <http://www.microcontrollershub.com>
// Created on 18 June 2018

#include <LiquidCrystal.h>
LiquidCrystal lcd1(12, 11, 5, 4, 3, 2);
LiquidCrystal lcd2(12, 10, 5, 4, 3, 2);

// Change following variables as per your need
char * LargeText = "    Connecting 2 - 16*2 LCD with Arduino by microcontrollershub.       ";

int iLineNumber = 1;                                                                   // Line number to show your string (Either 0 or 1)

int iCursor = 0;

void setup()
{
  lcd1.begin(16, 2);                                                                   // Initialise both LCD.
  lcd2.begin(16, 2);
  lcd1.clear();
  lcd2.clear();
}

void loop()
{
  UpdateLCDDisplay();                                                                  // Update text on LCD Display.
  delay(160);                                                                          // Change this value to change speed of scrolling text.
  lcd1.clear();
  lcd2.clear();
  delay(60);
}

void UpdateLCDDisplay()
{
  int iLenOfLargeText = strlen(LargeText);                                            // Calculate length of string.
  if (iCursor == (iLenOfLargeText - 1) )                                              // Reset variable for rollover effect.
  {
    iCursor = 0;
  }
  lcd1.setCursor(0,iLineNumber);
  lcd2.setCursor(0,iLineNumber);
  if(iCursor < iLenOfLargeText - 32)                                                  // This loop executed for normal 16 characters.
  {
    for (int iChar = iCursor; iChar < iCursor + 16 ; iChar++)
    {
      lcd1.print(LargeText[iChar]);
    }
    for (int iChar = iCursor + 16 ; iChar < iCursor + 32 ; iChar++)
    {
      lcd2.print(LargeText[iChar]);
    }
  }
  else
  {
      for (int iChar = iCursor; iChar < (iLenOfLargeText - 1) ; iChar++)                //  This code takes care of printing characters of current string.
      {
        if(16 > (iChar - iCursor))
        {
          lcd1.print(LargeText[iChar]);
        }
        else
        {
          lcd2.print(LargeText[iChar]);
        }
      }
      for (int iChar = 0; iChar <= 32 - (iLenOfLargeText - iCursor); iChar++)           //  Remaining characters will be printed by this loop.
      {

        if(16 > (32 - (iLenOfLargeText - iCursor)))
        {
          lcd2.print(LargeText[iChar]);
        }
        else
        {
          if( ((32 - (iLenOfLargeText - iCursor)) - 16) >=  iChar)
          {
            lcd1.print(LargeText[iChar]);
          }
          else
          {
            lcd2.print(LargeText[iChar]);
          }

        }
      }
  }
  iCursor++;
}
참고 추가 코드는 Scrollimg Display
// Scrolling display for 1602 LCD by Arduino
// by Varad Kulkarni <http://www.microcontrollershub.com>
// Created on 20 May 2018

#include <LiquidCrystal.h>
LiquidCrystal lcd(12, 11, 5, 4, 3, 2);

// Change following variables as per your need
char * LargeText = "    Understanding code for scrolling text on 16*2 LCD Display.    ";

int iLineNumber = 1;                                                                   // Line number to show your string (Either 0 or 1)

int iCursor = 0;

void setup()
{
  lcd.begin(16, 2);
}

void loop()
{
  UpdateLCDDisplay();                                                                 // Scoll text by 1 character
  delay(150);                                                                         // Change delay to change speed for scrollig text.
}

void UpdateLCDDisplay()
{
  int iLenOfLargeText = strlen(LargeText);                                            // Calculate lenght of string.
  if (iCursor == (iLenOfLargeText - 1) )                                              // Reset variable for rollover effect.
  {
    iCursor = 0;
  }
  //lcd.clear();
  lcd.setCursor(0,iLineNumber);

  if(iCursor < iLenOfLargeText - 16)                                                  // This loop exicuted for normal 16 characters.
  {
    for (int iChar = iCursor; iChar < iCursor + 16 ; iChar++)
    {
      lcd.print(LargeText[iChar]);
    }
  }
  else
  {
    for (int iChar = iCursor; iChar < (iLenOfLargeText - 1) ; iChar++)                //  This code takes care of printing charecters of current string.
    {
      lcd.print(LargeText[iChar]);
    }
    for (int iChar = 0; iChar <= 16 - (iLenOfLargeText - iCursor); iChar++)           //  Reamining charecter will be printed by this loop.
    {
      lcd.print(LargeText[iChar]);
    }
  }
  iCursor++;
}
추가 코드 Custom Character
// Custom Character for 1602 LCD
// by Varad Kulkarni <http://www.microcontrollershub.com>
// Created on 9 May 2018
// Project link : https://youtu.be/Lkvu3Qug_PM

// Battery Full
byte BatteryF[8] = {
	0b00100,
	0b11111,
	0b11111,
	0b11111,
	0b11111,
	0b11111,
	0b11111,
	0b11111
};

// Battery Half
byte BatteryH[8] = {
	0b00100,
	0b11111,
	0b10001,
	0b10001,
	0b11111,
	0b11111,
	0b11111,
	0b11111
};

// Battery Empty
byte BatteryE[8] = {
	0b00100,
	0b11111,
	0b10001,
	0b10001,
	0b10001,
	0b10001,
	0b10001,
	0b11111
};


// Heart
byte Heart[8] = {
	0b00000,
	0b00000,
	0b01010,
	0b11111,
	0b11111,
	0b01110,
	0b00100,
	0b00000
};


// Invert Heart
byte IHeart[8] = {
	0b11111,
	0b11111,
	0b10101,
	0b00000,
	0b00000,
	0b10001,
	0b11011,
	0b11111
};


// Charger
byte Charger[8] = {
	0b01010,
	0b01010,
	0b11111,
	0b10001,
	0b10001,
	0b01110,
	0b00100,
	0b00100
};

// Speaker
byte Speaker[8] = {
	0b00001,
	0b00011,
	0b00111,
	0b11111,
	0b11111,
	0b00111,
	0b00011,
	0b00001
};

// Bell
byte Bell[8] = {
	0b00100,
	0b01110,
	0b01110,
	0b01110,
	0b11111,
	0b00000,
	0b00100,
	0b00000
};

// Music 1
byte Music_1[8] = {
	0b00001,
	0b00011,
	0b00101,
	0b01001,
	0b01011,
	0b11011,
	0b11000,
	0b00000
};

// Music 2
byte Music_2[8] = {
	0b00000,
	0b00001,
	0b00011,
	0b00101,
	0b01001,
	0b01011,
	0b11011,
	0b11000
};
참고
'아두이노우노 R4' 카테고리의 다른 글
| 아두이노 우노 R4 HID 키보드 제어 API (1) | 2024.03.07 |
|---|---|
| 아두이노 우노 R4 WiFi 마우스, 키보드 제어 방법 (1) | 2024.03.06 |
| Arduino Uno R4 빠르게 시작하기 (1) | 2024.03.04 |
| 아두이노 우노 R4 HID 장애인 키보드 구현 (1) | 2024.02.29 |
| 아두이노에서 인터럽트를 사용하는 방법 (1) | 2023.11.24 |
| 만능 멤브레인 키패드 4X4-D 제어 (1) | 2023.11.06 |
| 아두이노 통합 개발 환경 IDE 2 가이드 (1) | 2023.11.03 |
| 아두이노 우노 R4 출시 소개 (2) | 2023.10.18 |
취업, 창업의 막막함, 외주 관리, 제품 부재!
당신의 고민은 무엇입니까? 현실과 동떨어진 교육, 실패만 반복하는 외주 계약,
아이디어는 있지만 구현할 기술이 없는 막막함.
우리는 알고 있습니다. 문제의 원인은 '명확한 학습, 실전 경험과 신뢰할 수 있는 기술력의 부재'에서 시작됩니다.
이제 고민을 멈추고, 캐어랩을 만나세요!
코딩(펌웨어), 전자부품과 디지털 회로설계, PCB 설계 제작, 고객(시장/수출) 발굴과 마케팅 전략으로 당신을 지원합니다.
제품 설계의 고수는 성공이 만든 게 아니라 실패가 만듭니다. 아이디어를 양산 가능한 제품으로!
귀사의 제품을 만드세요. 교육과 개발 실적으로 신뢰할 수 있는 파트너를 확보하세요.
캐어랩


