ESP32 BLE 서버 및 클라이언트(Bluetooth Low Energy)
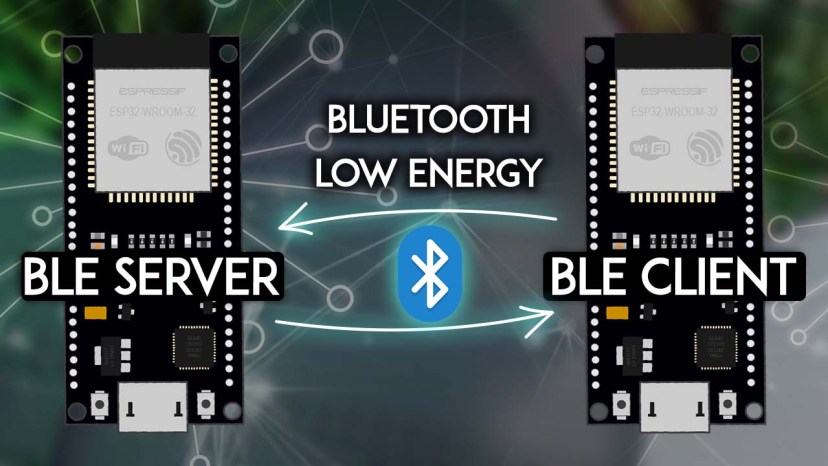
두 ESP32 보드 간에 BLE(Bluetooth Low Energy) 연결을 만드는 방법을 알아보세요. 한 ESP32는 서버가 되고 다른 ESP32는 클라이언트가 됩니다. BLE 서버는 클라이언트가 읽을 수 있는 센서 판독 값이 포함된 특성을 광고합니다. ESP32 BLE 클라이언트는 이러한 특성(온도 및 습도)의 값을 읽고 OLED 디스플레이에 표시합니다.
ESP32 BLE 서버 및 클라이언트 BLuetooth Low Energy Arduino IDE
추천 독서: ESP32 Bluetooth Low Energy(BLE) 시작하기
Bluetooth Low Energy란 무엇인가요?
프로젝트로 바로 가기 전에 몇 가지 필수적인 BLE 개념을 잠깐 살펴보는 것이 중요합니다. 그러면 나중에 프로젝트를 더 잘 이해할 수 있습니다. 이미 BLE에 익숙하다면 프로젝트 개요 섹션으로 건너뛸 수 있습니다.
Bluetooth Low Energy(약칭 BLE)는 Bluetooth의 전력 절약형 변형입니다. BLE의 주요 응용 분야는 소량의 데이터(저대역폭)를 단거리로 전송하는 것입니다. 항상 켜져 있는 Bluetooth와 달리 BLE는 연결이 시작될 때를 제외하고는 항상 절전 모드를 유지합니다.
이로 인해 매우 낮은 전력을 소모합니다. BLE는 Bluetooth보다 약 100배 적은 전력을 소모합니다(사용 사례에 따라 다름). Bluetooth와 Bluetooth Low Energy의 주요 차이점은 여기에서 확인할 수 있습니다 .
BLE 서버 및 클라이언트
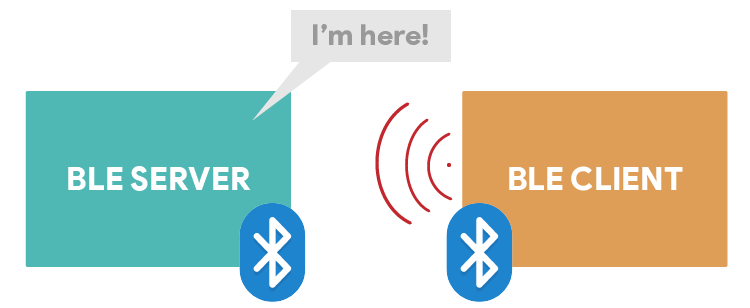
Bluetooth Low Energy에는 서버와 클라이언트라는 두 가지 유형의 장치가 있습니다. ESP32는 클라이언트 또는 서버로 작동할 수 있습니다.
서버는 자신의 존재를 광고하므로 다른 기기에서 찾을 수 있으며 클라이언트가 읽을 수 있는 데이터가 포함됩니다. 클라이언트는 근처 기기를 스캔하고 찾고 있는 서버를 찾으면 연결을 설정하고 들어오는 데이터를 수신합니다. 이를 지점 간 통신이라고 합니다.
BLE 클라이언트 서버 서버 광고
브로드캐스트 모드 및 메시 네트워크와 같은 다른 통신 모드도 가능합니다(이 튜토리얼에서는 다루지 않음).
GATT
GATT는 Generic Attributes의 약자로, 연결된 BLE 기기에 노출되는 계층적 데이터 구조를 정의합니다. 즉, GATT는 두 BLE 기기가 표준 메시지를 보내고 받는 방식을 정의합니다. 이 계층을 이해하는 것은 ESP32에서 BLE를 사용하는 방법을 더 쉽게 이해할 수 있기 때문에 중요합니다.

GATT 계층 ESP32 BLE 서버 클라이언트 예제
- Profile 프로필 : 특정 사용 사례를 위한 표준 서비스 컬렉션입니다.
- Service서비스 : 센서 판독값, 배터리 수준, 심박수 등과 같은 관련 정보 수집
- Characteristic 특징 : 실제 데이터가 계층 구조에 저장되는 위치입니다( 값 ).
- Descriptor 설명자 : 데이터에 대한 메타데이터
- Properties 속성 : 특성 값과 상호 작용하는 방법을 설명합니다. 예: 읽기, 쓰기, 알림, 브로드캐스트, 표시 등
우리의 예에서 우리는 두 가지 특성을 가진 서비스를 만들 것입니다 . 하나는 온도이고 다른 하나는 습도입니다. 실제 온도와 습도 판독값은 특성 아래의 값 에 저장됩니다 . 각 특성 에는 notify 속성이 있어서 값이 변경될 때마다 클라이언트에 알립니다.
UUID Universial Unique Identifier
각 서비스, 특성 및 설명자에는 UUID(Universally Unique Identifier)가 있습니다. UUID는 고유한 128비트(16바이트) 숫자입니다. 예를 들어:
55072829-bc9e-4c53-938a-74a6d4c78776
SIG(Bluetooth Special Interest Group) 에서는 모든 유형, 서비스 및 프로필에 대해 단축 UUID를 지정합니다 .
하지만 애플리케이션에 고유한 UUID가 필요한 경우 UUID 생성기 웹사이트를 사용하여 생성할 수 있습니다 .
요약하자면, UUID는 고유 식별 정보에 사용됩니다. 예를 들어, Bluetooth 기기에서 제공하는 특정 서비스를 식별할 수 있습니다.
BLE에 대한 더 자세한 소개는 시작 가이드를 읽어보세요. "Arduino IDE에서 ESP32 Bluetooth Low Energy(BLE) 시작하기"
프로젝트 개요
이 튜토리얼에서는 두 ESP32 보드 간에 BLE 연결을 만드는 방법을 배우게 됩니다. 한 ESP32는 BLE 서버가 되고, 다른 ESP32는 BLE 클라이언트가 됩니다.
ESP32 BLE 클라이언트 서버 OLED 디스플레이 데모
ESP32 BLE 서버는 BME280 센서 에 연결되어 있으며 30초마다 온도 및 습도 특성 값을 업데이트합니다.
ESP32 클라이언트는 BLE 서버에 연결하고 온도 및 습도 특성 값을 통보받습니다. 이 ESP32는 OLED 디스플레이에 연결되고 최신 판독값을 인쇄합니다.
이 프로젝트는 두 부분으로 나뉩니다.
- 1부 – ESP32 BLE 서버
- 2부 – ESP32 BLE 클라이언트
필요한 부품 - 이 프로젝트를 수행하는 데 필요한 부품 목록은 다음과 같습니다.
ESP32 BLE 서버:
- ESP32 DOIT DEVKIT V1 보드 ( 최고의 ESP32 개발 보드 읽기 )
- BME280 센서
- 점퍼 와이어
- 브레드보드
- 블루투스 기능이 있는 스마트폰 (옵션)
ESP32 BLE 클라이언트:
- ESP32 DOIT DEVKIT V1 보드 ( 최고의 ESP32 개발 보드 읽기 )
- OLED 디스플레이
- 점퍼 와이어
- 브레드보드
1) ESP32 BLE 서버
이 부분에서는 온도와 습도의 두 가지 특성을 포함하는 서비스를 광고하는 BLE 서버를 설정합니다. 이러한 특성에는 클라이언트에 새 값을 알리는 Notify 속성이 있습니다.

nRF Connect 앱에 연결된 ESP32 BLE 서버
Schematic Diagram 회로도
ESP32 BLE 서버는 BME280 센서의 온도 및 습도 특성을 광고합니다. 코드에 필요한 줄을 추가하기만 하면 다른 센서를 사용할 수 있습니다.
우리는 BME280 센서 모듈과 I2C 통신을 사용할 것입니다. 이를 위해 센서를 기본 ESP32 SCL(GPIO 22) 및 SDA(GPIO 21) 핀은 다음의 개략도에 표시된 것과 같습니다.
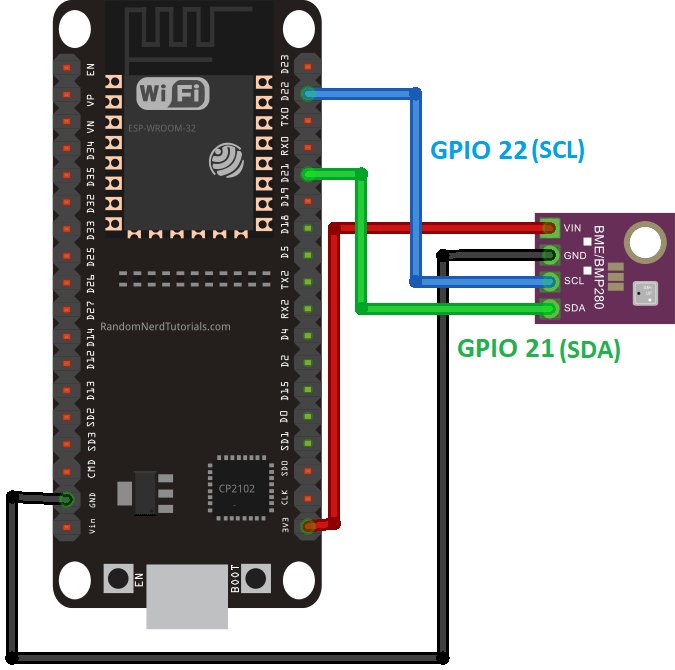
ESP32 배선 회로 대 BME280 회로도
추천 자료: ESP32 핀아웃 참조: 어떤 GPIO 핀을 사용해야 하나요?
BME280 라이브러리 설치
이전에 언급했듯이, 우리는 BME280 센서의 센서 판독값을 광고할 것입니다. 따라서 BME280 센서와 인터페이스하려면 라이브러리를 설치해야 합니다.
- Adafruit_BME280 라이브러리
- Adafruit_Sensor 라이브러리
Arduino Library Manager를 사용하여 라이브러리를 설치할 수 있습니다. Sketch > Include Library > Manage Libraries 로 이동하여 라이브러리 이름을 검색합니다.
라이브러리 설치(VS Code + PlatformIO)
PlatformIO 확장 기능과 함께 VS Code를 사용하는 경우 다음을 복사하세요.플랫폼io.ini라이브러리를 포함할 파일입니다.
lib_deps = adafruit/Adafruit Unified Sensor @ ^1.1.4
            adafruit/Adafruit BME280 Library @ ^2.1.2
ESP32 BLE 서버 – 코드
회로가 준비되고 필요한 라이브러리가 설치되면 다음 코드를 Arduino IDE나 main.cpp VS Code를 사용하는 경우 파일입니다.
/*********
  Rui Santos
  Complete instructions at https://RandomNerdTutorials.com/esp32-ble-server-client/
  Permission is hereby granted, free of charge, to any person obtaining a copy of this software and associated documentation files.
  The above copyright notice and this permission notice shall be included in all copies or substantial portions of the Software.
*********/

#include <BLEDevice.h>
#include <BLEServer.h>
#include <BLEUtils.h>
#include <BLE2902.h>
#include <Wire.h>
#include <Adafruit_Sensor.h>
#include <Adafruit_BME280.h>

//Default Temperature is in Celsius
//Comment the next line for Temperature in Fahrenheit
#define temperatureCelsius

//BLE server name
#define bleServerName "BME280_ESP32"

Adafruit_BME280 bme; // I2C

float temp;
float tempF;
float hum;

// Timer variables
unsigned long lastTime = 0;
unsigned long timerDelay = 30000;

bool deviceConnected = false;

// See the following for generating UUIDs:
// https://www.uuidgenerator.net/
#define SERVICE_UUID "91bad492-b950-4226-aa2b-4ede9fa42f59"

// Temperature Characteristic and Descriptor
#ifdef temperatureCelsius
  BLECharacteristic bmeTemperatureCelsiusCharacteristics("cba1d466-344c-4be3-ab3f-189f80dd7518", BLECharacteristic::PROPERTY_NOTIFY);
  BLEDescriptor bmeTemperatureCelsiusDescriptor(BLEUUID((uint16_t)0x2902));
#else
  BLECharacteristic bmeTemperatureFahrenheitCharacteristics("f78ebbff-c8b7-4107-93de-889a6a06d408", BLECharacteristic::PROPERTY_NOTIFY);
  BLEDescriptor bmeTemperatureFahrenheitDescriptor(BLEUUID((uint16_t)0x2902));
#endif

// Humidity Characteristic and Descriptor
BLECharacteristic bmeHumidityCharacteristics("ca73b3ba-39f6-4ab3-91ae-186dc9577d99", BLECharacteristic::PROPERTY_NOTIFY);
BLEDescriptor bmeHumidityDescriptor(BLEUUID((uint16_t)0x2903));

//Setup callbacks onConnect and onDisconnect
class MyServerCallbacks: public BLEServerCallbacks {
  void onConnect(BLEServer* pServer) {
    deviceConnected = true;
  };
  void onDisconnect(BLEServer* pServer) {
    deviceConnected = false;
  }
};

void initBME(){
  if (!bme.begin(0x76)) {
    Serial.println("Could not find a valid BME280 sensor, check wiring!");
    while (1);
  }
}

void setup() {
  // Start serial communication
  Serial.begin(115200);

  // Init BME Sensor
  initBME();

  // Create the BLE Device
  BLEDevice::init(bleServerName);

  // Create the BLE Server
  BLEServer *pServer = BLEDevice::createServer();
  pServer->setCallbacks(new MyServerCallbacks());

  // Create the BLE Service
  BLEService *bmeService = pServer->createService(SERVICE_UUID);

  // Create BLE Characteristics and Create a BLE Descriptor
  // Temperature
  #ifdef temperatureCelsius
    bmeService->addCharacteristic(&bmeTemperatureCelsiusCharacteristics);
    bmeTemperatureCelsiusDescriptor.setValue("BME temperature Celsius");
    bmeTemperatureCelsiusCharacteristics.addDescriptor(&bmeTemperatureCelsiusDescriptor);
  #else
    bmeService->addCharacteristic(&bmeTemperatureFahrenheitCharacteristics);
    bmeTemperatureFahrenheitDescriptor.setValue("BME temperature Fahrenheit");
    bmeTemperatureFahrenheitCharacteristics.addDescriptor(&bmeTemperatureFahrenheitDescriptor);
  #endif

  // Humidity
  bmeService->addCharacteristic(&bmeHumidityCharacteristics);
  bmeHumidityDescriptor.setValue("BME humidity");
  bmeHumidityCharacteristics.addDescriptor(new BLE2902());

  // Start the service
  bmeService->start();

  // Start advertising
  BLEAdvertising *pAdvertising = BLEDevice::getAdvertising();
  pAdvertising->addServiceUUID(SERVICE_UUID);
  pServer->getAdvertising()->start();
  Serial.println("Waiting a client connection to notify...");
}

void loop() {
  if (deviceConnected) {
    if ((millis() - lastTime) > timerDelay) {
      // Read temperature as Celsius (the default)
      temp = bme.readTemperature();
      // Fahrenheit
      tempF = 1.8*temp +32;
      // Read humidity
      hum = bme.readHumidity();

      //Notify temperature reading from BME sensor
      #ifdef temperatureCelsius
        static char temperatureCTemp[6];
        dtostrf(temp, 6, 2, temperatureCTemp);
        //Set temperature Characteristic value and notify connected client
        bmeTemperatureCelsiusCharacteristics.setValue(temperatureCTemp);
        bmeTemperatureCelsiusCharacteristics.notify();
        Serial.print("Temperature Celsius: ");
        Serial.print(temp);
        Serial.print(" ºC");
      #else
        static char temperatureFTemp[6];
        dtostrf(tempF, 6, 2, temperatureFTemp);
        //Set temperature Characteristic value and notify connected client
        bmeTemperatureFahrenheitCharacteristics.setValue(temperatureFTemp);
        bmeTemperatureFahrenheitCharacteristics.notify();
        Serial.print("Temperature Fahrenheit: ");
        Serial.print(tempF);
        Serial.print(" ºF");
      #endif

      //Notify humidity reading from BME
      static char humidityTemp[6];
      dtostrf(hum, 6, 2, humidityTemp);
      //Set humidity Characteristic value and notify connected client
      bmeHumidityCharacteristics.setValue(humidityTemp);
      bmeHumidityCharacteristics.notify();
      Serial.print(" - Humidity: ");
      Serial.print(hum);
      Serial.println(" %");

      lastTime = millis();
    }
  }
}
코드를 업로드하면 온도 및 습도 특성으로 서비스를 광고하는 즉시 작동합니다. 계속 읽어서 코드 작동 방식을 알아보거나 클라이언트 섹션 으로 건너뜁니다 .
예제 섹션 에는 ESP32와 함께 BLE를 사용하는 방법을 보여주는 여러 가지 예가 있습니다 . Arduino IDE에서 파일 > 예제 > ESP32 BLE Arduino 로 이동합니다. 이 서버 스케치는 Notify 예제를 기반으로 합니다 .
라이브러리 가져오기
코드는 필요한 라이브러리를 가져오는 것으로 시작합니다.
#include <BLEDevice.h>
#include <BLEServer.h>
#include <BLEUtils.h>
#include <BLE2902.h>
#include <Wire.h>
#include <Adafruit_Sensor.h>
#include <Adafruit_BME280.h>
온도 단위 선택
기본적으로 ESP는 섭씨로 온도를 전송합니다. 다음 줄에 주석을 달거나 삭제하여 화씨로 온도를 전송할 수 있습니다.
//Comment the next line for Temperature in Fahrenheit
#define temperatureCelsius
BLE 서버 이름
다음 줄은 BLE 서버의 이름을 정의합니다. 기본 BLE 서버 이름을 그대로 두세요. 그렇지 않으면 클라이언트 코드의 서버 이름도 변경해야 합니다(일치해야 하기 때문입니다).
//BLE server name
#define bleServerName "BME280_ESP32"
BME280 센서
기본 ESP32 I2C 핀에 bme라는 Adafruit_BME280 객체를 생성합니다.
Adafruit_BME280 bme; // I2C
온도, 온도F 및 습도 변수는 섭씨 온도, 화씨 온도 및 BME280 센서에서 읽은 습도를 섭씨도 단위로 유지합니다.
float temp;
float tempF;
float hum;
기타 변수
다음 타이머 변수는 온도 및 습도 특성에 얼마나 자주 쓸 것인지 정의합니다. 우리는 다음을 설정합니다.타이머 지연최대 30000 밀리초(30초)까지 설정할 수 있지만, 이를 변경할 수 있습니다.
// Timer variables
unsigned long lastTime = 0;
unsigned long timerDelay = 30000;
deviceConnected 부울 변수를 사용하면 클라이언트가 서버에 연결되어 있는지 추적할 수 있습니다.
bool deviceConnected = false;
BLE UUID
다음 줄에서는 서비스에 대한 UUID, 섭씨 온도 특성, 화씨 온도 특성, 습도에 대한 UUID를 정의합니다.
// https://www.uuidgenerator.net/
#define SERVICE_UUID "91bad492-b950-4226-aa2b-4ede9fa42f59"

// Temperature Characteristic and Descriptor
#ifdef temperatureCelsius
  BLECharacteristic bmeTemperatureCelsiusCharacteristics("cba1d466-344c-4be3-ab3f-189f80dd7518", BLECharacteristic::PROPERTY_NOTIFY);
  BLEDescriptor bmeTemperatureCelsiusDescriptor(BLEUUID((uint16_t)0x2902));
#else
  BLECharacteristic bmeTemperatureFahrenheitCharacteristics("f78ebbff-c8b7-4107-93de-889a6a06d408", BLECharacteristic::PROPERTY_NOTIFY);
  BLEDescriptor bmeTemperatureFahrenheitDescriptor(BLEUUID((uint16_t)0x2901));
#endif

// Humidity Characteristic and Descriptor
BLECharacteristic bmeHumidityCharacteristics("ca73b3ba-39f6-4ab3-91ae-186dc9577d99", BLECharacteristic::PROPERTY_NOTIFY);
BLEDescriptor bmeHumidityDescriptor(BLEUUID((uint16_t)0x2903));
모든 기본 UUID를 그대로 두는 것이 좋습니다. 그렇지 않으면 클라이언트 측의 코드도 변경해야 합니다. 그래야 클라이언트가 서비스를 찾고 특성 값을 검색할 수 있습니다.
setup()
setup()에서 직렬 모니터와 BME280 센서를 초기화합니다.
// Start serial communication
Serial.begin(115200);
// Init BME Sensor
initBME();
이전에 정의한 BLE 서버 이름으로 새 BLE 장치를 만듭니다.
// Create the BLE Device
BLEDevice::init(bleServerName);
BLE 장치를 서버로 설정하고 콜백 함수를 할당합니다.
// Create the BLE Server
BLEServer *pServer = BLEDevice::createServer();
pServer->setCallbacks(new MyServerCallbacks());
콜백 함수 MyServerCallbacks()는 BLE 디바이스의 현재 상태에 따라 부울 변수 deviceConnected를 참 또는 거짓으로 변경합니다. 즉, 클라이언트가 서버에 연결되어 있으면 상태가 참입니다. 클라이언트가 연결을 끊으면 부울 변수가 false로 변경됩니다. 다음은 MyServerCallbacks() 함수를 정의하는 코드의 일부입니다.
//Setup callbacks onConnect and onDisconnect
class MyServerCallbacks: public BLEServerCallbacks {
  void onConnect(BLEServer* pServer) {
    deviceConnected = true;
  };
  void onDisconnect(BLEServer* pServer) {
    deviceConnected = false;
  }
};
이전에 정의한 서비스 UUID로 BLE 서비스를 시작합니다.
BLEService *bmeService = pServer->createService(SERVICE_UUID);
그런 다음 온도 BLE 특성을 만듭니다. 섭씨 온도를 사용하는 경우 다음 특성과 설명자를 설정합니다.
#ifdef temperatureCelsius
  bmeService->addCharacteristic(&bmeTemperatureCelsiusCharacteristics);
  bmeTemperatureCelsiusDescriptor.setValue("BME temperature Celsius");
  bmeTemperatureCelsiusCharacteristics.addDescriptor(new BLE2902());
그렇지 않으면 화씨 특성이 설정됩니다.
#else
  bmeService->addCharacteristic(&dhtTemperatureFahrenheitCharacteristics);
  bmeTemperatureFahrenheitDescriptor.setValue("BME temperature Fahrenheit");
  bmeTemperatureFahrenheitCharacteristics.addDescriptor(new BLE2902());
#endif
그 후, 습도 특성을 설정합니다.
// Humidity
bmeService->addCharacteristic(&bmeHumidityCharacteristics);
bmeHumidityDescriptor.setValue("BME humidity");
bmeHumidityCharacteristics.addDescriptor(new BLE2902());
마지막으로 서비스를 시작하면 서버는 다른 기기에서 찾을 수 있도록 광고를 시작합니다.
// Start the service
bmeService->start();

// Start advertising
BLEAdvertising *pAdvertising = BLEDevice::getAdvertising();
pAdvertising->addServiceUUID(SERVICE_UUID);
pServer->getAdvertising()->start();
Serial.println("Waiting a client connection to notify...");
loop()
loop() 함수는 매우 간단합니다. 장치가 클라이언트에 연결되어 있는지 여부를 지속적으로 확인합니다. 연결되어 있고 타이머 지연 시간이 지나면 현재 온도와 습도를 읽습니다.
if (deviceConnected) {
  if ((millis() - lastTime) > timerDelay) {
    // Read temperature as Celsius (the default)
    temp = bme.readTemperature();
    // Fahrenheit
    tempF = temp*1.8 +32;
    // Read humidity
    hum = bme.readHumidity();
온도를 섭씨 단위로 사용하는 경우 다음 코드 섹션이 실행됩니다. 먼저 온도를 문자 변수(temperatureCTemp 변수)로 변환합니다. 온도를 설정값() 함수에서 사용하려면 온도를 문자 변수 유형으로 변환해야 합니다.
static char temperatureCTemp[6];
dtostrf(temp, 6, 2, temperatureCTemp);
그런 다음 setValue() 함수를 사용하여 bmeTemperatureCelsiusCharacteristic 값을 새 온도 값(temperatureCTemp)으로 설정합니다. 새 값을 설정한 후 notify() 함수를 사용하여 연결된 클라이언트에 알릴 수 있습니다.
//Set temperature Characteristic value and notify connected client bmeTemperatureCelsiusCharacteristics.setValue(temperatureCTemp);
bmeTemperatureCelsiusCharacteristics.notify();
화씨 온도도 비슷한 절차를 따릅니다.
#else
    static char temperatureFTemp[6];
    dtostrf(f, 6, 2, temperatureFTemp);
    //Set temperature Characteristic value and notify connected client
    bmeTemperatureFahrenheitCharacteristics.setValue(tempF);
    bmeTemperatureFahrenheitCharacteristics.notify();
    Serial.print("Temperature Fahrenheit: ");
    Serial.print(tempF);
    Serial.print(" *F");
#endif
습도를 보내는 것도 동일한 과정을 사용합니다.
//Notify humidity reading from DHT
static char humidityTemp[6];
dtostrf(hum, 6, 2, humidityTemp);
//Set humidity Characteristic value and notify connected client
bmeHumidityCharacteristics.setValue(humidityTemp);
bmeHumidityCharacteristics.notify();
Serial.print(" - Humidity: ");
Serial.print(hum);
Serial.println(" %");
ESP32 BLE 서버 테스트
코드를 보드에 업로드한 다음, 직렬 모니터를 엽니다. 아래와 같이 메시지가 표시됩니다.
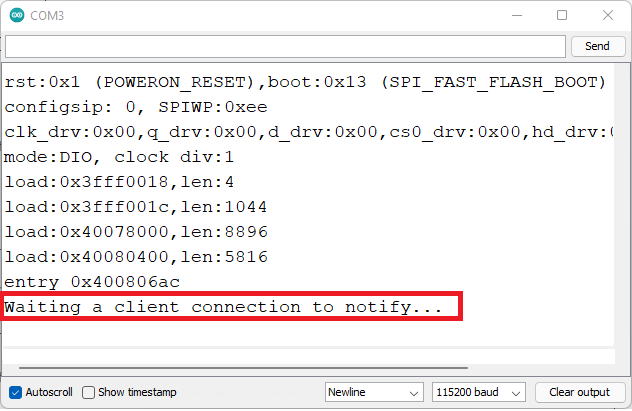
ESP32 BLE 서버가 직렬 모니터를 시작합니다.
그런 다음, nRF Connect 와 같은 스마트폰의 BLE 스캔 애플리케이션을 사용하여 BLE 서버가 예상대로 작동하는지 테스트할 수 있습니다 . 이 애플리케이션은 Android 및 iOS 에서 사용할 수 있습니다 .
앱을 설치한 후 스마트폰에서 Bluetooth를 활성화합니다. nRF Connect 앱을 열고 Scan 버튼을 클릭합니다. BME280_ESP32 기기를 포함하여 근처의 모든 Bluetooth 기기를 찾습니다 (코드에서 정의한 BLE 서버 이름입니다).
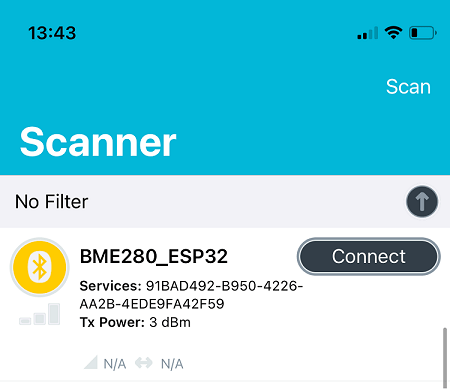
ESP32 BLE 서버 스캐너 앱
BME280_ESP32 장치에 연결한 다음 클라이언트 탭을 선택합니다(인터페이스는 약간 다를 수 있음). 코드에서 정의한 UUID와 온도 및 습도 특성을 사용하여 서비스를 광고하는지 확인할 수 있습니다. 이러한 특성에는 Notify 속성이 있습니다.
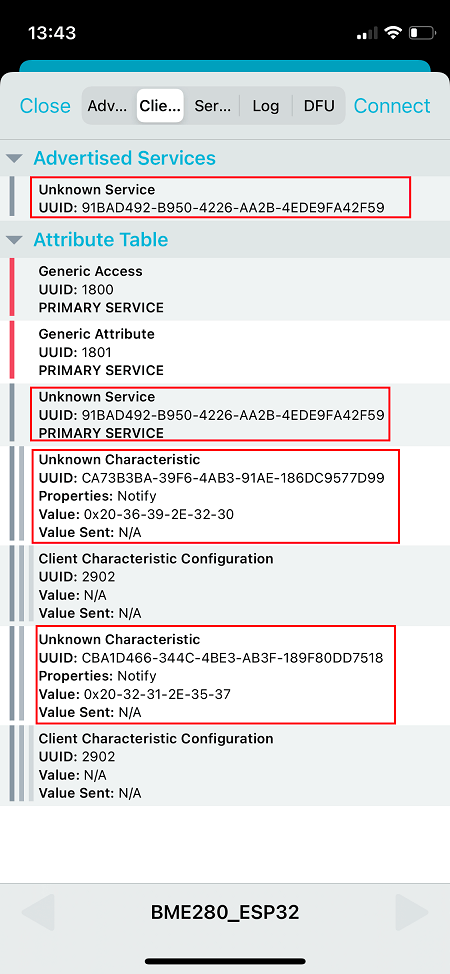
ESP32 BLE 서버 특성 nRF Connect 앱
ESP32 BLE 서버가 준비되었습니다!
다음 섹션으로 이동하여 온도 및 습도 특성에 액세스하고 OLED 디스플레이에 판독값을 표시하는 ESP32 클라이언트를 서버에 생성합니다.
2) ESP32 BLE 클라이언트
이 섹션에서는 ESP32 BLE 서버와 연결을 설정하고 OLED 디스플레이에 판독값을 표시하는 ESP32 BLE 클라이언트를 만들어 보겠습니다.
회로도
ESP32 BLE 클라이언트는 OLED 디스플레이에 연결됩니다. 디스플레이는 Bluetooth를 통해 수신된 판독값을 표시합니다.
다음 회로도를 따라 OLED 디스플레이를 ESP32에 연결하세요. SCL 핀은 다음에 연결됩니다.GPIO 22그리고 SDA 핀은GPIO 21.

ESP32 배선 회로 OLED SSD1306 회로도
SSD1306, GFX 및 BusIO 라이브러리 설치
OLED 디스플레이와 인터페이스하려면 다음 라이브러리를 설치해야 합니다.
- Adafruit_SSD1306 라이브러리
- Adafruit GFX 라이브러리
- Adafruit BusIO 라이브러리
라이브러리를 설치하려면 스케치 > 라이브러리 포함 > 라이브러리 관리로 가서 라이브러리 이름을 검색합니다.
라이브러리 설치(VS Code + PlatformIO)
PlatformIO 확장 기능과 함께 VS Code를 사용하는 경우 다음을 복사하세요. platformio.ini라이브러리를 포함할 파일입니다.
lib_deps =
	adafruit/Adafruit GFX Library@^1.10.12
	adafruit/Adafruit SSD1306@^2.4.6
ESP32 BLE 클라이언트 – 코드
BLE 클라이언트 스케치를 Arduino IDE 또는 main.cpp PlatformIO와 함께 VS Code를 사용하는 경우 파일입니다.
/*********
  Rui Santos
  Complete instructions at https://RandomNerdTutorials.com/esp32-ble-server-client/
  Permission is hereby granted, free of charge, to any person obtaining a copy of this software and associated documentation files.
  The above copyright notice and this permission notice shall be included in all copies or substantial portions of the Software.
*********/

#include "BLEDevice.h"
#include <Wire.h>
#include <Adafruit_SSD1306.h>
#include <Adafruit_GFX.h>

//Default Temperature is in Celsius
//Comment the next line for Temperature in Fahrenheit
#define temperatureCelsius

//BLE Server name (the other ESP32 name running the server sketch)
#define bleServerName "BME280_ESP32"

/* UUID's of the service, characteristic that we want to read*/
// BLE Service
static BLEUUID bmeServiceUUID("91bad492-b950-4226-aa2b-4ede9fa42f59");

// BLE Characteristics
#ifdef temperatureCelsius
  //Temperature Celsius Characteristic
  static BLEUUID temperatureCharacteristicUUID("cba1d466-344c-4be3-ab3f-189f80dd7518");
#else
  //Temperature Fahrenheit Characteristic
  static BLEUUID temperatureCharacteristicUUID("f78ebbff-c8b7-4107-93de-889a6a06d408");
#endif

// Humidity Characteristic
static BLEUUID humidityCharacteristicUUID("ca73b3ba-39f6-4ab3-91ae-186dc9577d99");

//Flags stating if should begin connecting and if the connection is up
static boolean doConnect = false;
static boolean connected = false;

//Address of the peripheral device. Address will be found during scanning...
static BLEAddress *pServerAddress;

//Characteristicd that we want to read
static BLERemoteCharacteristic* temperatureCharacteristic;
static BLERemoteCharacteristic* humidityCharacteristic;

//Activate notify
const uint8_t notificationOn[] = {0x1, 0x0};
const uint8_t notificationOff[] = {0x0, 0x0};

#define SCREEN_WIDTH 128 // OLED display width, in pixels
#define SCREEN_HEIGHT 64 // OLED display height, in pixels

//Declaration for an SSD1306 display connected to I2C (SDA, SCL pins)
Adafruit_SSD1306 display(SCREEN_WIDTH, SCREEN_HEIGHT, &Wire, -1);

//Variables to store temperature and humidity
char* temperatureChar;
char* humidityChar;

//Flags to check whether new temperature and humidity readings are available
boolean newTemperature = false;
boolean newHumidity = false;

//Connect to the BLE Server that has the name, Service, and Characteristics
bool connectToServer(BLEAddress pAddress) {
   BLEClient* pClient = BLEDevice::createClient();

  // Connect to the remove BLE Server.
  pClient->connect(pAddress);
  Serial.println(" - Connected to server");

  // Obtain a reference to the service we are after in the remote BLE server.
  BLERemoteService* pRemoteService = pClient->getService(bmeServiceUUID);
  if (pRemoteService == nullptr) {
    Serial.print("Failed to find our service UUID: ");
    Serial.println(bmeServiceUUID.toString().c_str());
    return (false);
  }

  // Obtain a reference to the characteristics in the service of the remote BLE server.
  temperatureCharacteristic = pRemoteService->getCharacteristic(temperatureCharacteristicUUID);
  humidityCharacteristic = pRemoteService->getCharacteristic(humidityCharacteristicUUID);

  if (temperatureCharacteristic == nullptr || humidityCharacteristic == nullptr) {
    Serial.print("Failed to find our characteristic UUID");
    return false;
  }
  Serial.println(" - Found our characteristics");

  //Assign callback functions for the Characteristics
  temperatureCharacteristic->registerForNotify(temperatureNotifyCallback);
  humidityCharacteristic->registerForNotify(humidityNotifyCallback);
  return true;
}

//Callback function that gets called, when another device's advertisement has been received
class MyAdvertisedDeviceCallbacks: public BLEAdvertisedDeviceCallbacks {
  void onResult(BLEAdvertisedDevice advertisedDevice) {
    if (advertisedDevice.getName() == bleServerName) { //Check if the name of the advertiser matches
      advertisedDevice.getScan()->stop(); //Scan can be stopped, we found what we are looking for
      pServerAddress = new BLEAddress(advertisedDevice.getAddress()); //Address of advertiser is the one we need
      doConnect = true; //Set indicator, stating that we are ready to connect
      Serial.println("Device found. Connecting!");
    }
  }
};

//When the BLE Server sends a new temperature reading with the notify property
static void temperatureNotifyCallback(BLERemoteCharacteristic* pBLERemoteCharacteristic,
                                        uint8_t* pData, size_t length, bool isNotify) {
  //store temperature value
  temperatureChar = (char*)pData;
  newTemperature = true;
}

//When the BLE Server sends a new humidity reading with the notify property
static void humidityNotifyCallback(BLERemoteCharacteristic* pBLERemoteCharacteristic,
                                    uint8_t* pData, size_t length, bool isNotify) {
  //store humidity value
  humidityChar = (char*)pData;
  newHumidity = true;
  Serial.print(newHumidity);
}

//function that prints the latest sensor readings in the OLED display
void printReadings(){

  display.clearDisplay();
  // display temperature
  display.setTextSize(1);
  display.setCursor(0,0);
  display.print("Temperature: ");
  display.setTextSize(2);
  display.setCursor(0,10);
  display.print(temperatureChar);
  display.setTextSize(1);
  display.cp437(true);
  display.write(167);
  display.setTextSize(2);
  Serial.print("Temperature:");
  Serial.print(temperatureChar);
  #ifdef temperatureCelsius
    //Temperature Celsius
    display.print("C");
    Serial.print("C");
  #else
    //Temperature Fahrenheit
    display.print("F");
    Serial.print("F");
  #endif

  //display humidity
  display.setTextSize(1);
  display.setCursor(0, 35);
  display.print("Humidity: ");
  display.setTextSize(2);
  display.setCursor(0, 45);
  display.print(humidityChar);
  display.print("%");
  display.display();
  Serial.print(" Humidity:");
  Serial.print(humidityChar);
  Serial.println("%");
}

void setup() {
  //OLED display setup
  // SSD1306_SWITCHCAPVCC = generate display voltage from 3.3V internally
  if(!display.begin(SSD1306_SWITCHCAPVCC, 0x3C)) { // Address 0x3C for 128x32
    Serial.println(F("SSD1306 allocation failed"));
    for(;;); // Don't proceed, loop forever
  }
  display.clearDisplay();
  display.setTextSize(2);
  display.setTextColor(WHITE,0);
  display.setCursor(0,25);
  display.print("BLE Client");
  display.display();

  //Start serial communication
  Serial.begin(115200);
  Serial.println("Starting Arduino BLE Client application...");

  //Init BLE device
  BLEDevice::init("");

  // Retrieve a Scanner and set the callback we want to use to be informed when we
  // have detected a new device.  Specify that we want active scanning and start the
  // scan to run for 30 seconds.
  BLEScan* pBLEScan = BLEDevice::getScan();
  pBLEScan->setAdvertisedDeviceCallbacks(new MyAdvertisedDeviceCallbacks());
  pBLEScan->setActiveScan(true);
  pBLEScan->start(30);
}

void loop() {
  // If the flag "doConnect" is true then we have scanned for and found the desired
  // BLE Server with which we wish to connect.  Now we connect to it.  Once we are
  // connected we set the connected flag to be true.
  if (doConnect == true) {
    if (connectToServer(*pServerAddress)) {
      Serial.println("We are now connected to the BLE Server.");
      //Activate the Notify property of each Characteristic
      temperatureCharacteristic->getDescriptor(BLEUUID((uint16_t)0x2902))->writeValue((uint8_t*)notificationOn, 2, true);
      humidityCharacteristic->getDescriptor(BLEUUID((uint16_t)0x2902))->writeValue((uint8_t*)notificationOn, 2, true);
      connected = true;
    } else {
      Serial.println("We have failed to connect to the server; Restart your device to scan for nearby BLE server again.");
    }
    doConnect = false;
  }
  //if new temperature readings are available, print in the OLED
  if (newTemperature && newHumidity){
    newTemperature = false;
    newHumidity = false;
    printReadings();
  }
  delay(1000); // Delay a second between loops.
}
코드가 작동하는 방식을 알아보려면 계속 읽거나 데모 섹션으로 건너뛰세요.
라이브러리 가져오기
먼저 필요한 라이브러리를 가져옵니다.
#include "BLEDevice.h"
#include <Wire.h>
#include <Adafruit_SSD1306.h>
#include <Adafruit_GFX.h>
온도 단위 선택
기본적으로 클라이언트는 섭씨 단위로 온도를 받게 되지만, 다음 줄에 주석을 달거나 삭제하면 화씨 단위로 온도를 받게 됩니다.
//Default Temperature is in Celsius
//Comment the next line for Temperature in Fahrenheit
#define temperatureCelsius
BLE 서버 이름 및 UUID
그런 다음 연결하려는 BLE 서버 이름과 읽고자 하는 서비스 및 특성 UUID를 정의합니다. 기본 BLE 서버 이름과 UUID를 그대로 두고 서버 스케치에 정의된 것과 일치시킵니다.
//BLE Server name (the other ESP32 name running the server sketch)
#define bleServerName "BME280_ESP32"

/* UUID's of the service, characteristic that we want to read*/
// BLE Service
static BLEUUID bmeServiceUUID("91bad492-b950-4226-aa2b-4ede9fa42f59");

// BLE Characteristics
#ifdef temperatureCelsius
  //Temperature Celsius Characteristic
  static BLEUUID temperatureCharacteristicUUID("cba1d466-344c-4be3-ab3f-189f80dd7518");
#else
  //Temperature Fahrenheit Characteristic
  static BLEUUID temperatureCharacteristicUUID("f78ebbff-c8b7-4107-93de-889a6a06d408");
#endif

// Humidity Characteristic
static BLEUUID humidityCharacteristicUUID("ca73b3ba-39f6-4ab3-91ae-186dc9577d99");
변수 선언
그런 다음, 나중에 Bluetooth에서 서버에 연결되었는지 여부를 확인하는 데 사용할 일부 변수를 선언해야 합니다.
//Flags stating if should begin connecting and if the connection is up
static boolean doConnect = false;
static boolean connected = false;
연결하려는 서버의 주소를 참조하는 BLEAddress 유형의 변수를 생성합니다. 이 주소는 스캔 중에 찾을 수 있습니다.
//Address of the peripheral device. Address will be found during scanning...
static BLEAddress *pServerAddress;
읽고 싶은 특성(온도와 습도)을 설정합니다.
//Characteristicd that we want to read
static BLERemoteCharacteristic* temperatureCharacteristic;
static BLERemoteCharacteristic* humidityCharacteristic;
OLED 디스플레이
OLED와 함께 작동하려면 몇 가지 변수를 선언해야 합니다. OLED 너비와 높이를 정의합니다.
#define SCREEN_WIDTH 128 // OLED display width, in pixels
#define SCREEN_HEIGHT 64 // OLED display height, in pixels
이전에 정의한 너비와 높이로 OLED 디스플레이를 인스턴스화합니다.
Adafruit_SSD1306 display(SCREEN_WIDTH, SCREEN_HEIGHT, &Wire);
온도 및 습도 변수
서버에서 수신한 온도 및 습도 값을 보관할 char 변수를 정의합니다.
//Variables to store temperature and humidity
char* temperatureChar;
char* humidityChar;
다음 변수는 새로운 온도 및 습도 판독값이 있는지 확인하고 OLED 디스플레이를 업데이트할 시기인지 확인하는 데 사용됩니다.
//Flags to check whether new temperature and humidity readings are available
boolean newTemperature = false;
boolean newHumidity = false;
printReading()
우리는 라는 함수를 생성했습니다인쇄 판독()OLED 디스플레이에 온도와 습도 측정값을 표시합니다.
void printReadings(){

  display.clearDisplay();
  // display temperature
  display.setTextSize(1);
  display.setCursor(0,0);
  display.print("Temperature: ");
  display.setTextSize(2);
  display.setCursor(0,10);
  display.print(temperatureChar);
  display.print(" ");
  display.setTextSize(1);
  display.cp437(true);
  display.write(167);
  display.setTextSize(2);
  Serial.print("Temperature:");
  Serial.print(temperatureChar);
  #ifdef temperatureCelsius
    //Temperature Celsius
    display.print("C");
    Serial.print("C");
  #else
    //Temperature Fahrenheit
    display.print("F");
    Serial.print("F");
  #endif

  //display humidity
  display.setTextSize(1);
  display.setCursor(0, 35);
  display.print("Humidity: ");
  display.setTextSize(2);
  display.setCursor(0, 45);
  display.print(humidityChar);
  display.print("%");
  display.display();
  Serial.print(" Humidity:");
  Serial.print(humidityChar);
  Serial.println("%");
}
추천 독서: Arduino IDE를 사용한 ESP32 OLED 디스플레이
setup()
setup()에서 OLED 디스플레이를 시작합니다.
//OLED display setup
// SSD1306_SWITCHCAPVCC = generate display voltage from 3.3V internally
if(!display.begin(SSD1306_SWITCHCAPVCC, 0x3C)) { // Address 0x3C for 128x32
  Serial.println(F("SSD1306 allocation failed"));
  for(;;); // Don't proceed, loop forever
}
그런 다음 첫 번째 줄에 "BME SENSOR"라는 메시지를 인쇄합니다.
display.clearDisplay();
display.setTextSize(2);
display.setTextColor(WHITE,0);
display.setCursor(0,25);
display.print("BLE Client");
display.display();
115200의 통신 속도로 직렬 통신을 시작합니다.
Serial.begin(115200);
BLE 장치를 초기화합니다.
//Init BLE device
BLEDevice::init("");
근처 장치 검색
다음 방법은 근처 장치를 검색합니다.
// Retrieve a Scanner and set the callback we want to use to be informed when we
// have detected a new device.  Specify that we want active scanning and start the
// scan to run for 30 seconds.
BLEScan* pBLEScan = BLEDevice::getScan();
pBLEScan->setAdvertisedDeviceCallbacks(new MyAdvertisedDeviceCallbacks());
pBLEScan->setActiveScan(true);
pBLEScan->start(30);
MyAdvertisedDeviceCallbacks() 함수
참고 사항내 광고된 장치 콜백()기능은 BLE 장치를 찾으면 찾은 장치에 올바른 BLE 서버 이름이 있는지 확인합니다. 있으면 스캔을 중지하고 doConnect 부울 변수를 True로 변경합니다. 이렇게 하면 원하는 서버를 찾았다는 것을 알 수 있고, 연결 설정을 시작할 수 있습니다.
//Callback function that gets called, when another device's advertisement has been received
class MyAdvertisedDeviceCallbacks: public BLEAdvertisedDeviceCallbacks {
  void onResult(BLEAdvertisedDevice advertisedDevice) {
    if (advertisedDevice.getName() == bleServerName) { //Check if the name of the advertiser matches
      advertisedDevice.getScan()->stop(); //Scan can be stopped, we found what we are looking for
      pServerAddress = new BLEAddress(advertisedDevice.getAddress()); //Address of advertiser is the one we need
      doConnect = true; //Set indicator, stating that we are ready to connect
      Serial.println("Device found. Connecting!");
    }
  }
};
서버에 연결
doConnect 변수가 참이면 BLE 서버에 연결을 시도합니다. connectToServer() 함수는 클라이언트와 서버 간의 연결을 처리합니다.
//Connect to the BLE Server that has the name, Service, and Characteristics
bool connectToServer(BLEAddress pAddress) {
   BLEClient* pClient = BLEDevice::createClient();

  // Connect to the remove BLE Server.
  pClient->connect(pAddress);
  Serial.println(" - Connected to server");

  // Obtain a reference to the service we are after in the remote BLE server.
  BLERemoteService* pRemoteService = pClient->getService(bmeServiceUUID);
  if (pRemoteService == nullptr) {
    Serial.print("Failed to find our service UUID: ");
    Serial.println(bmeServiceUUID.toString().c_str());
    return (false);
  }

  // Obtain a reference to the characteristics in the service of the remote BLE server.
  temperatureCharacteristic = pRemoteService->getCharacteristic(temperatureCharacteristicUUID);
  humidityCharacteristic = pRemoteService->getCharacteristic(humidityCharacteristicUUID);

  if (temperatureCharacteristic == nullptr || humidityCharacteristic == nullptr) {
    Serial.print("Failed to find our characteristic UUID");
    return false;
  }
  Serial.println(" - Found our characteristics");

  //Assign callback functions for the Characteristics
  temperatureCharacteristic->registerForNotify(temperatureNotifyCallback);
  humidityCharacteristic->registerForNotify(humidityNotifyCallback);
  return true;
}
또한 새 값을 받을 때 발생하는 일을 처리하는 콜백 함수도 할당합니다.
//Assign callback functions for the Characteristics
temperatureCharacteristic->registerForNotify(temperatureNotifyCallback);
humidityCharacteristic->registerForNotify(humidityNotifyCallback);
BLE 클라이언트가 서버에 연결되면 각 특성에 대해 알림 속성을 활성화해야 합니다. 이를 위해 다음을 사용합니다. writeValue() 설명자에 대한 메서드입니다.
if (connectToServer(*pServerAddress)) {
  Serial.println("We are now connected to the BLE Server.");
  //Activate the Notify property of each Characteristic
  temperatureCharacteristic->getDescriptor(BLEUUID((uint16_t)0x2902))->writeValue((uint8_t*)notificationOn, 2, true);
  humidityCharacteristic->getDescriptor(BLEUUID((uint16_t)0x2902))->writeValue((uint8_t*)notificationOn, 2, true);
새로운 값을 알림
클라이언트가 새 알림 값을 받으면 새 값을 검색하는 온도NotifyCallback() 및 습도NotifyCallback() 함수를 호출하여 OLED를 새 판독값으로 업데이트하고 직렬 모니터에 출력하는 두 가지 함수를 호출합니다.
//When the BLE Server sends a new temperature reading with the notify property
static void temperatureNotifyCallback(BLERemoteCharacteristic* pBLERemoteCharacteristic,
                                        uint8_t* pData, size_t length, bool isNotify) {
  //store temperature value
  temperatureChar = (char*)pData;
  newTemperature = true;
}

//When the BLE Server sends a new humidity reading with the notify property
static void humidityNotifyCallback(BLERemoteCharacteristic* pBLERemoteCharacteristic,
                                    uint8_t* pData, size_t length, bool isNotify) {
  //store humidity value
  humidityChar = (char*)pData;
  newHumidity = true;
  Serial.print(newHumidity);
}
앞의 두 함수는 BLE 서버가 클라이언트에 새 값을 알릴 때마다 실행되며, 30초마다 실행됩니다. 이 함수는 온도 문자 및 습도 문자 변수에 수신된 값을 저장합니다. 또한 새로운 판독값을 수신했음을 알 수 있도록 newTemperature 및 newHumidity 변수를 true로 변경합니다.
새로운 온도 및 습도 판독값 표시
loop() 함수에는 새 판독값이 있는지 확인하는 if 문이 있습니다. 새로운 판독값이 있는 경우, 나중에 새로운 판독값을 수신할 수 있도록 newTemperature 및 newHumidity 변수를 false로 설정합니다. 그런 다음 printReadings() 함수를 호출하여 OLED에 판독값을 표시합니다.
//if new temperature readings are available, print in the OLED
if (newTemperature && newHumidity){
  newTemperature = false;
  newHumidity = false;
  printReadings();
}
프로젝트 테스트
코드는 여기까지입니다. ESP32 보드에 업로드할 수 있습니다.
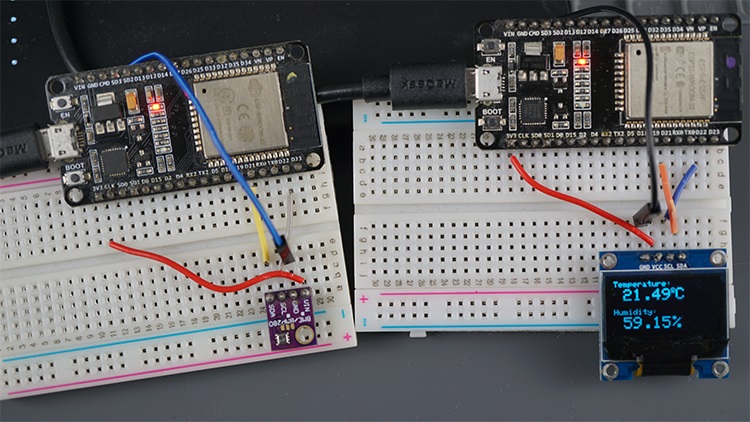
코드가 업로드되면 ESP32 BLE 서버에 전원을 공급한 다음 클라이언트 스케치로 ESP32에 전원을 공급합니다. 클라이언트는 근처 기기를 스캔하기 시작하고 다른 ESP32를 찾으면 블루투스 연결을 설정합니다. 30초마다 최신 판독값으로 디스플레이를 업데이트합니다.

ESP32 BLE 클라이언트 서버 OLED 디스플레이 데모
중요: 스마트폰을 BLE 서버에서 분리하는 것을 잊지 마세요. 그렇지 않으면 ESP32 BLE 클라이언트가 서버에 연결할 수 없습니다.
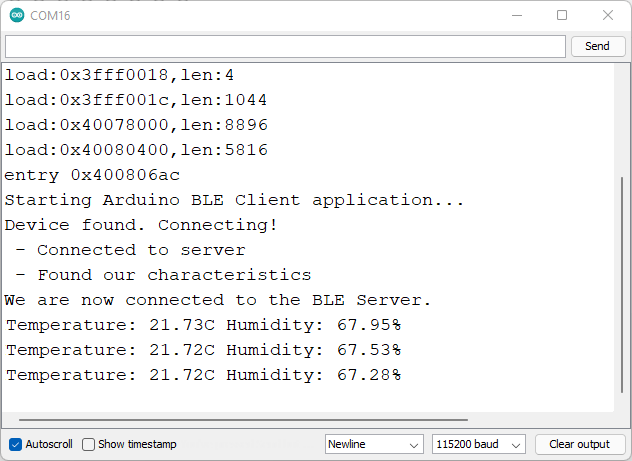
ESP32 BLE 클라이언트가 ESP32 BLE 서버 직렬 모니터에 연결됨
마무리하기
이 튜토리얼에서는 ESP32로 BLE 서버와 BLE 클라이언트를 만드는 방법을 배웠습니다. BLE 서버 특성에 새로운 온도 및 습도 값을 설정하는 방법을 배웠습니다. 그런 다음 다른 BLE 장치(클라이언트)가 해당 서버에 연결하여 해당 특성 값을 읽어 최신 온도 및 습도 값을 얻을 수 있습니다. 해당 특성에는 notify 속성이 있으므로 클라이언트는 새 값이 있을 때마다 알림을 받습니다.
BLE를 사용하는 것은 Wi-Fi 외에도 ESP32 보드에서 사용할 수 있는 또 다른 통신 프로토콜입니다. 이 튜토리얼이 유용했기를 바랍니다. 유용하다고 생각될 수 있는 다른 통신 프로토콜에 대한 튜토리얼이 있습니다.
- ESP32 Bluetooth Classic with Arduino IDE – Getting Started
- ESP32 Useful Wi-Fi Library Functions (Arduino IDE)
- ESP-MESH with ESP32 and ESP8266: Getting Started (painlessMesh library)
- Getting Started with ESP-NOW (ESP32 with Arduino IDE)
더 많은 것들을 배워보세요. 배움을 멈추지 마세요. 더불어 절대 포기하지 마세요.
'ESP32' 카테고리의 다른 글
| ESP32 및 ESP8266을 사용한 ESP-MESH 시작하기 (1) | 2025.01.09 |
|---|---|
| ESP32 WebSocket 서버와 제어 출력 (0) | 2025.01.09 |
| ESP32 ESP-NOW 시작하기 (0) | 2025.01.08 |
| ESP32 MQTT 메시지를 게시하고 토픽을 구독하는 방법 (0) | 2025.01.08 |
| ESP32 Bluetooth Low Energy(BLE) 시작하기 (1) | 2025.01.06 |
| ESP32 LoRa 송신 수신기 제작 방법 (0) | 2025.01.06 |
| ESP32 웨이크업 소스를 사용한 Deep Sleep (1) | 2025.01.03 |
| ESP32 인터럽트와 타이머를 사용한 PIR 모션 센서 (3) | 2025.01.03 |
더욱 좋은 정보를 제공하겠습니다.~ ^^


