반응형
지금 만들고 있는 theflow에 꼭 필요해서 찾아 보았다. 일단 OneButton 라이브러리를 사용한 예제를 올려둔다. 사실은 로우 코드를 찾고 있다. 라이브러리를 사용하지 않고 인터럽트나 소프트웨어로 직접 구현한 코드를 더 찾아볼 생각이다. 하나의 입력으로 무려 3가지 형태의 처리 기능을 갖는다. 아주 좋은 코드다.
아두이노 버튼처리 한번, 버튼 길게, 더블 클릭 감지하기
연결도는 따로 그리지 않고, 참고 자료의 동영상 회로를 캡쳐한 이미지다. 소스코드를 참고하면 연결하기에는 어렵지 않을 것이다. 특히 4pin RGB LED 핀 연결에 주의한다.
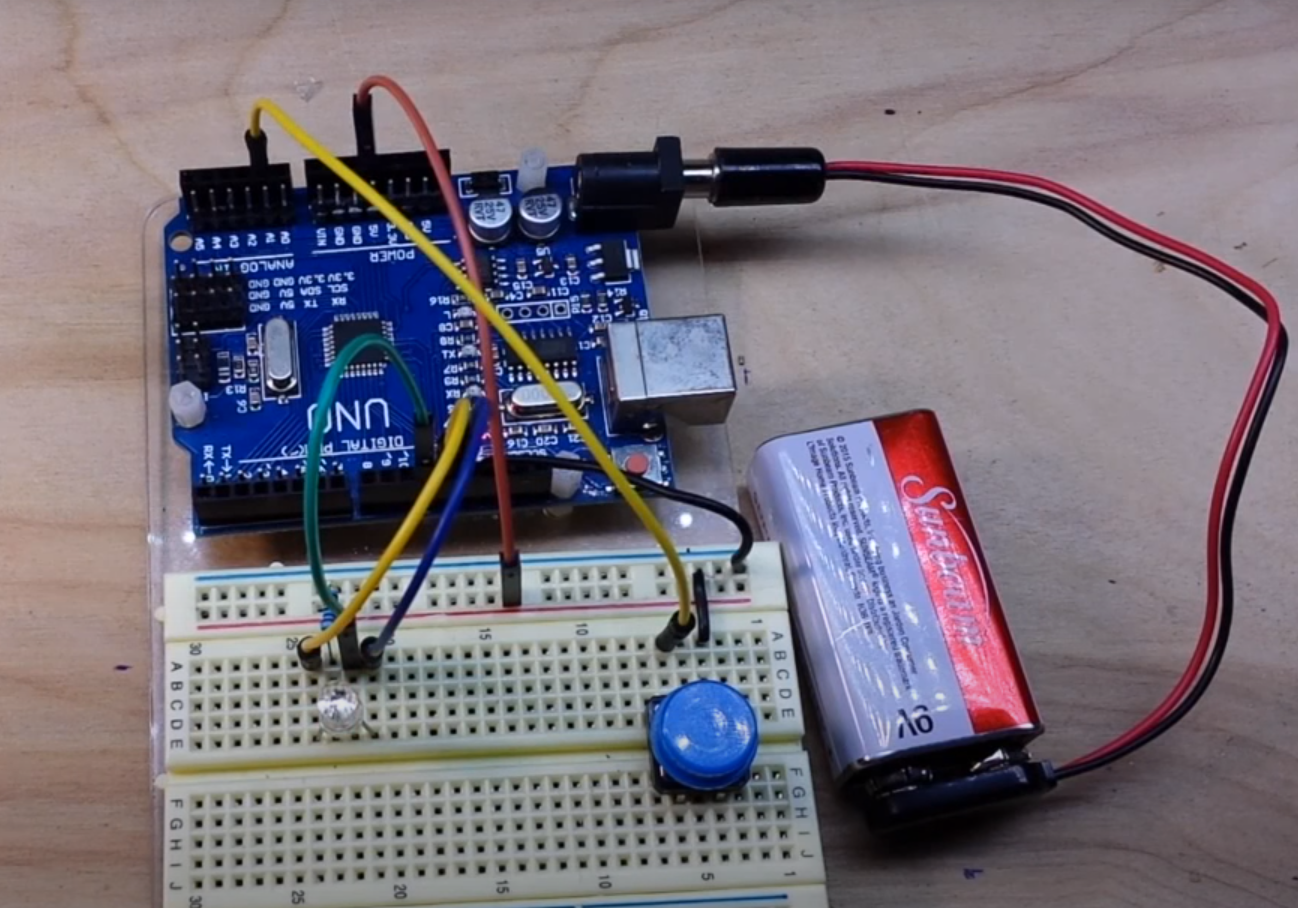
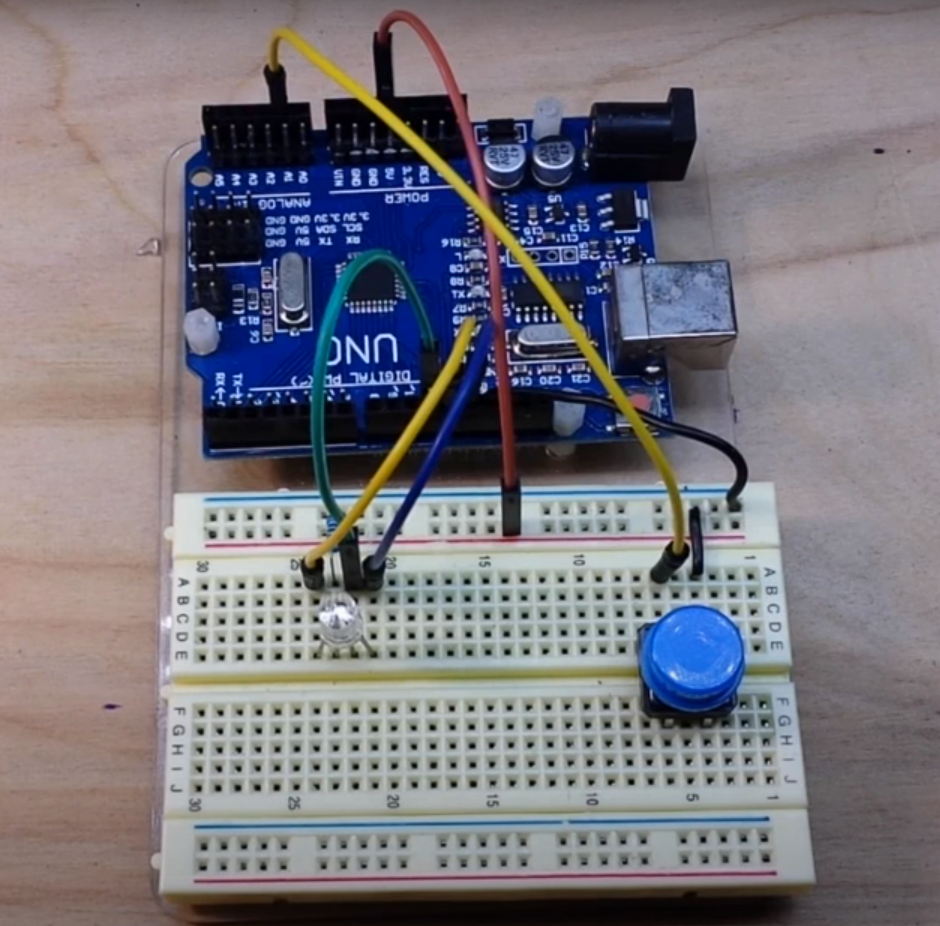
소스코드는 아래와 같다.
/*
 * One Button two button red button blue button
 *
 * learnelectronics
 * 23 Sept 2017
 *
 * www.youtube.com/c/learnelectronics
 * arduino0169@gmail.com
 *
 * Find the library here: http://www.mathertel.de/Arduino/OneButtonLibrary.aspx
 */

#include "OneButton.h"                              //we need the OneButton library

OneButton button(A1, true);                         //attach a button on pin A1 to the library

void setup() {

  pinMode(13, OUTPUT);                              // sets the digital pin as output
  pinMode(12, OUTPUT);                              // sets the digital pin as output
  pinMode(11, OUTPUT);                              // sets the digital pin as output

  button.attachDoubleClick(doubleclick);            // link the function to be called on a doubleclick event.
  button.attachClick(singleclick);                  // link the function to be called on a singleclick event.
  button.attachLongPressStop(longclick);            // link the function to be called on a longpress event.
}

void loop() {

  button.tick();                                    // check the status of the button
  delay(10);                                        // a short wait between checking the button
} // loop

void doubleclick() {                                // what happens when button is double-clicked
 digitalWrite(11,HIGH);                             // light the green LED
 delay(1000);                                       // wait one second
 digitalWrite(11,LOW);                              // turn off green LED
}

void singleclick(){                                 // what happens when the button is clicked
  digitalWrite(12,HIGH);                            // light the red LED
 delay(1000);                                       // wait one second
 digitalWrite(12,LOW);                              // turn off the gren led
}

void longclick(){                                   // what happens when buton is long-pressed
  digitalWrite(13,HIGH);                            // light the blue LED
 delay(1000);                                       // wait one second
 digitalWrite(13,LOW);                              // turn off the blue LED
}
아두이노에서 라이브러리를 사용하지 않고 직접 구현한 코드를 참고하세요. 출처는 링크를 참고하세요.
const byte pinBut = A1;
byte butLst;

//GERRY MOD
//enum { None, SingleClick, DoubleClick };
enum { None, SingleClick, DoubleClick, YesSingle};

// -----------------------------------------------------------------------------
int
chkButton (void)
{
  const  unsigned long ButTimeout  = 250;
  static unsigned long msecLst;
  unsigned long msec = millis ();
  //GERRY MOD
  const int debDuration = 100;
  static unsigned long  debStartTime = 0;

  if (msecLst && (msec - msecLst) > ButTimeout)  {
    msecLst = 0;
	//GERRY MOD
    //return SingleClick;
    return YesSingle;
  }

  byte but = digitalRead (pinBut);
  if (butLst != but)  {
    //GERRY MOD
    if (millis() - debStartTime < debDuration) {
      return None;
    }
    debStartTime = millis();

    butLst = but;

    if (LOW == but)  {   // press
      if (msecLst)  { // 2nd press
        msecLst = 0;
        return DoubleClick;
      }
      else {
        msecLst = 0 == msec ? 1 : msec;
		//GERRY MOD
        return SingleClick; //SINGLE?
      }
    }
  }

  return None;
}

// -----------------------------------------------------------------------------
void
loop ()
{

  switch (chkButton ())  {
    case SingleClick:
      Serial.println ("single?");
      break;

    case DoubleClick:
      Serial.println ("Its double");
      break;

    //GERRY MOD
    case YesSingle:
      Serial.println ("YesSingle");
      break;

  }
}

// -----------------------------------------------------------------------------
void
setup ()
{
  Serial.begin (9600);

  pinMode (pinBut, INPUT_PULLUP);
  butLst = digitalRead (pinBut);
}
참고
영상 - Arduino로 짧은, 긴 및 두 번 클릭을 감지하는 방법
반응형
'개발자 > Arduino' 카테고리의 다른 글
| 아두이노 가변 저항 7-segment 에 표시하기 smart knob (0) | 2022.04.04 |
|---|---|
| 아두이노 dht22 온도 습도 센서 테스트 (0) | 2022.04.04 |
| 아두아노 millis()함수 시간 다루기 (0) | 2022.04.04 |
| 4 Digit 7 Segment Display 아두이노 제어 (0) | 2022.03.31 |
| ATtiny13a 기반 가장 작은 제어 시스템 (0) | 2022.03.03 |
| Arduino 에서 ATtiny13, ATtiny13a 프로그래밍하는 방법 (0) | 2022.02.18 |
| Nano 33 IoT 보드 IoT Application (0) | 2022.02.16 |
| Adafruit Feather nRF52840 05. 씨리얼 포트 인식 해결 (0) | 2022.02.11 |
더욱 좋은 정보를 제공하겠습니다.~ ^^


