RFID RC522 모듈을 테스트하기 전에 반드시 알아야 할 사항은 다음과 같다.
1. 파이선 2.7x 버전에서 시험할 것. 코드가 옛날 코드다. 3.x 번전은 Python3 어쩌고 하면서 실행하니까 어려운 일은 아니다.
2. MFRC522 설치할 때 Git 버전을 roll back 하는 명령을 반드시 실행한다.
3. 라즈베리파이의 CE0(물리번호 24번)을 사용할 경우에는 그대로 코드를 사용하고, CE1(물리번호 26번)을 사용하는 경우는 반드시 MFRC522.py 파일을 수정할 것
일단 RFID 카드에 대한 내용은 다음 내용을 참고한다. 아래 실습은 따라 하지 마세요. 라즈베리파이 4 스마트홈 RFID RC522 실습 11
라즈베리파이4 스마트홈 RFID RC522 실습 11
스마트홈 시스템에서는 Doorlock 의 개폐 인증을 위해 RFID를 사용하였다. 응용분야가 많은 만큼 RFID 에 대해 자세하게 알아보자. RFID란 RFID(전파식별 : Radio Frequency IDentification)란 라디오파(Radio Wave)
fishpoint.tistory.com
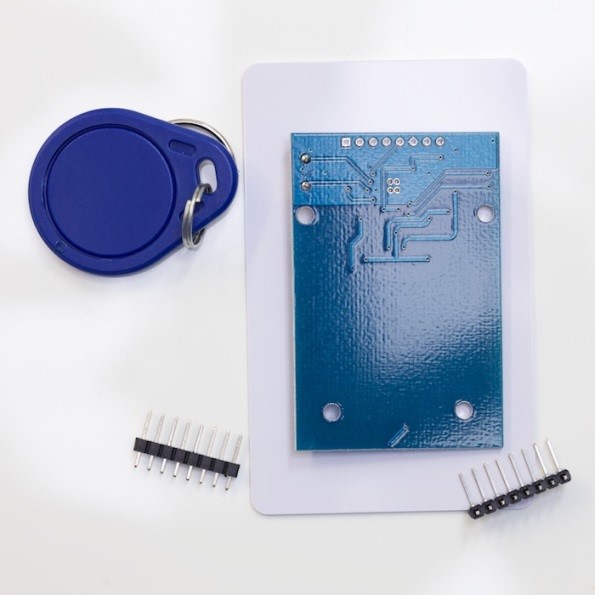
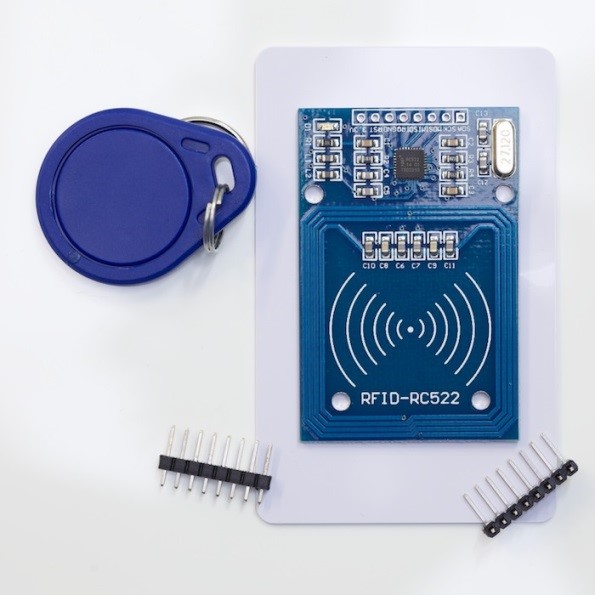
여기서 에스트 하는 RFID Card Reader/Detector Module Kit (13.56 Mhz, RC522, S50, Mifare One) 이미지는 아래와 같다.


참고로 아래 테이블에 상세 Specification을 나타내었다.
| Specification: |
| Module Name: MF522-ED Working current:13—26mA/ DC 3.3V Standby current:10-13mA/DC 3.3V sleeping current:<80uA peak current:<30mA Working frequency:13.56MHz Card reading distance :0~60mm(mifare1 card) Protocol:SPI data communication speed:Maximum 10Mbit/s Card types supported:mifare1 S50、mifare1 S70、mifare UltraLight、mifare Pro、mifare Desfire Dimension:40mm×60mm Environment Working temperature:-20—80 degree Storage temperature:-40—85 degree Humidity:relevant humidity 5%—95% Max SPI speed: 10Mbit/s |
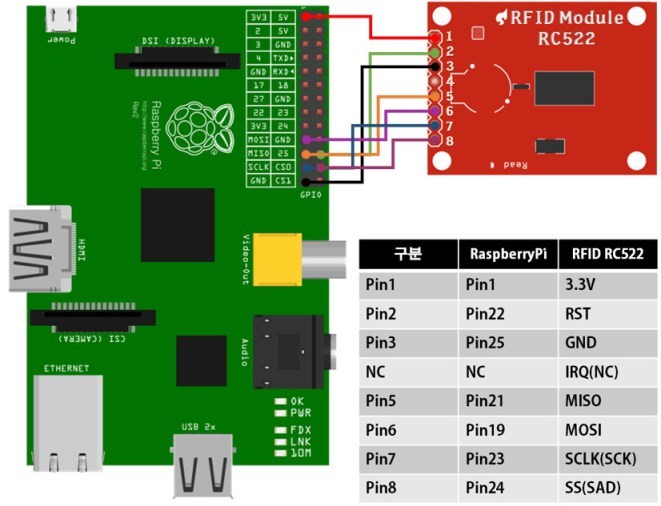
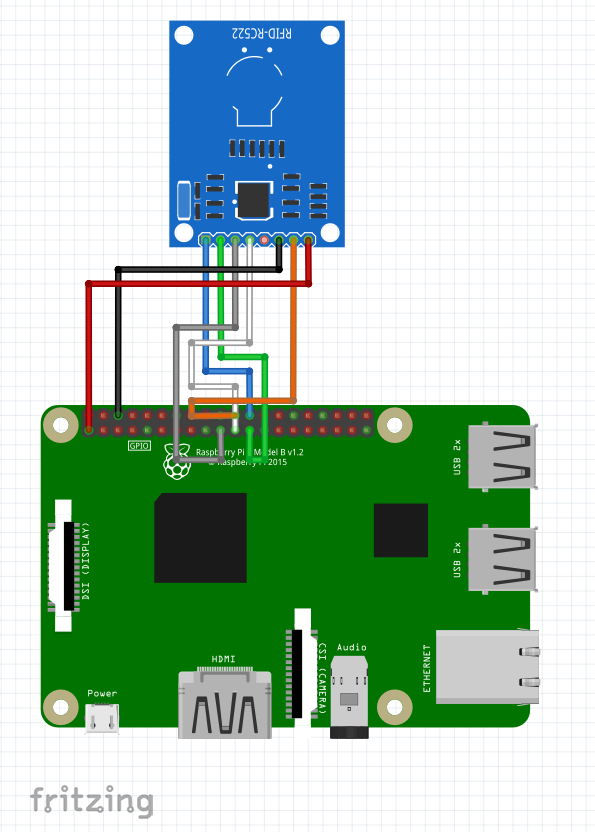
스마트홈 시스템에서 결선도는 아래와 같다. 초기 구현 버전이라서 라즈베리파이가 구형이다. 업데이트가 필요하다.


핀 연결은 아래와 같다.
- SDA <--> 24 // 혹시 CE1을 사용한다면 26번에 연결되어 있을 것이다.
- SCK <--> 23
- MOSI <--> 19
- MISO <--> 21
- IRQ <--> UNUSED
- GND <--> 6
- RST <--> 22
- 3.3V <--> 1
$sudo raspi-config 명령을 실행하여 interface 항목에서 SPI 포트를 enable 시킨다.
파이썬 모듈을 사용하기 위해서 SPI wrapper 가 필요하다. 우선 'python-dev'를 인스톨하여 환경을 구성한다. 'python-dev’를 인스톨하기 위해 다음 명령어를 사용한다.
$sudo apt-get install python-dev
파이선 버전 확인
pi@raspberrypi:~ $ python --version
Python 2.7.16
SPI 포트 활성화 확인
pi@raspberrypi:~ $ lsmod | grep spi
spidev                 20480  0
spi_bcm2835            24576  0
SPI 버스로부터 데이터를 읽기 위해 필요한 함수들은 SPI-Py 집합에 있는데 이것은 github를 통해 구할 수 있다. 인스톨하기 위해 SPI-Py 라이브러리를 그대로 카피한다. 이것은 파이썬 SPI 라이브러리를 사용하기 위한 소스코드들이다.
$ git clone http://github.com/lthiery/SPI-Py.git
위 라이브러리를 롤 백을 수행한다.
pi@raspberrypi:~ $ cd SPI-Py/

pi@raspberrypi:~/SPI-Py $ git checkout 8cce26b9ee6e69eb041e9d5665944b88688fca68

output: Notice: '8cce26b9ee6e69eb041e9d5665944b88688fca68' checkout.

~

~

~

Current position of HEADER 8cce26b realized I can't make the license looser
pi@raspberrypi:~ $ cd SPI-Py/
pi@raspberrypi:~/SPI-Py $ git checkout 8cce26b9ee6e69eb041e9d5665944b88688fca68
output: Notice: '8cce26b9ee6e69eb041e9d5665944b88688fca68' checkout.
~
~
~
Current position of HEADER 8cce26b realized I can't make the license looser
인스톨한다.
pi@raspberrypi:~/SPI-Py $ sudo python setup.py install인스톨할 때 보이는 화면 내용은 아래와 같다.
pi@raspberrypi:~/SPI-Py $ sudo python setup.py install
running install
running build
running build_ext
building 'spi' extension
creating build
creating build/temp.linux-armv7l-2.7
arm-linux-gnueabihf-gcc -pthread -DNDEBUG -g -fwrapv -O2 -Wall -Wstrict-prototypes -fno-strict-aliasing -Wdate-time -D_FORTIFY_SOURCE=2 -g -fdebug-prefix-map=/build/python2.7-InigCj/python2.7-2.7.16=. -fstack-protector-strong -Wformat -Werror=format-security -fPIC -I/usr/include/python2.7 -c spi.c -o build/temp.linux-armv7l-2.7/spi.o
creating build/lib.linux-armv7l-2.7
arm-linux-gnueabihf-gcc -pthread -shared -Wl,-O1 -Wl,-Bsymbolic-functions -Wl,-z,relro -fno-strict-aliasing -DNDEBUG -g -fwrapv -O2 -Wall -Wstrict-prototypes -Wdate-time -D_FORTIFY_SOURCE=2 -g -fdebug-prefix-map=/build/python2.7-InigCj/python2.7-2.7.16=. -fstack-protector-strong -Wformat -Werror=format-security -Wl,-z,relro -Wdate-time -D_FORTIFY_SOURCE=2 -g -fdebug-prefix-map=/build/python2.7-InigCj/python2.7-2.7.16=. -fstack-protector-strong -Wformat -Werror=format-security build/temp.linux-armv7l-2.7/spi.o -o build/lib.linux-armv7l-2.7/spi.so
running install_lib
copying build/lib.linux-armv7l-2.7/spi.so -> /usr/local/lib/python2.7/dist-packages
running install_egg_info
Writing /usr/local/lib/python2.7/dist-packages/SPI_Py-1.0.egg-info
MFRC522 파이선 코드를 내려받는다. 반드시 다운 폴더는 아래에 보이는 폴더에 한다.
pi@raspberrypi:~/SPI-Py $ git clone https://github.com/mxgxw/MFRC522-python.git
실행 명령과 화면 코드다.
pi@raspberrypi:~/SPI-Py $ git clone https://github.com/mxgxw/MFRC522-python.git
'MFRC522-python' Copy...
remote: Enumerating objects: 109, done.
remote: Total 109 (delta 0), reused 0 (delta 0), pack-reused 109
downloading object: 100% (109/109), 36.57 KiB | 5.22 MiB/s, complete.
Delta ~~~: 100% (47/47), complete.
폴더를 이동한다.
pi@raspberrypi:~/SPI-Py $ cd MFRC522-python/
혹시 CE1을 사용한다면 $nano MFRC522.py 파일을 열어서 110라인 근처 코드 한 줄을 다음과 같이 코드를 수정한다.
Here, on line 110 of the MFRC522.py file, we'll use the
def __init__(self, dev='/dev/spidev0.0', spd=1000000):

-->>>> modify it like this.

def __init__(self, dev='/dev/spidev0.1', spd=1000000):
아래는 찾기 쉽도록 더 많은 코드를 보여준다.
TestADCReg      = 0x3B
  Reserved31      = 0x3C
  Reserved32      = 0x3D
  Reserved33      = 0x3E
  Reserved34      = 0x3F

  serNum = []

  def __init__(self, dev='/dev/spidev0.0', spd=1000000):  // 여기여기
    spi.openSPI(device=dev,speed=spd)
    GPIO.setmode(GPIO.BOARD)
    GPIO.setup(self.NRSTPD, GPIO.OUT)
    GPIO.output(self.NRSTPD, 1)
    self.MFRC522_Init()
이것을 dev=/dev/spidev0.0’ 을 반드시 dev=/dev/spidev0.1 로 바꾸어 준다.
TestADCReg      = 0x3B
  Reserved31      = 0x3C
  Reserved32      = 0x3D
  Reserved33      = 0x3E
  Reserved34      = 0x3F

  serNum = []

  def __init__(self, dev='/dev/spidev0.1', spd=1000000): //여기여기
    spi.openSPI(device=dev,speed=spd)
    GPIO.setmode(GPIO.BOARD)
    GPIO.setup(self.NRSTPD, GPIO.OUT)
    GPIO.output(self.NRSTPD, 1)
    self.MFRC522_Init()
다 되었다. 아래는 실행을 보여준다.
pi@raspberrypi:~/SPI-Py/MFRC522-python $ python Read.py
Welcome to the MFRC522 data read example
Press Ctrl-C to stop.
Card detected
Card read UID: 124,201,112,4
Size: 8
Sector 8 [0, 0, 0, 0, 0, 0, 0, 0, 0, 0, 0, 0, 0, 0, 0, 0]
Card detected
Card read UID: 124,201,112,4
Size: 8
Sector 8 [0, 0, 0, 0, 0, 0, 0, 0, 0, 0, 0, 0, 0, 0, 0, 0]
Card detected
Card read UID: 124,201,112,4
Size: 8
Sector 8 [0, 0, 0, 0, 0, 0, 0, 0, 0, 0, 0, 0, 0, 0, 0, 0]
Card detected
Card read UID: 124,201,112,4
Size: 8
Sector 8 [0, 0, 0, 0, 0, 0, 0, 0, 0, 0, 0, 0, 0, 0, 0, 0]
Card detected
Card read UID: 124,201,112,4
Size: 8
[참고사이트]
RFID RC522(raspberry Pi) 가장 처음 자료
SPI-Py 라이브러리 roll back 문제 해결 참고 - 두 번째 답변에 있다
파이선3 방식으로 다루는 예제 - 이거 하다가 안됨. CE1 연결 시 해결 방법 없어서 ㅠ.ㅠ
또 하나의 일이 어렵게 끝났다. SD 카드 16Gb 굽는데 20분이 걸린다. 테스트를 하는데 10분이 걸린다. 이걸 5번 하면서 테스트하고 다시 굽고 문서 작성하고 확인하는 일을 반복한다. 이건 약과라는 것을 잘 안다. 이런 건 아무것도 아니다. 어느 분야나 같다. 늘 이런 기분을 느끼며 사는 것은 아니다. 작은 성취감, 그게 또 반복되고, 희망적이고, 더 큰 도전을 하고... 이상에 불과하다. 우린 늘 우울하다. 조용하다. 아무 일이 없다. 그 순간을 잘 견뎌야 한다. 늘 중요한 말은 제일 마지막에 한다. 너무 멋지다. 진실은 늘 가장 밑바닥에 가라앉아 있다.
끝났다. 남자는 일이 손에 안 잡히고 하기 싫어도 끝까지 자리를 지킨다. 놀면서도 지킨다. 그러면 언젠가는 끝내야 하는 시간이 온다. 누구는 시간 낭비다. 안되면 접고 다른 일하라. 머, 이런 이야기를 하는데 절박할 때 절박한 방법이 나온다. 끝까지 물고 늘어진다. 그게 내 방식이다. 강한 자들이 강하게 사는 방식이다.
'개발자 > 라즈베리파이4' 카테고리의 다른 글
| 라즈베리파이4 파이선 버튼 입력 제어 (2) | 2023.10.26 |
|---|---|
| 라즈베리파이4 파이선 LED 제어 (1) | 2023.10.26 |
| 라즈베리파이4 UART 6개 활성화 방법 (2) | 2023.10.26 |
| 라즈베리파이 Pico 정리 잘된 곳 (0) | 2023.07.24 |
| 라즈베리파이4 스마트홈 안드로이드 앱 설명 16 (0) | 2023.05.31 |
| 라즈베리파이4 스마트홈 서버 프로그램 실습 15 (0) | 2023.05.30 |
| 라즈베리파이4 스마트홈 조명 LED bar 실습 14 (1) | 2023.05.29 |
| 라즈베리파이4 스마트홈 카메라 실습 13 (2) | 2023.05.26 |
취업, 창업의 막막함, 외주 관리, 제품 부재!
당신의 고민은 무엇입니까? 현실과 동떨어진 교육, 실패만 반복하는 외주 계약,
아이디어는 있지만 구현할 기술이 없는 막막함.
우리는 알고 있습니다. 문제의 원인은 '명확한 학습, 실전 경험과 신뢰할 수 있는 기술력의 부재'에서 시작됩니다.
이제 고민을 멈추고, 캐어랩을 만나세요!
코딩(펌웨어), 전자부품과 디지털 회로설계, PCB 설계 제작, 고객(시장/수출) 발굴과 마케팅 전략으로 당신을 지원합니다.
제품 설계의 고수는 성공이 만든 게 아니라 실패가 만듭니다. 아이디어를 양산 가능한 제품으로!
귀사의 제품을 만드세요. 교육과 개발 실적으로 신뢰할 수 있는 파트너를 확보하세요.
캐어랩


