ESP32 및 ESP8266을 사용한 ESP-MESH: 시작하기(painlessMesh 라이브러리)
ESP32 및 ESP8266 NodeMCU 보드로 메시 네트워크를 구축하기 위해 ESP-MESH 네트워킹 프로토콜을 사용하는 방법을 알아보세요. ESP-MESH를 사용하면 여러 장치(노드)가 단일 무선 LAN(Local Area Network)에서 서로 통신할 수 있습니다. ESP32 및 ESP8266 보드에서 지원됩니다. 이 가이드에서는 Arduino 코어를 사용하여 ESP-MESH를 시작하는 방법을 보여드리겠습니다.

ESP32 및 ESP8266을 사용한 ESP-MESH: 시작하기
이 문서에서는 다음 주제를 다룹니다.
- ESP-MESH 소개
- ESP-MESH 기본 예제(브로드캐스트 메시지)
- ESP-MESH를 사용하여 센서 판독값 교환(브로드캐스트)
Arduino IDE
Arduino IDE를 사용하여 ESP32 및 ESP8266 보드를 프로그래밍하려면 ESP32 또는 ESP8266 애드온이 설치되어 있어야 합니다. 다음 가이드를 따르세요.
Arduino IDE에 ESP32 보드 설치(Windows, Mac OS X, Linux)
Arduino IDE에 ESP8266 보드 설치(Windows, Mac OS X, Linux)
VS Code + PlatformIO를 사용하여 ESP32/ESP8266을 프로그래밍하려면 다음 튜토리얼을 따르세요.
ESP32 및 ESP8266을 위한 VS Code 및 PlatformIO IDE 시작하기(Windows, Mac OS X, Linux Ubuntu)
ESP-MESH 소개
Espressif 설명서에 따르면: “ESP-MESH는 Wi-Fi 프로토콜을 기반으로 구축된 네트워킹 프로토콜입니다. ESP-MESH를 사용하면 넓은 물리적 영역(실내 및 실외 모두)에 분산된 여러 장치(노드라고 함)를 단일 WLAN(무선 로컬 영역 네트워크)으로 상호 연결할 수 있습니다.
ESP-MESH는 자체 구성 및 자체 복구가 가능하므로 네트워크를 자율적으로 구축하고 유지 관리할 수 있습니다.” 자세한 내용은 ESP-MESH 공식 문서를 참조하세요.
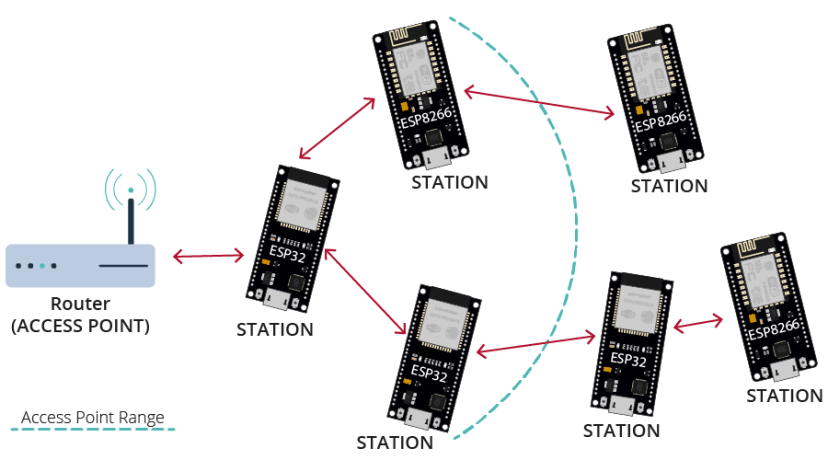
기존 Wi-Fi 네트워크 아키텍처
기존 Wi-Fi 네트워크 아키텍처에서 단일 노드(액세스 포인트 - 일반적으로 라우터)는 다른 모든 노드(스테이션)에 연결됩니다. 각 노드는 액세스 포인트를 사용하여 서로 통신할 수 있습니다. 그러나 이는 액세스 포인트 Wi-Fi 범위로 제한됩니다. 모든 스테이션은 액세스 포인트에 직접 연결할 수 있는 범위 내에 있어야 합니다. ESP-MESH에서는 이런 일이 발생하지 않습니다.

기존 Wi-Fi 네트워크 ESP32 ESP8266
ESP-MESH 네트워크 아키텍처
ESP-MESH를 사용하면 노드가 중앙 노드에 연결할 필요가 없습니다. 노드는 서로의 전송을 중계해야 합니다. 이를 통해 여러 장치가 넓은 물리적 영역에 분산될 수 있습니다. 노드는 자체 구성되고 동적으로 서로 통신하여 패킷이 최종 노드 목적지에 도달하도록 할 수 있습니다. 노드가 네트워크에서 제거되면 패킷이 목적지에 도달하도록 자체 구성할 수 있습니다.
ESP-MESH 네트워크 ESP32 ESP8266
painlessMesh 라이브러리
painlessMesh 라이브러리를 사용하면 ESP8266 또는/및 ESP32 보드로 메시 네트워크를 쉽게 만들 수 있습니다.
"painlessMesh는 진정한 임시 네트워크로, 계획, 중앙 컨트롤러 또는 라우터가 필요하지 않습니다. 1개 이상의 노드로 구성된 모든 시스템은 완전히 기능하는 메시로 자체 구성됩니다. 메시의 최대 크기는 하위 연결 버퍼에 할당할 수 있는 힙의 메모리 양에 따라 제한되므로(저희 생각에는) 실제로 상당히 높아야 합니다." painlessMesh 라이브러리에 대한 자세한 정보.
painlessMesh 라이브러리 설치
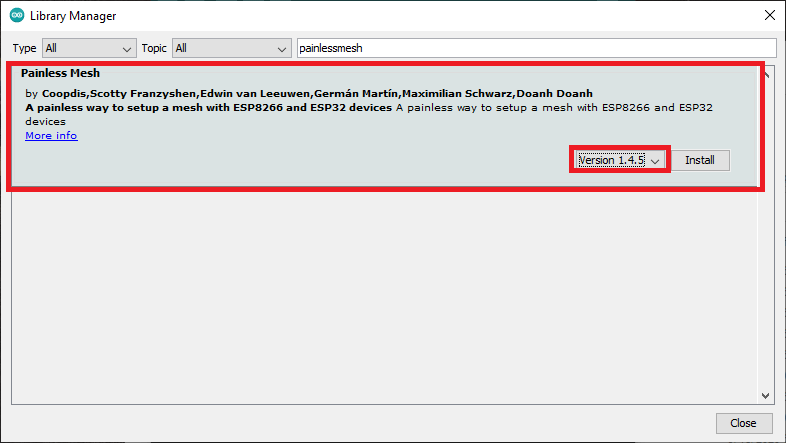
Arduino 라이브러리 관리자를 통해 painlessMesh를 설치할 수 있습니다. 도구 > 라이브러리 관리로 이동합니다. 라이브러리 관리자가 열립니다.
"painlessmesh"를 검색하여 라이브러리를 설치합니다. 버전 1.4.5를 사용하고 있습니다.
painlessMesh 라이브러리 Arduino IDE 설치
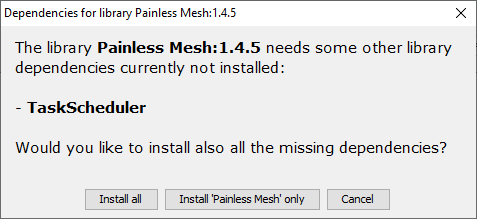
이 라이브러리에는 다른 라이브러리 종속성이 필요합니다. 새 창이 나타나 누락된 종속성을 설치하라는 메시지가 표시됩니다. "모두 설치"를 선택합니다.
Arduino IDE에 painlessmesh 라이브러리 종속성 설치
이 창이 나타나지 않으면 다음 라이브러리 종속성을 설치해야 합니다.
- ArduinoJson(bblanchon 제공)
- TaskScheduler
- ESPAsyncTCP(ESP8266)
- AsyncTCP(ESP32)
PlatformIO를 사용하는 경우 다음 줄을 platformio.ini 파일에 추가하여 라이브러리를 추가하고 모니터 속도를 변경합니다.
ESP32의 경우:
monitor_speed = 115200
lib_deps = painlessmesh/painlessMesh @ ^1.4.5
    ArduinoJson
    arduinoUnity
    TaskScheduler
    AsyncTCP
ESP8266의 경우:
monitor_speed = 115200
lib_deps = painlessmesh/painlessMesh @ ^1.4.5
    ArduinoJson
    TaskScheduler
    ESPAsyncTCP
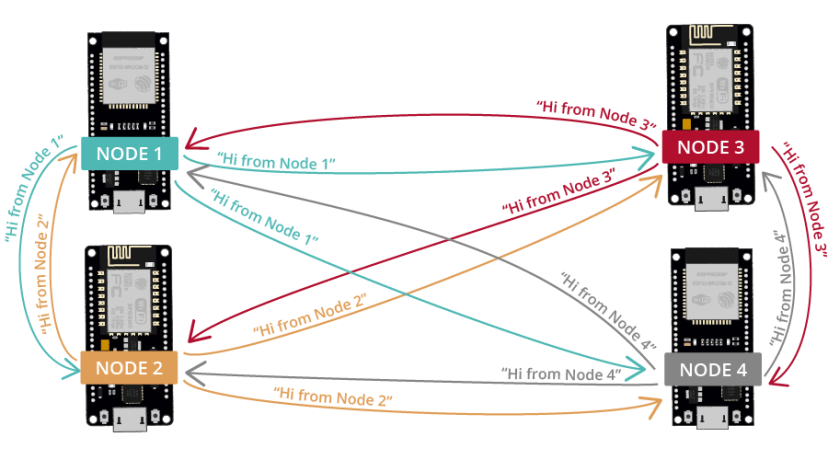
ESP-MESH 기본 예제(브로드캐스트 메시지)
ESP-MESH를 시작하기 위해 먼저 라이브러리의 기본 예제를 실험해 보겠습니다. 이 예제는 모든 보드가 다른 모든 보드에 메시지를 브로드캐스트하는 메시 네트워크를 만듭니다.
이 예제는 4개의 보드(ESP32 2개와 ESP8266 2개)로 실험했습니다. 보드를 추가하거나 제거할 수 있습니다. 이 코드는 ESP32 및 ESP8266 보드와 모두 호환됩니다.
ESP-MESH painlessMesh 기본 예제 ESP32 ESP8266
코드 – painlessMesh 라이브러리 기본 예제
다음 코드를 Arduino IDE에 복사합니다(라이브러리 예제의 코드). 이 코드는 ESP32 및 ESP8266 보드와 모두 호환됩니다.
ESP32를 사용하는 경우 ESP32 보드의 애드온을 버전 2.0.X로 다운그레이드해야 합니다. 현재 painlessMesh 라이브러리는 버전 3.X와 호환되지 않습니다.
/*
  Rui Santos
  Complete project details at https://RandomNerdTutorials.com/esp-mesh-esp32-esp8266-painlessmesh/

  This is a simple example that uses the painlessMesh library: https://github.com/gmag11/painlessMesh/blob/master/examples/basic/basic.ino
*/

#include "painlessMesh.h"

#define   MESH_PREFIX     "whateverYouLike"
#define   MESH_PASSWORD   "somethingSneaky"
#define   MESH_PORT       5555

Scheduler userScheduler; // to control your personal task
painlessMesh  mesh;

// User stub
void sendMessage() ; // Prototype so PlatformIO doesn't complain

Task taskSendMessage( TASK_SECOND * 1 , TASK_FOREVER, &sendMessage );

void sendMessage() {
  String msg = "Hi from node1";
  msg += mesh.getNodeId();
  mesh.sendBroadcast( msg );
  taskSendMessage.setInterval( random( TASK_SECOND * 1, TASK_SECOND * 5 ));
}

// Needed for painless library
void receivedCallback( uint32_t from, String &msg ) {
  Serial.printf("startHere: Received from %u msg=%s\n", from, msg.c_str());
}

void newConnectionCallback(uint32_t nodeId) {
    Serial.printf("--> startHere: New Connection, nodeId = %u\n", nodeId);
}

void changedConnectionCallback() {
  Serial.printf("Changed connections\n");
}

void nodeTimeAdjustedCallback(int32_t offset) {
    Serial.printf("Adjusted time %u. Offset = %d\n", mesh.getNodeTime(),offset);
}

void setup() {
  Serial.begin(115200);

//mesh.setDebugMsgTypes( ERROR | MESH_STATUS | CONNECTION | SYNC | COMMUNICATION | GENERAL | MSG_TYPES | REMOTE ); // all types on
  mesh.setDebugMsgTypes( ERROR | STARTUP );  // set before init() so that you can see startup messages

  mesh.init( MESH_PREFIX, MESH_PASSWORD, &userScheduler, MESH_PORT );
  mesh.onReceive(&receivedCallback);
  mesh.onNewConnection(&newConnectionCallback);
  mesh.onChangedConnections(&changedConnectionCallback);
  mesh.onNodeTimeAdjusted(&nodeTimeAdjustedCallback);

  userScheduler.addTask( taskSendMessage );
  taskSendMessage.enable();
}

void loop() {
  // it will run the user scheduler as well
  mesh.update();
}
코드를 업로드하기 전에 MESH_PREFIX(MESH 네트워크 이름과 같음)와 MESH_PASSWORD 변수(원하는 대로 설정할 수 있음)를 설정할 수 있습니다.
그런 다음 각 보드에 대해 다음 줄을 변경하여 메시지를 보낸 노드를 쉽게 식별하는 것이 좋습니다. 예를 들어 노드 1의 경우 메시지를 다음과 같이 변경합니다.
String msg = "Hi from node 1 ";
코드 작동 방식
painlessMesh 라이브러리를 포함하는 것으로 시작합니다.
#include "painlessMesh.h"
MESH 세부 정보
그런 다음 메시 세부 정보를 추가합니다. MESH_PREFIX는 메시의 이름을 나타냅니다. 원하는 대로 변경할 수 있습니다.
#define MESH_PREFIX "whateverYouLike"
이름에서 알 수 있듯이 MESH_PASSWORD는 메시 비밀번호입니다. 원하는 대로 변경할 수 있습니다.
#define MESH_PASSWORD "somethingSneaky"
메시의 모든 노드는 동일한 MESH_PREFIX 및 MESH_PASSWORD를 사용해야 합니다.
MESH_PORT는 메시 서버를 실행하려는 TCP 포트를 나타냅니다. 기본값은 5555입니다.
#define MESH_PORT 5555
스케줄러
메시 네트워크 코드에서 delay()를 사용하지 않는 것이 좋습니다. 메시를 유지하려면 일부 작업을 백그라운드에서 수행해야 합니다. delay()를 사용하면 이러한 작업이 중단되고 메시가 안정성을 잃거나 분해될 수 있습니다.
대신 painlessMesh 자체에서 사용되는 TaskScheduler를 사용하여 작업을 실행하는 것이 좋습니다.
다음 줄은 userScheduler라는 새 Scheduler를 만듭니다.
Scheduler userScheduler; // 개인 작업을 제어합니다.
painlessMesh
메시 네트워크를 처리하기 위해 mesh라는 painlessMesh 객체를 만듭니다.
작업 만들기
프로그램이 실행되는 동안 매초 sendMessage() 함수를 호출하는 taskSendMessage라는 작업을 만듭니다.
Task taskSendMessage(TASK_SECOND * 1 , TASK_FOREVER, &sendMessage);
메시에 메시지 보내기
sendMessage() 함수는 메시지 네트워크의 모든 노드에 메시지를 보냅니다(브로드캐스트).
void sendMessage() {
  String msg = "Hi from node 1";
  msg += mesh.getNodeId();
  mesh.sendBroadcast( msg );
  taskSendMessage.setInterval(random(TASK_SECOND * 1, TASK_SECOND * 5));
}
메시지에는 "Hi from node 1" 텍스트와 보드 칩 ID가 포함됩니다.
String msg = "Hi from node 1";
msg += mesh.getNodeId();
메시지를 브로드캐스트하려면 메시 객체에서 sendBroadcast() 메서드를 사용하고 보내려는 메시지(msg)를 인수로 전달하기만 하면 됩니다.
mesh.sendBroadcast(msg);
새 메시지를 보낼 때마다 코드는 메시지 간 간격(1~5초)을 변경합니다.
taskSendMessage.setInterval(random(TASK_SECOND * 1, TASK_SECOND * 5));
메시 콜백 함수
다음으로, 메시에서 특정 이벤트가 발생할 때 호출되는 여러 콜백 함수가 생성됩니다.
receivedCallback() 함수는 메시지 발신자(from)와 메시지 내용(msg.c_str())을 인쇄합니다.
void receivedCallback( uint32_t from, String &msg ) {
  Serial.printf("startHere: Received from %u msg=%s\n", from, msg.c_str());
}
newConnectionCallback() 함수는 새 노드가 네트워크에 가입할 때마다 실행됩니다. 이 함수는 단순히 새 노드의 칩 ID를 인쇄합니다. 함수를 수정하여 다른 작업을 수행할 수 있습니다.
void newConnectionCallback(uint32_t nodeId) {
  Serial.printf("--> startHere: New Connection, nodeId = %u\n", nodeId);
}
changedConnectionCallback() 함수는 네트워크에서 연결이 변경될 때마다(노드가 네트워크에 가입하거나 네트워크를 떠날 때) 실행됩니다.
void changedConnectionCallback() {
  Serial.printf("Changed connections\n");
}
nodeTimeAdjustedCallback() 함수는 네트워크가 시간을 조정하여 모든 노드가 동기화될 때 실행됩니다. 오프셋을 인쇄합니다.
void nodeTimeAdjustedCallback(int32_t offset) {
  Serial.printf("Adjusted time %u. Offset = %d\n", mesh.getNodeTime(),offset);
}
setup()
setup()에서 직렬 모니터를 초기화합니다.
void setup() {
Serial.begin(115200);
원하는 디버그 메시지 유형을 선택하세요.
//mesh.setDebugMsgTypes( ERROR | MESH_STATUS | CONNECTION | SYNC | COMMUNICATION | GENERAL | MSG_TYPES | REMOTE ); // all types on

mesh.setDebugMsgTypes( ERROR | STARTUP );  // set before init() so that you can see startup messages
이전에 정의한 세부 정보로 메시를 초기화합니다.
mesh.init(MESH_PREFIX, MESH_PASSWORD, &userScheduler, MESH_PORT);
모든 콜백 함수를 해당 이벤트에 할당합니다.
mesh.onReceive(&receivedCallback);
mesh.onNewConnection(&newConnectionCallback);
mesh.onChangedConnections(&changedConnectionCallback);
mesh.onNodeTimeAdjusted(&nodeTimeAdjustedCallback);
마지막으로 userScheduler에 taskSendMessage 함수를 추가합니다. 스케줄러는 적절한 시기에 작업을 처리하고 실행하는 역할을 합니다.
userScheduler.addTask(taskSendMessage);
마지막으로 taskSendMessage를 활성화하여 프로그램이 메시에 메시지를 전송하도록 합니다.
taskSendMessage.enable();
메시를 계속 실행하려면 loop()에 mesh.update()를 추가합니다.
void loop() {
  // it will run the user scheduler as well
  mesh.update();
}
데모
제공된 코드를 모든 보드에 업로드합니다. 메시지를 수정하여 발신자 노드를 쉽게 식별하는 것을 잊지 마세요.
보드를 컴퓨터에 연결한 후 각 보드와 직렬 연결을 엽니다. 직렬 모니터를 사용하거나 PuTTY와 같은 소프트웨어를 사용하여 모든 보드에 대해 여러 창을 열 수 있습니다.
모든 보드가 서로의 메시지를 수신하는지 확인해야 합니다. 예를 들어, 이는 노드 1에서 수신한 메시지입니다. 노드 2, 3, 4에서 메시지를 수신합니다.
ESP-MESH 기본 예제 4 보드 Arduino 직렬 모니터
메시에 변경 사항이 있을 때 다른 메시지도 확인해야 합니다. 보드가 네트워크를 떠나거나 가입할 때입니다.

ESP MESH 기본 예제 직렬 모니터 변경된 연결
ESP-MESH를 사용하여 센서 판독값 교환
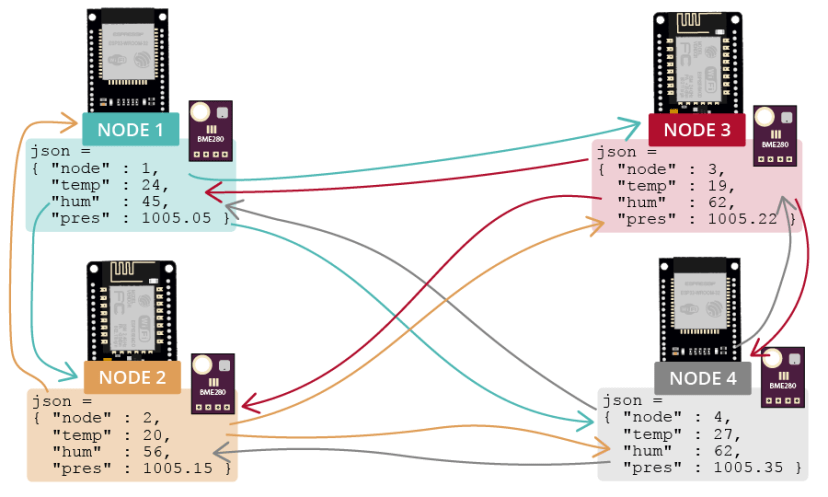
다음 예제에서는 4개 보드 간에 센서 판독값을 교환합니다(다른 수의 보드를 사용할 수 있음). 각 보드는 다른 보드의 판독값을 수신합니다.
ESP-MESH BME280 센서 판독값 교환 ESP32 ESP8266
예를 들어, BME280 센서의 센서 판독값을 교환하지만 다른 센서를 사용할 수 있습니다.
필요한 부품
이 예제에 필요한 부품은 다음과 같습니다.
4x ESP 보드(ESP32 또는 ESP8266)
4x BME280
브레드보드
점퍼 와이어
Arduino_JSON 라이브러리
이 예제에서는 JSON 형식으로 센서 판독값을 교환합니다. JSON 변수를 더 쉽게 처리할 수 있도록 Arduino_JSON 라이브러리를 사용합니다.
Arduino IDE 라이브러리 관리자에서 이 라이브러리를 설치할 수 있습니다. Sketch > Include Library > Manage Libraries로 가서 다음과 같이 라이브러리 이름을 검색하세요.
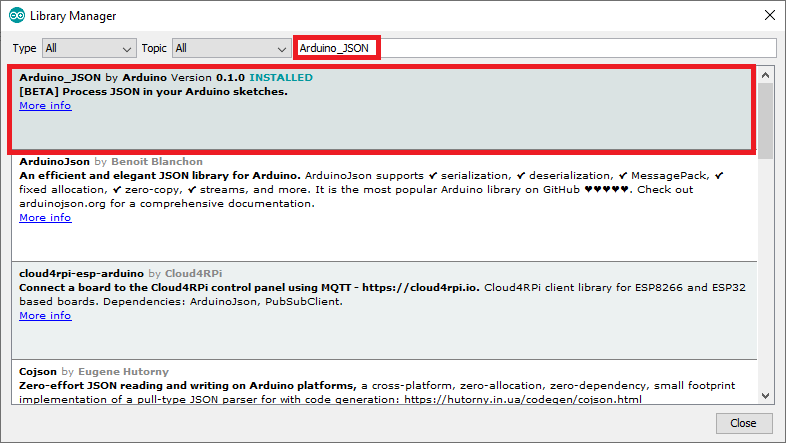
Arduino JSON 라이브러리 Arduino IDE 설치
PlatformIO와 함께 VS Code를 사용하는 경우 다음과 같이 platformio.ini 파일에 라이브러리를 포함하세요.
ESP32
monitor_speed = 115200
lib_deps = painlessmesh/painlessMesh @ ^1.4.5
    ArduinoJson
    arduinoUnity
    AsyncTCP
    TaskScheduler
    adafruit/Adafruit Unified Sensor @ ^1.1.4
    adafruit/Adafruit BME280 Library @ ^2.1.2
    arduino-libraries/Arduino_JSON @ ^0.1.0
ESP8266
monitor_speed = 115200
lib_deps = painlessmesh/painlessMesh @ ^1.4.5
    ArduinoJson
    TaskScheduler
    ESPAsyncTCP
    adafruit/Adafruit Unified Sensor @ ^1.1.4
    adafruit/Adafruit BME280 Library @ ^2.1.2
    arduino-libraries/Arduino_JSON @ ^0.1.0
회로도
다음 회로도에 표시된 대로 BME280 센서를 ESP32 또는 ESP8266 기본 I2C 핀에 연결합니다.
ESP32
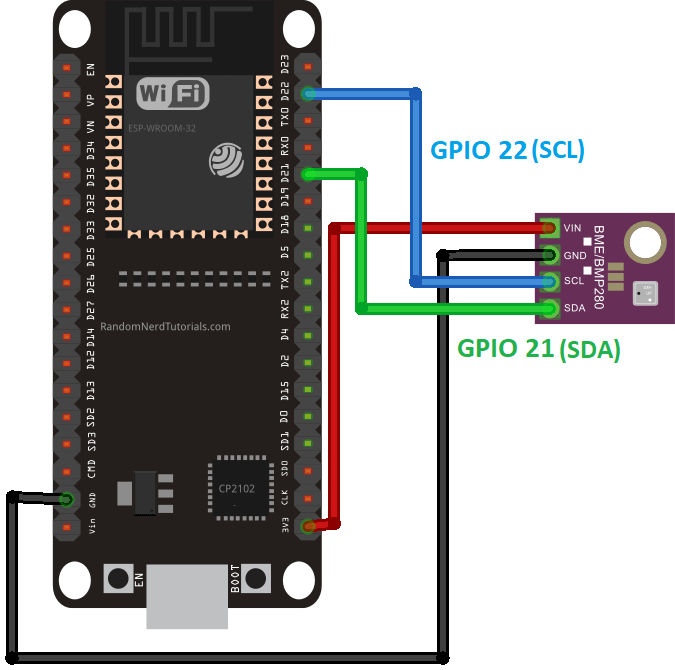
ESP32 BME280 센서 온도 습도 압력 배선 다이어그램 회로
추천 자료: Arduino IDE를 사용하는 BME280 센서가 있는 ESP32(압력, 온도, 습도)
ESP8266 NodeMCU
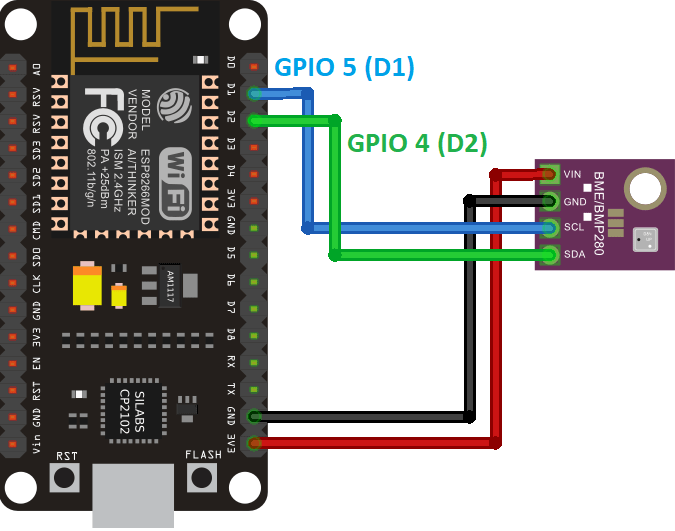
ESP8266 NodeMCU BME280 센서 온도 습도 압력 배선 다이어그램 회로
추천 자료: Arduino IDE를 사용하는 BME280이 있는 ESP8266(압력, 온도, 습도)
코드 - ESP-MESH 브로드캐스트 센서 판독
다음 코드를 각 보드에 업로드합니다. 이 코드는 현재 온도, 습도 및 압력 판독값을 읽고 메시 네트워크의 모든 보드에 브로드캐스트합니다. 판독값은 노드 번호가 포함된 JSON 문자열로 전송되어 송신 보드를 식별합니다.
/*
  Rui Santos
  Complete project details at https://RandomNerdTutorials.com/esp-mesh-esp32-esp8266-painlessmesh/

  Permission is hereby granted, free of charge, to any person obtaining a copy
  of this software and associated documentation files.

  The above copyright notice and this permission notice shall be included in all
  copies or substantial portions of the Software.
*/

#include <Adafruit_Sensor.h>
#include <Adafruit_BME280.h>
#include "painlessMesh.h"
#include <Arduino_JSON.h>

// MESH Details
#define   MESH_PREFIX     "RNTMESH" //name for your MESH
#define   MESH_PASSWORD   "MESHpassword" //password for your MESH
#define   MESH_PORT       5555 //default port

//BME object on the default I2C pins
Adafruit_BME280 bme;

//Number for this node
int nodeNumber = 2;

//String to send to other nodes with sensor readings
String readings;

Scheduler userScheduler; // to control your personal task
painlessMesh  mesh;

// User stub
void sendMessage() ; // Prototype so PlatformIO doesn't complain
String getReadings(); // Prototype for sending sensor readings

//Create tasks: to send messages and get readings;
Task taskSendMessage(TASK_SECOND * 5 , TASK_FOREVER, &sendMessage);

String getReadings () {
  JSONVar jsonReadings;
  jsonReadings["node"] = nodeNumber;
  jsonReadings["temp"] = bme.readTemperature();
  jsonReadings["hum"] = bme.readHumidity();
  jsonReadings["pres"] = bme.readPressure()/100.0F;
  readings = JSON.stringify(jsonReadings);
  return readings;
}

void sendMessage () {
  String msg = getReadings();
  mesh.sendBroadcast(msg);
}

//Init BME280
void initBME(){
  if (!bme.begin(0x76)) {
    Serial.println("Could not find a valid BME280 sensor, check wiring!");
    while (1);
  }
}

// Needed for painless library
void receivedCallback( uint32_t from, String &msg ) {
  Serial.printf("Received from %u msg=%s\n", from, msg.c_str());
  JSONVar myObject = JSON.parse(msg.c_str());
  int node = myObject["node"];
  double temp = myObject["temp"];
  double hum = myObject["hum"];
  double pres = myObject["pres"];
  Serial.print("Node: ");
  Serial.println(node);
  Serial.print("Temperature: ");
  Serial.print(temp);
  Serial.println(" C");
  Serial.print("Humidity: ");
  Serial.print(hum);
  Serial.println(" %");
  Serial.print("Pressure: ");
  Serial.print(pres);
  Serial.println(" hpa");
}

void newConnectionCallback(uint32_t nodeId) {
  Serial.printf("New Connection, nodeId = %u\n", nodeId);
}

void changedConnectionCallback() {
  Serial.printf("Changed connections\n");
}

void nodeTimeAdjustedCallback(int32_t offset) {
  Serial.printf("Adjusted time %u. Offset = %d\n", mesh.getNodeTime(),offset);
}

void setup() {
  Serial.begin(115200);

  initBME();

  //mesh.setDebugMsgTypes( ERROR | MESH_STATUS | CONNECTION | SYNC | COMMUNICATION | GENERAL | MSG_TYPES | REMOTE ); // all types on
  mesh.setDebugMsgTypes( ERROR | STARTUP );  // set before init() so that you can see startup messages

  mesh.init( MESH_PREFIX, MESH_PASSWORD, &userScheduler, MESH_PORT );
  mesh.onReceive(&receivedCallback);
  mesh.onNewConnection(&newConnectionCallback);
  mesh.onChangedConnections(&changedConnectionCallback);
  mesh.onNodeTimeAdjusted(&nodeTimeAdjustedCallback);

  userScheduler.addTask(taskSendMessage);
  taskSendMessage.enable();
}

void loop() {
  // it will run the user scheduler as well
  mesh.update();
}
이 코드는 ESP32 및 ESP8266 보드와 모두 호환됩니다.
코드 작동 방식
이 섹션을 계속 읽어 코드 작동 방식을 알아보세요.
라이브러리
필수 라이브러리를 포함하여 시작합니다. BME280 센서와 인터페이스하기 위한 Adafruit_Sensor 및 Adafruit_BME280, 메시 네트워크를 처리하기 위한 painlessMesh 라이브러리, JSON 문자열을 쉽게 생성하고 처리하기 위한 Arduino_JSON.
#include <Adafruit_Sensor.h>
#include <Adafruit_BME280.h>
#include "painlessMesh.h"
#include <Arduino_JSON.h>
메시 세부 정보
다음 줄에 메시 세부 정보를 삽입합니다.
#define MESH_PREFIX    "RNTMESH" //name for your MESH
#define MESH_PASSWORD  "MESHpassword" //password for your MESH
#define MESH_PORT      5555 //default port
MESH_PREFIX는 메시의 이름을 나타냅니다. 원하는 대로 변경할 수 있습니다. 이름에서 알 수 있듯이 MESH_PASSWORD는 메시 비밀번호입니다. 원하는 대로 변경할 수 있습니다. 메시의 모든 노드는 동일한 MESH_PREFIX 및 MESH_PASSWORD를 사용해야 합니다.
MESH_PORT는 메시 서버를 실행하려는 TCP 포트를 나타냅니다. 기본값은 5555입니다.
BME280
기본 ESP32 또는 ESP8266 핀에 bme라는 Adafruit_BME280 객체를 만듭니다.
Adafruit_BME280 bme;
nodeNumber 변수에 보드의 노드 번호를 삽입합니다. 각 보드마다 다른 번호여야 합니다.
int nodeNumber = 2;
readings 변수는 다른 보드로 보낼 판독값을 저장하는 데 사용됩니다.
String readings;
Scheduler
다음 줄은 userScheduler라는 새 Scheduler를 만듭니다.
Scheduler userScheduler; // 개인 작업을 제어합니다.
painlessMesh
mesh라는 painlessMesh 객체를 만들어 메시 네트워크를 처리합니다.
작업 만들기
프로그램이 실행되는 동안 5초마다 sendMessage() 함수를 호출하는 taskSendMessage라는 작업을 만듭니다.
작업 taskSendMessage(TASK_SECOND * 5 , TASK_FOREVER, &sendMessage);
getReadings()
getReadings() 함수는 BME280 센서에서 온도, 습도 및 압력 판독값을 가져오고 노드 번호를 포함한 모든 정보를 jsonReadings라는 JSON 변수에 연결합니다.
JSONVar jsonReadings;
jsonReadings["node"] = nodeNumber;
jsonReadings["temp"] = bme.readTemperature();
jsonReadings["hum"] = bme.readHumidity();
jsonReadings["pres"] = bme.readPressure()/100.0F;
다음 줄은 임의의 값을 가진 jsonReadings 변수의 구조를 보여줍니다.
{
  "node":2,
  "temperature":24.51,
  "humidity":52.01,
  "pressure":1005.21
}
그런 다음 jsonReadings 변수는 stringify() 메서드를 사용하여 JSON 문자열로 변환되고 readings 변수에 저장됩니다.
readings = JSON.stringify(jsonReadings);
이 변수는 함수에 의해 반환됩니다.
return readings;
메시에 메시지 보내기
sendMessage() 함수는 네트워크의 모든 노드에 판독값과 노드 번호(getReadings())가 포함된 JSON 문자열을 보냅니다(브로드캐스트).
void sendMessage () {
  String msg = getReadings();
  mesh.sendBroadcast(msg);
}
Init BME280 센서
initBME() 함수는 BME280 센서를 초기화합니다.
void initBME(){
  if (!bme.begin(0x76)) {
    Serial.println("Could not find a valid BME280 sensor, check wiring!");
    while (1);
  }
}
메시 콜백 함수
다음으로 메시에서 어떤 이벤트가 발생하면 호출되는 여러 콜백 함수가 생성됩니다.
receivedCallback() 함수는 메시지 발신자(from)와 메시지 내용(msg.c_str())을 출력합니다.
void receivedCallback( uint32_t from, String &msg ) {
  Serial.printf("startHere: Received from %u msg=%s\n", from, msg.c_str());
메시지는 JSON 형식으로 제공되므로 다음과 같이 변수에 액세스할 수 있습니다.
JSONVar myObject = JSON.parse(msg.c_str());
int node = myObject["node"];
double temp = myObject["temp"];
double hum = myObject["hum"];
double pres = myObject["pres"];
마지막으로 모든 정보를 직렬 모니터에 출력합니다.
Serial.print("Node: ");
Serial.println(node);
Serial.print("Temperature: ");
Serial.print(temp);
Serial.println(" C");
Serial.print("Humidity: ");
Serial.print(hum);
Serial.println(" %");
Serial.print("Pressure: ");
Serial.print(pres);
Serial.println(" hpa");
newConnectionCallback() 함수는 새 노드가 네트워크에 가입할 때마다 실행됩니다. 이 함수는 단순히 새 노드의 칩 ID를 인쇄합니다. 함수를 수정하여 다른 작업을 수행할 수 있습니다.
void newConnectionCallback(uint32_t nodeId) {
  Serial.printf("--> startHere: New Connection, nodeId = %u\n", nodeId);
}
changedConnectionCallback() 함수는 네트워크에서 연결이 변경될 때마다(노드가 네트워크에 가입하거나 네트워크를 떠날 때) 실행됩니다.
void changedConnectionCallback() {
  Serial.printf("Changed connections\n");
}
nodeTimeAdjustedCallback() 함수는 네트워크가 시간을 조정하여 모든 노드가 동기화될 때 실행됩니다. 오프셋을 인쇄합니다.
void nodeTimeAdjustedCallback(int32_t offset) {
  Serial.printf("Adjusted time %u. Offset = %d\n", mesh.getNodeTime(),offset);
}
setup()
setup()에서 직렬 모니터를 초기화합니다.
void setup() {
Serial.begin(115200);
initBME() 함수를 호출하여 BME280 센서를 초기화합니다.
initBME();
원하는 디버그 메시지 유형을 선택합니다.
//mesh.setDebugMsgTypes( ERROR | MESH_STATUS | CONNECTION | SYNC | COMMUNICATION | GENERAL | MSG_TYPES | REMOTE ); // all types on

mesh.setDebugMsgTypes( ERROR | STARTUP );  // set before init() so that you can see startup messages
이전에 정의한 세부 정보로 메시를 초기화합니다.
mesh.init(MESH_PREFIX, MESH_PASSWORD, &userScheduler, MESH_PORT);
모든 콜백 함수를 해당 이벤트에 할당합니다.
mesh.onReceive(&receivedCallback);
mesh.onNewConnection(&newConnectionCallback);
mesh.onChangedConnections(&changedConnectionCallback);
mesh.onNodeTimeAdjusted(&nodeTimeAdjustedCallback);
마지막으로 taskSendMessage 함수를 userScheduler에 추가합니다. 스케줄러는 적절한 시기에 작업을 처리하고 실행하는 역할을 합니다.
userScheduler.addTask(taskSendMessage);
마지막으로 taskSendMessage를 활성화하여 프로그램이 메시에 메시지를 보내기 시작하도록 합니다.
taskSendMessage.enable();
메시를 계속 실행하려면 loop()에 mesh.update()를 추가합니다.
void loop() {
  // it will run the user scheduler as well
  mesh.update();
}
데모
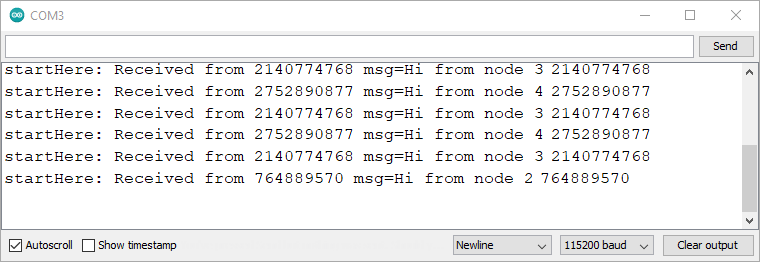
모든 보드(각 보드의 노드 번호는 다름)에 코드를 업로드하면 각 보드가 다른 보드의 메시지를 수신하는 것을 볼 수 있습니다.
다음 스크린샷은 노드 1에서 수신한 메시지를 보여줍니다. 노드 2, 3, 4에서 센서 판독값을 수신합니다.
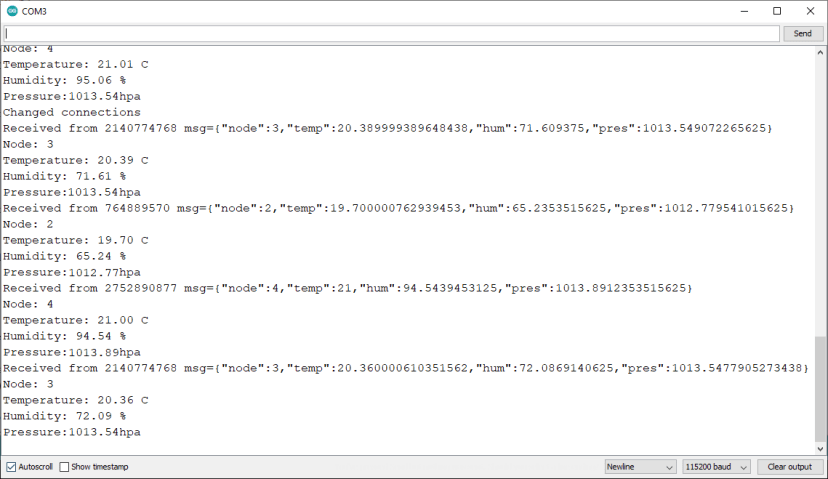
ESP-MESH Exchange BME280 센서 판독값 ESP32 ESP8266 직렬 모니터
마무리
ESP-MESH 네트워킹 프로토콜에 대한 이 간단한 소개가 마음에 들었으면 합니다. 더 많은 예제는 painlessMesh 라이브러리에서 확인할 수 있습니다.
가까운 미래에 이 주제에 대한 튜토리얼을 더 많이 만들 예정입니다. 따라서 의견 섹션에 제안 사항을 적어주세요.
다음 기사도 마음에 드실 수 있습니다.
ESP-NOW 시작하기(Arduino IDE를 사용한 ESP32)
ESP-NOW 시작하기(Arduino IDE를 사용한 ESP8266 NodeMCU)
ESP32: ESP-NOW 웹 서버 센서 대시보드(ESP-NOW + Wi-Fi)
다음 리소스를 통해 ESP32 및 ESP8266에 대해 자세히 알아보세요.
Arduino IDE를 사용한 ESP32 배우기
ESP8266을 사용한 홈 오토메이션
더 많은 ESP32 프로젝트 및 튜토리얼
더 많은 ESP8266 프로젝트 및 튜토리얼
읽어주셔서 감사합니다. 배움을 멈추지 마세요. 또한 포기하지 마세요.
'ESP32' 카테고리의 다른 글
| ESP32 HTTP GET Web APIs, OpenWeatherMap.org 및 ThingSpeak (1) | 2025.01.13 |
|---|---|
| ESP32 HTTP GET 및 HTTP POST와 JSON, URL 인코딩, 텍스트 (0) | 2025.01.13 |
| ESP32 SIM800L 문자 메시지(SMS 알림) 보내기 (0) | 2025.01.10 |
| ESP32 SMTP 서버를 사용하여 이메일 보내기 (0) | 2025.01.10 |
| ESP32 WebSocket 서버와 제어 출력 (0) | 2025.01.09 |
| ESP32 ESP-NOW 시작하기 (0) | 2025.01.08 |
| ESP32 MQTT 메시지를 게시하고 토픽을 구독하는 방법 (0) | 2025.01.08 |
| ESP32 BLE 서버 및 클라이언트(Bluetooth Low Energy) (1) | 2025.01.08 |
더욱 좋은 정보를 제공하겠습니다.~ ^^


