ESP32 SMTP 서버를 사용하여 이메일 보내기: HTML, 텍스트 및 첨부 파일(Arduino IDE)
SMTP 서버를 사용하여 ESP32로 이메일을 보내는 방법을 알아보세요. HTML 또는 원시 텍스트가 포함된 간단한 이메일을 보내는 방법과 이미지 및 파일(.txt)과 같은 첨부 파일을 보내는 방법을 보여드리겠습니다. ESP32 보드는 Arduino IDE를 사용하여 프로그래밍됩니다.

ESP32 SMTP 서버를 사용하여 이메일 보내기: HTML, 텍스트 및 첨부 파일(Arduino IDE)
이 튜토리얼에서는 다음 주제를 다룹니다.
ESP32 이메일 보내기(HTML 및 원시 텍스트)
ESP32 첨부 파일이 포함된 이메일 보내기(이미지 및 .txt 파일)
ESP8266 보드에 대한 유사한 튜토리얼이 있습니다. ESP8266 NodeMCU SMTP 서버를 사용하여 이메일 보내기: HTML, 텍스트 및 첨부 파일(Arduino)
SMTP 서버 소개
SMTP는 Simple Mail Transfer Protocol의 약자로 이메일 전송을 위한 인터넷 표준입니다. ESP32를 사용하여 이메일을 보내려면 SMTP 서버에 연결해야 합니다.
ESP 메일 클라이언트 라이브러리
ESP32로 이메일을 보내려면 ESP-Mail-Client 라이브러리를 사용합니다. 이 라이브러리를 사용하면 ESP32가 SMTP 및 IMAP 서버를 통해 첨부 파일이 있거나 없는 이메일을 보내고 받을 수 있습니다.
이 튜토리얼에서는 SMTP를 사용하여 첨부 파일이 있거나 없는 이메일을 보냅니다. 예를 들어 이미지(.png)와 텍스트(.txt) 파일을 보냅니다. 이메일을 통해 보낸 파일은 ESP32 파일 시스템(SPIFFS, LittleFS 또는 FatFs) 또는 microSD 카드(이 튜토리얼에서는 다루지 않음)에 저장할 수 있습니다.
ESP-Mail-Client 라이브러리 설치
이 튜토리얼을 진행하기 전에 ESP-Mail-Client 라이브러리를 설치해야 합니다.
Sketch > Include Library > Manage Libraries로 이동하여 ESP Mail Client를 검색합니다. Mobizt의 ESP Mail Client 라이브러리를 설치합니다.
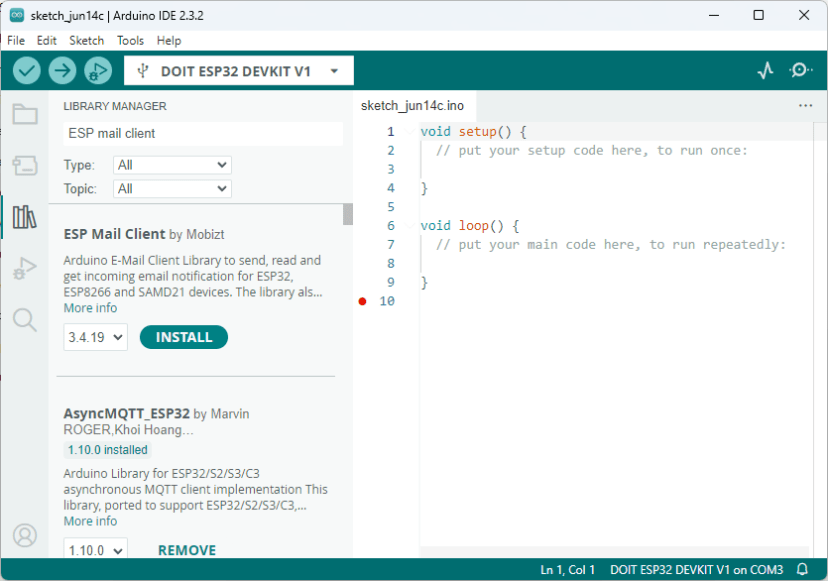
ESP 메일 클라이언트 라이브러리 Arduino IDE 설치
발신자 이메일(새 계정)
기본 개인 이메일 주소로 이메일을 보내려면 새 이메일 계정을 만드는 것이 좋습니다. ESP32를 통해 이메일을 보내는 데 기본 개인 이메일을 사용하지 마세요. 코드에 문제가 생기거나 실수로 요청을 너무 많이 하면 금지되거나 계정이 일시적으로 비활성화될 수 있습니다.
새로 만든 Gmail.com 계정을 사용하여 이메일을 보내지만 다른 이메일 공급자를 사용할 수 있습니다. 수신자 이메일은 아무 문제 없이 개인 이메일이 될 수 있습니다.
발신자 이메일 계정 만들기
ESP32로 이메일을 보내기 위한 새 이메일 계정을 만듭니다. Gmail 계정을 사용하려면 이 링크로 이동하여 새 계정을 만드세요.
Gmail 새 계정 만들기
앱 비밀번호 만들기
ESP32가 Gmail 계정을 사용하여 이메일을 보낼 수 있도록 앱 비밀번호를 만들어야 합니다. 앱 비밀번호는 보안 수준이 낮은 앱이나 기기가 Google 계정에 액세스할 수 있는 권한을 부여하는 16자리 암호입니다. 앱 비밀번호로 로그인하는 방법에 대한 자세한 내용은 여기에서 확인하세요.
앱 비밀번호는 2단계 인증이 켜진 계정에서만 사용할 수 있습니다.
- Google 계정을 엽니다.
- 검색 패널에서 보안을 선택합니다.
- "Google에 로그인"에서 2단계 인증 > 시작을 선택합니다.
- 화면에 나오는 단계를 따릅니다.
2단계 인증을 활성화한 후 앱 비밀번호를 만들 수 있습니다.
- Google 계정을 엽니다.
- 검색 패널에서 앱 비밀번호를 검색합니다.
- 앱 비밀번호 메뉴를 엽니다.

Google - 앱 비밀번호 만들기
4. 앱 비밀번호에 ESP와 같은 이름을 지정합니다. 그런 다음 만들기를 클릭합니다. ESP32 또는 ESP8266에서 이메일을 보내는 데 사용할 비밀번호가 있는 창이 팝업됩니다. 나중에 필요하므로 비밀번호를 저장하세요(기억할 필요가 없다고 하지만).

앱 비밀번호 만들기 gmail
ESP32 또는 ESP8266에서 이메일을 보내는 데 사용할 비밀번호가 있는 창이 팝업됩니다. 나중에 필요하므로 해당 비밀번호를 저장하세요(기억할 필요가 없다고 나와 있지만).

생성된 앱 비밀번호 Gmail
이제 ESP 코드에서 이메일을 보내는 데 사용할 앱 비밀번호가 생겼습니다.

앱 비밀번호 생성 ESP32
다른 이메일 공급자를 사용하는 경우 앱 비밀번호를 만드는 방법을 확인하세요. 간단한 Google 검색 "your_email_provider + create app password"로 지침을 찾을 수 있습니다.
Gmail SMTP 서버 설정
Gmail 계정을 사용하는 경우 SMTP 서버 세부 정보는 다음과 같습니다.
SMTP Server: smtp.gmail.com
SMTP username: Complete Gmail address
SMTP password: Your Gmail password
SMTP port (TLS): 587
SMTP port (SSL): 465
SMTP TLS/SSL required: yes
Outlook SMTP 서버 설정
Outlook 계정의 경우 SMTP 서버 설정은 다음과 같습니다.
SMTP Server: smtp.office365.com
SMTP Username: Complete Outlook email address
SMTP Password: Your Outlook password
SMTP Port: 587
SMTP TLS/SSL Required: Yes
Live 또는 Hotmail SMTP 서버 설정
Live 또는 Hotmail 계정의 경우 SMTP 서버 설정은 다음과 같습니다.
SMTP Server: smtp.live.com
SMTP Username: Complete Live/Hotmail email address
SMTP Password: Your Windows Live Hotmail password
SMTP Port: 587
SMTP TLS/SSL Required: Yes
다른 이메일 공급자를 사용하는 경우 해당 SMTP 서버 설정을 검색해야 합니다. 이제 ESP32로 이메일을 보내기 위한 모든 준비가 완료되었습니다.
ESP32(Arduino IDE)로 HTML 또는 원시 텍스트로 이메일 보내기
다음 코드는 SMTP 서버를 통해 HTML 또는 원시 텍스트로 이메일을 보냅니다. 데모 목적으로 ESP32는 부팅할 때 한 번 이메일을 보냅니다. 그런 다음 코드를 수정하여 자신의 프로젝트에 통합할 수 있어야 합니다.
아직 코드를 업로드하지 마세요. 작동하도록 하려면 몇 가지 수정이 필요합니다.
/*
  Rui Santos
  Complete project details at:
   - ESP32: https://RandomNerdTutorials.com/esp32-send-email-smtp-server-arduino-ide/
   - ESP8266: https://RandomNerdTutorials.com/esp8266-nodemcu-send-email-smtp-server-arduino/

  Permission is hereby granted, free of charge, to any person obtaining a copy of this software and associated documentation files.
  The above copyright notice and this permission notice shall be included in all copies or substantial portions of the Software.
  Example adapted from: https://github.com/mobizt/ESP-Mail-Client
*/

#include <Arduino.h>
#if defined(ESP32)
  #include <WiFi.h>
#elif defined(ESP8266)
  #include <ESP8266WiFi.h>
#endif
#include <ESP_Mail_Client.h>

#define WIFI_SSID "REPLACE_WITH_YOUR_SSID"
#define WIFI_PASSWORD "REPLACE_WITH_YOUR_PASSWORD"

/** The smtp host name e.g. smtp.gmail.com for GMail or smtp.office365.com for Outlook or smtp.mail.yahoo.com */
#define SMTP_HOST "smtp.gmail.com"
#define SMTP_PORT 465

/* The sign in credentials */
#define AUTHOR_EMAIL "YOUR_EMAIL@XXXX.com"
#define AUTHOR_PASSWORD "YOUR_EMAIL_APP_PASS"

/* Recipient's email*/
#define RECIPIENT_EMAIL "RECIPIENTE_EMAIL@XXXX.com"

/* Declare the global used SMTPSession object for SMTP transport */
SMTPSession smtp;

/* Callback function to get the Email sending status */
void smtpCallback(SMTP_Status status);

void setup(){
  Serial.begin(115200);
  Serial.println();
  WiFi.begin(WIFI_SSID, WIFI_PASSWORD);
  Serial.print("Connecting to Wi-Fi");
  while (WiFi.status() != WL_CONNECTED){
    Serial.print(".");
    delay(300);
  }
  Serial.println();
  Serial.print("Connected with IP: ");
  Serial.println(WiFi.localIP());
  Serial.println();

  /*  Set the network reconnection option */
  MailClient.networkReconnect(true);

  /** Enable the debug via Serial port
   * 0 for no debugging
   * 1 for basic level debugging
   *
   * Debug port can be changed via ESP_MAIL_DEFAULT_DEBUG_PORT in ESP_Mail_FS.h
   */
  smtp.debug(1);

  /* Set the callback function to get the sending results */
  smtp.callback(smtpCallback);

  /* Declare the Session_Config for user defined session credentials */
  Session_Config config;

  /* Set the session config */
  config.server.host_name = SMTP_HOST;
  config.server.port = SMTP_PORT;
  config.login.email = AUTHOR_EMAIL;
  config.login.password = AUTHOR_PASSWORD;
  config.login.user_domain = "";

  /*
  Set the NTP config time
  For times east of the Prime Meridian use 0-12
  For times west of the Prime Meridian add 12 to the offset.
  Ex. American/Denver GMT would be -6. 6 + 12 = 18
  See https://en.wikipedia.org/wiki/Time_zone for a list of the GMT/UTC timezone offsets
  */
  config.time.ntp_server = F("pool.ntp.org,time.nist.gov");
  config.time.gmt_offset = 3;
  config.time.day_light_offset = 0;

  /* Declare the message class */
  SMTP_Message message;

  /* Set the message headers */
  message.sender.name = F("ESP");
  message.sender.email = AUTHOR_EMAIL;
  message.subject = F("ESP Test Email");
  message.addRecipient(F("Sara"), RECIPIENT_EMAIL);

  /*Send HTML message*/
  /*String htmlMsg = "<div style=\"color:#2f4468;\"><h1>Hello World!</h1><p>- Sent from ESP board</p></div>";
  message.html.content = htmlMsg.c_str();
  message.html.content = htmlMsg.c_str();
  message.text.charSet = "us-ascii";
  message.html.transfer_encoding = Content_Transfer_Encoding::enc_7bit;*/


  //Send raw text message
  String textMsg = "Hello World! - Sent from ESP board";
  message.text.content = textMsg.c_str();
  message.text.charSet = "us-ascii";
  message.text.transfer_encoding = Content_Transfer_Encoding::enc_7bit;

  message.priority = esp_mail_smtp_priority::esp_mail_smtp_priority_low;
  message.response.notify = esp_mail_smtp_notify_success | esp_mail_smtp_notify_failure | esp_mail_smtp_notify_delay;


  /* Connect to the server */
  if (!smtp.connect(&config)){
    ESP_MAIL_PRINTF("Connection error, Status Code: %d, Error Code: %d, Reason: %s", smtp.statusCode(), smtp.errorCode(), smtp.errorReason().c_str());
    return;
  }

  if (!smtp.isLoggedIn()){
    Serial.println("\nNot yet logged in.");
  }
  else{
    if (smtp.isAuthenticated())
      Serial.println("\nSuccessfully logged in.");
    else
      Serial.println("\nConnected with no Auth.");
  }

  /* Start sending Email and close the session */
  if (!MailClient.sendMail(&smtp, &message))
    ESP_MAIL_PRINTF("Error, Status Code: %d, Error Code: %d, Reason: %s", smtp.statusCode(), smtp.errorCode(), smtp.errorReason().c_str());

}

void loop(){
}

/* Callback function to get the Email sending status */
void smtpCallback(SMTP_Status status){
  /* Print the current status */
  Serial.println(status.info());

  /* Print the sending result */
  if (status.success()){
    // ESP_MAIL_PRINTF used in the examples is for format printing via debug Serial port
    // that works for all supported Arduino platform SDKs e.g. AVR, SAMD, ESP32 and ESP8266.
    // In ESP8266 and ESP32, you can use Serial.printf directly.

    Serial.println("----------------");
    ESP_MAIL_PRINTF("Message sent success: %d\n", status.completedCount());
    ESP_MAIL_PRINTF("Message sent failed: %d\n", status.failedCount());
    Serial.println("----------------\n");

    for (size_t i = 0; i < smtp.sendingResult.size(); i++)
    {
      /* Get the result item */
      SMTP_Result result = smtp.sendingResult.getItem(i);

      // In case, ESP32, ESP8266 and SAMD device, the timestamp get from result.timestamp should be valid if
      // your device time was synched with NTP server.
      // Other devices may show invalid timestamp as the device time was not set i.e. it will show Jan 1, 1970.
      // You can call smtp.setSystemTime(xxx) to set device time manually. Where xxx is timestamp (seconds since Jan 1, 1970)

      ESP_MAIL_PRINTF("Message No: %d\n", i + 1);
      ESP_MAIL_PRINTF("Status: %s\n", result.completed ? "success" : "failed");
      ESP_MAIL_PRINTF("Date/Time: %s\n", MailClient.Time.getDateTimeString(result.timestamp, "%B %d, %Y %H:%M:%S").c_str());
      ESP_MAIL_PRINTF("Recipient: %s\n", result.recipients.c_str());
      ESP_MAIL_PRINTF("Subject: %s\n", result.subject.c_str());
    }
    Serial.println("----------------\n");

    // You need to clear sending result as the memory usage will grow up.
    smtp.sendingResult.clear();
  }
}
네트워크 자격 증명을 삽입하고 발신자 이메일, SMTP 서버 세부 정보, 수신자 및 메시지를 설정해야 합니다.
코드 작동 방식
이 코드는 라이브러리에서 제공한 예제에서 가져온 것입니다. 이 예제는 각 코드 줄의 기능을 이해할 수 있도록 잘 주석 처리되어 있습니다. 변경해야 하거나 변경해야 할 수 있는 관련 부분을 살펴보겠습니다.
먼저 다음 줄에 네트워크 자격 증명을 삽입합니다.
#define WIFI_SSID "REPLACE_WITH_YOUR_SSID"
#define WIFI_PASSWORD "REPLACE_WITH_YOUR_PASSWORD"
SMTP 서버 설정을 삽입합니다. Gmail 계정을 사용하여 이메일을 보내는 경우 설정은 다음과 같습니다.
#define SMTP_HOST "smtp.gmail.com"
#define SMTP_PORT 465
발신자 이메일 로그인 자격 증명(이전에 만든 전체 이메일 및 앱 비밀번호)을 삽입합니다.
#define AUTHOR_EMAIL "YOUR_EMAIL@XXXX.com"
#define AUTHOR_PASSWORD "YOUR_EMAIL_PASS"
수신자 이메일을 삽입합니다.
#define RECIPIENT_EMAIL "RECIPIENTE_EMAIL@XXXX.com"
이메일에 올바른 시간으로 타임스탬프가 지정되도록 위치에 따라 gmt_offset 변수를 조정해야 할 수도 있습니다.
config.time.ntp_server = F("pool.ntp.org,time.nist.gov");
config.time.gmt_offset = 3;
config.time.day_light_offset = 0;
setup()의 다음 줄에 메시지 헤더를 설정합니다. 발신자 이름, 발신자 이메일, 이메일 제목, 수신자 이름 및 이메일:
/* Set the message headers */
  message.sender.name = F("ESP");
  message.sender.email = AUTHOR_EMAIL;
  message.subject = F("ESP Test Email");
  message.addRecipient(F("Sara"), RECIPIENT_EMAIL);
다음 줄에서 textMsg 변수에 메시지 내용(원시 텍스트)을 설정합니다.
//Send raw text message
String textMsg = "Hello World - Sent from ESP board";
message.text.content = textMsg.c_str();
message.text.charSet = "us-ascii";
message.text.transfer_encoding = Content_Transfer_Encoding::enc_7bit;
대신 HTML 텍스트를 보내려면 다음 줄의 주석 처리를 제거합니다. HTML 텍스트를 htmlMsg 변수에 삽입해야 합니다.
/*Send HTML message*/
/*String htmlMsg = "<div style=\"color:#2f4468;\"><h1>Hello World!</h1><p>- Sent from ESP board</p></div>";
message.html.content = htmlMsg.c_str();
message.html.content = htmlMsg.c_str();
message.text.charSet = "us-ascii";
message.html.transfer_encoding = Content_Transfer_Encoding::enc_7bit;*/
마지막으로 다음 줄에서 메시지를 보냅니다.
if (!MailClient.sendMail(&smtp, &message))
  Serial.println("Error sending Email, " + smtp.errorReason());
데모
ESP32에 코드를 업로드합니다. 업로드한 후 115200의 전송 속도로 직렬 모니터를 엽니다. ESP32 재설정 버튼을 누릅니다.
모든 것이 예상대로 진행되었다면 직렬 모니터에 비슷한 메시지가 표시되어야 합니다.
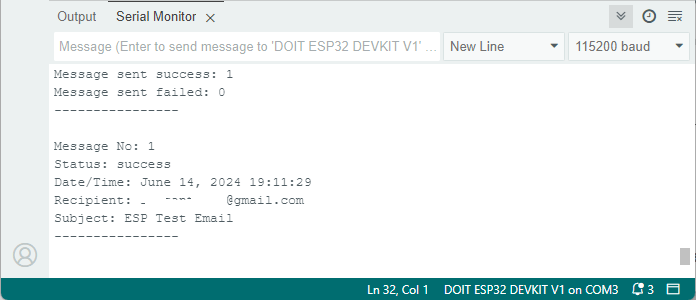
ESP send email SMTP server - serial monitor
이메일 계정을 확인합니다. ESP32 보드에서 이메일을 받았을 것입니다.

ESP32 SMTP 서버 이메일 수신 테스트
HTML 텍스트로 메시지를 보내도록 옵션을 설정한 경우 메시지는 다음과 같습니다.
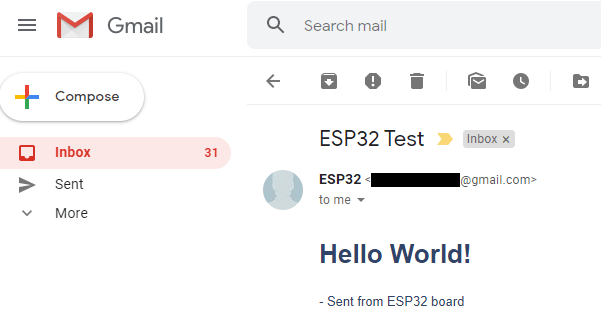
ESP32 SMTP 서버 본문 텍스트 형식 HTML로 이메일 보내기
원시 텍스트 메시지를 활성화한 경우 수신해야 하는 이메일입니다.

ESP32 SMTP 서버 본문 텍스트 형식만 이메일 보내기
ESP32(Arduino IDE)로 이메일로 첨부 파일 보내기
이 섹션에서는 ESP32에서 보낸 이메일에 첨부 파일을 보내는 방법을 보여드리겠습니다. .txt 파일이나 사진을 보내는 방법을 보여드리겠습니다. 이는 지난 몇 시간 동안의 센서 판독 값이 포함된 .txt 파일을 보내거나 ESP32-CAM으로 촬영한 사진을 보내는 데 유용할 수 있습니다.
이 튜토리얼에서는 보낼 파일을 ESP32 파일 시스템(LittleFS)에 저장해야 합니다.
LittleFS에 파일 업로드
이메일로 파일을 보내려면 ESP32 파일 시스템이나 microSD 카드에 저장해야 합니다. Arduino IDE용 ESP32 Filesystem Uploader 플러그인을 사용하여 그림과 .txt 파일을 ESP32 LittleFS 파일 시스템에 업로드합니다. 아직 설치하지 않았다면 다음 튜토리얼을 따라 플러그인을 설치하세요.
새로운 Arduino 스케치를 만들고 저장합니다. 스케치 > 스케치 폴더 표시로 이동합니다. Arduino 스케치 폴더 안에 data라는 폴더를 만듭니다. .jpg 파일과 .txt 파일을 data 폴더로 이동합니다.
또는 여기를 클릭하여 프로젝트 폴더를 다운로드할 수 있습니다.
참고: 기본 코드를 사용하는 경우 파일 이름은 image.png 및 text_file.txt여야 합니다. 또는 코드를 수정하여 다른 이름의 파일을 가져올 수 있습니다.
다음 파일을 보내드리겠습니다.
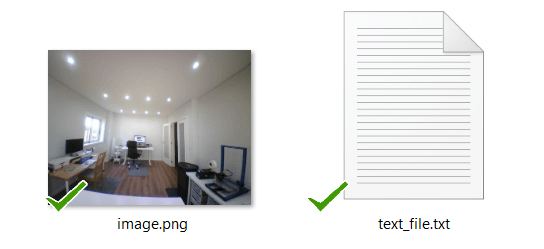
첨부 파일이 있는 이메일 보내기 ESP32 ESP8266 텍스트 파일 및 이미지
폴더 구조는 다음과 같아야 합니다(프로젝트 폴더 다운로드):
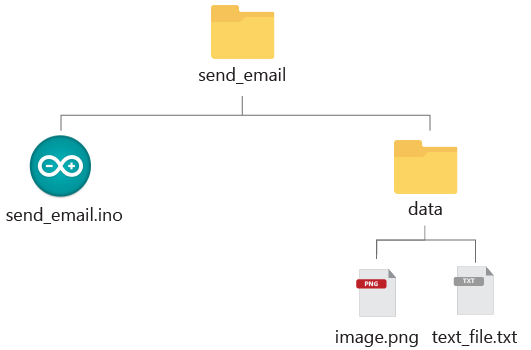
이메일 첨부 파일 보내기 폴더 구조 파일 시스템 파일 구성
파일을 데이터 폴더로 옮긴 후 보드에 업로드해야 합니다. Arduino IDE에서 Windows에서는 [Ctrl] + [Shift] + [P]를 누르고 MacOS에서는 [⌘] + [Shift] + [P]를 눌러 명령 팔레트를 엽니다. LittleFS를 Pico/ESP8266/ESP32에 업로드 명령을 검색하여 클릭합니다.

LittleFS를 Pico ESP8266 ESP32 Arduino IDE에 업로드
디버깅 창에 성공 메시지가 표시되어야 합니다. 파일이 성공적으로 업로드되었다면 다음 섹션으로 넘어갑니다.
참고: 디버깅 창에 많은 점 ….____…..____이 인쇄되기 시작하면 ESP32 온보드 BOOT 버튼을 눌러 파일을 업로드해야 합니다.
코드
다음 코드는 .txt 파일과 첨부된 사진이 있는 이메일을 보냅니다. 코드를 업로드하기 전에 발신자 이메일 설정과 수신자 이메일을 삽입해야 합니다.
/*
  Rui Santos
  Complete project details at:
   - ESP32: https://RandomNerdTutorials.com/esp32-send-email-smtp-server-arduino-ide/
   - ESP8266: https://RandomNerdTutorials.com/esp8266-nodemcu-send-email-smtp-server-arduino/

  Permission is hereby granted, free of charge, to any person obtaining a copy of this software and associated documentation files.
  The above copyright notice and this permission notice shall be included in all copies or substantial portions of the Software.
  Example adapted K. Suwatchai (Mobizt): https://github.com/mobizt/ESP-Mail-Client Copyright (c) 2021 mobizt
*/

// To use send Email for Gmail to port 465 (SSL), less secure app option should be enabled. https://myaccount.google.com/lesssecureapps?pli=1

#include <Arduino.h>
#if defined(ESP32)
  #include <WiFi.h>
#elif defined(ESP8266)
  #include <ESP8266WiFi.h>
#endif
#include <ESP_Mail_Client.h>

#define WIFI_SSID "REPLACE_WITH_YOUR_SSID"
#define WIFI_PASSWORD "REPLACE_WITH_YOUR_PASSWORD"

#define SMTP_HOST "smtp.gmail.com"

/** The smtp port e.g.
 * 25  or esp_mail_smtp_port_25
 * 465 or esp_mail_smtp_port_465
 * 587 or esp_mail_smtp_port_587
*/
#define SMTP_PORT 465

/* The sign in credentials */
#define AUTHOR_EMAIL "YOUR_EMAIL@XXXX.com"
#define AUTHOR_PASSWORD "YOUR_EMAIL_APP_PASS"

/* Recipient's email*/
#define RECIPIENT_EMAIL "RECIPIENTE_EMAIL@XXXX.com"

/* The SMTP Session object used for Email sending */
SMTPSession smtp;

/* Callback function to get the Email sending status */
void smtpCallback(SMTP_Status status);

void setup(){
  Serial.begin(115200);
  Serial.println();
  Serial.print("Connecting to AP");
  WiFi.begin(WIFI_SSID, WIFI_PASSWORD);
  while (WiFi.status() != WL_CONNECTED){
    Serial.print(".");
    delay(200);
  }
  Serial.println("");
  Serial.println("WiFi connected.");
  Serial.println("IP address: ");
  Serial.println(WiFi.localIP());
  Serial.println();

  // Init filesystem
  ESP_MAIL_DEFAULT_FLASH_FS.begin();

  /** Enable the debug via Serial port
   * none debug or 0
   * basic debug or 1
  */
  smtp.debug(1);

  /* Set the callback function to get the sending results */
  smtp.callback(smtpCallback);

  /* Declare the Session_Config for user defined session credentials */
  Session_Config config;

  /* Set the session config */
  config.server.host_name = SMTP_HOST;
  config.server.port = SMTP_PORT;
  config.login.email = AUTHOR_EMAIL;
  config.login.password = AUTHOR_PASSWORD;
  config.login.user_domain = "mydomain.net";

  /*
  Set the NTP config time
  For times east of the Prime Meridian use 0-12
  For times west of the Prime Meridian add 12 to the offset.
  Ex. American/Denver GMT would be -6. 6 + 12 = 18
  See https://en.wikipedia.org/wiki/Time_zone for a list of the GMT/UTC timezone offsets
  */
  config.time.ntp_server = F("pool.ntp.org,time.nist.gov");
  config.time.gmt_offset = 3;
  config.time.day_light_offset = 0;

  /* Declare the message class */
  SMTP_Message message;

  /* Enable the chunked data transfer with pipelining for large message if server supported */
  message.enable.chunking = true;

  /* Set the message headers */
  message.sender.name = "ESP Mail";
  message.sender.email = AUTHOR_EMAIL;

  message.subject = F("Test sending Email with attachments and inline images from Flash");
  message.addRecipient(F("Sara"), RECIPIENT_EMAIL);

  /** Two alternative content versions are sending in this example e.g. plain text and html */
  String htmlMsg = "This message contains attachments: image and text file.";
  message.html.content = htmlMsg.c_str();
  message.html.charSet = "utf-8";
  message.html.transfer_encoding = Content_Transfer_Encoding::enc_qp;

  message.priority = esp_mail_smtp_priority::esp_mail_smtp_priority_normal;
  message.response.notify = esp_mail_smtp_notify_success | esp_mail_smtp_notify_failure | esp_mail_smtp_notify_delay;

  /* The attachment data item */
  SMTP_Attachment att;

  /** Set the attachment info e.g.
   * file name, MIME type, file path, file storage type,
   * transfer encoding and content encoding
  */
  att.descr.filename = "image.png";
  att.descr.mime = "image/png"; //binary data
  att.file.path = "/image.png";
  att.file.storage_type = esp_mail_file_storage_type_flash;
  att.descr.transfer_encoding = Content_Transfer_Encoding::enc_base64;

  /* Add attachment to the message */
  message.addAttachment(att);

  message.resetAttachItem(att);
  att.descr.filename = "text_file.txt";
  att.descr.mime = "text/plain";
  att.file.path = "/text_file.txt";
  att.file.storage_type = esp_mail_file_storage_type_flash;
  att.descr.transfer_encoding = Content_Transfer_Encoding::enc_base64;

  /* Add attachment to the message */
  message.addAttachment(att);

  /* Connect to server with the session config */
  if (!smtp.connect(&config)){
    ESP_MAIL_PRINTF("Connection error, Status Code: %d, Error Code: %d, Reason: %s", smtp.statusCode(), smtp.errorCode(), smtp.errorReason().c_str());
    return;
  }

  if (!smtp.isLoggedIn()){
    Serial.println("\nNot yet logged in.");
  }
  else{
    if (smtp.isAuthenticated())
      Serial.println("\nSuccessfully logged in.");
    else
      Serial.println("\nConnected with no Auth.");
  }

  /* Start sending the Email and close the session */
  if (!MailClient.sendMail(&smtp, &message, true))
    Serial.println("Error sending Email, " + smtp.errorReason());
}

void loop(){
}

/* Callback function to get the Email sending status */
void smtpCallback(SMTP_Status status){
  /* Print the current status */
  Serial.println(status.info());

  /* Print the sending result */
  if (status.success()){
    Serial.println("----------------");
    ESP_MAIL_PRINTF("Message sent success: %d\n", status.completedCount());
    ESP_MAIL_PRINTF("Message sent failled: %d\n", status.failedCount());
    Serial.println("----------------\n");
    struct tm dt;

    for (size_t i = 0; i < smtp.sendingResult.size(); i++){
      /* Get the result item */
      SMTP_Result result = smtp.sendingResult.getItem(i);
      time_t ts = (time_t)result.timestamp;
      localtime_r(&ts, &dt);

      ESP_MAIL_PRINTF("Message No: %d\n", i + 1);
      ESP_MAIL_PRINTF("Status: %s\n", result.completed ? "success" : "failed");
      ESP_MAIL_PRINTF("Date/Time: %d/%d/%d %d:%d:%d\n", dt.tm_year + 1900, dt.tm_mon + 1, dt.tm_mday, dt.tm_hour, dt.tm_min, dt.tm_sec);
      ESP_MAIL_PRINTF("Recipient: %s\n", result.recipients.c_str());
      ESP_MAIL_PRINTF("Subject: %s\n", result.subject.c_str());
    }
    Serial.println("----------------\n");

    // You need to clear sending result as the memory usage will grow up.
    smtp.sendingResult.clear();
  }
}
코드 작동 방식
이 코드는 이전 코드와 매우 유사하므로 첨부 파일을 보내는 데 필요한 부분만 살펴보겠습니다.
setup()에서 ESP 메일 클라이언트 라이브러리 메서드를 사용하여 파일 시스템을 초기화합니다. ESP32의 라이브러리에 설정된 기본 파일 시스템은 LittleFS입니다(라이브러리 파일 ESP_Mail_FS.h에서 기본값을 변경할 수 있음).
// 파일 시스템 초기화
ESP_MAIL_DEFAULT_FLASH_FS.begin();
다음과 같이 첨부 파일을 만들어야 합니다.
/* 첨부 파일 데이터 항목 */
SMTP_Attachment att;
그런 다음 첨부 파일 세부 정보(파일 이름, MIME 유형, 파일 경로, 파일 저장 유형 및 전송 인코딩)를 추가합니다. 다음 줄에서는 이미지 파일을 보냅니다.
att.descr.filename = "image.png";
att.descr.mime = "image/png";
att.file.path = "/image.png";
att.file.storage_type = esp_mail_file_storage_type_flash;
att.descr.transfer_encoding = Content_Transfer_Encoding::enc_base64;
마지막으로 메시지에 첨부 파일을 추가합니다.
message.addAttachment(att);
첨부 파일을 더 보내려면 다음 첨부 파일을 추가하기 전에 다음 줄을 호출해야 합니다.
message.resetAttachItem(att);
그런 다음 다른 첨부 파일(텍스트 파일)의 세부 정보를 입력합니다.
att.descr.filename = "text_file.txt";
att.descr.mime = "text/plain";
att.file.path = "/text_file.txt";
att.file.storage_type = esp_mail_file_storage_type_flash;
att.descr.transfer_encoding = Content_Transfer_Encoding::enc_base64;
그리고 이 첨부 파일을 메시지에 추가합니다.
message.addAttachment(att);
마지막으로 이전 예제와 마찬가지로 메시지를 보내기만 하면 됩니다.
if (!MailClient.sendMail(&smtp, &message, true))
  Serial.println("Error sending Email, " + smtp.errorReason());
데모
코드를 업로드한 후 115200의 전송 속도로 직렬 모니터를 열고 온보드 EN/RESET 버튼을 누릅니다. 모든 것이 순조롭게 진행된다면 직렬 모니터에 비슷한 메시지가 표시될 것입니다.

ESP 이메일 메시지 전송 성공 직렬 모니터
수신자의 이메일 주소를 확인합니다. 첨부 파일 두 개가 있는 새 이메일이 있을 것입니다.

ESP32 및 ESP8266에 첨부 파일이 있는 이메일 보내기
마무리
이 튜토리얼에서는 SMTP 서버를 사용하여 ESP32로 이메일을 보내는 방법을 알아보았습니다. 이 방법을 사용하려면 ESP32가 인터넷에 액세스할 수 있어야 합니다.
SMTP 서버를 사용하지 않으려면 ESP32 또는 ESP8266 보드로 이메일 알림을 보내는 PHP 스크립트를 작성할 수도 있습니다.
텍스트와 첨부 파일이 있는 간단한 이메일을 보내는 방법을 알아보았습니다. 첨부 파일을 사용하는 경우 ESP32 파일 시스템(LittleFS) 또는 microSD 카드(이 튜토리얼에서는 다루지 않음)에 저장해야 합니다.
제시된 예제에서는 ESP32가 부팅될 때 단일 이메일을 보내는 방법을 보여줍니다. 아이디어는 코드를 수정하여 자신의 프로젝트에 포함하는 것입니다. 예를 들어, 센서 판독값이 포함된 .txt 파일을 보내거나, ESP32-CAM으로 촬영한 사진을 보내거나, 딥 슬립을 사용하여 매시간 보드를 깨우고 데이터가 포함된 이메일을 보내는 등의 작업이 유용할 수 있습니다.
이 튜토리얼이 흥미로웠기를 바랍니다.
ESP32에 대해 자세히 알아보려면 리소스를 살펴보세요.
Arduino IDE로 ESP32 배우기
ESP32 및 ESP8266으로 웹 서버 구축 전자책
ESP32 및 ESP8266으로 MicroPython 프로그래밍
추가 ESP32 리소스…
읽어주셔서 감사합니다. 배움을 멈추지 마세요. 어떤 상황에도 포기하지 마세요.
'ESP32' 카테고리의 다른 글
| ESP32 Bluetooth Classic과 Arduino IDE (1) | 2025.01.14 |
|---|---|
| ESP32 HTTP GET Web APIs, OpenWeatherMap.org 및 ThingSpeak (1) | 2025.01.13 |
| ESP32 HTTP GET 및 HTTP POST와 JSON, URL 인코딩, 텍스트 (0) | 2025.01.13 |
| ESP32 SIM800L 모듈 문자 메시지(SMS 알림) 보내기 (0) | 2025.01.10 |
| ESP32 및 ESP8266을 사용한 ESP-MESH 시작하기 (1) | 2025.01.09 |
| ESP32 WebSocket 서버와 제어 출력 (0) | 2025.01.09 |
| ESP32 ESP-NOW 시작하기 (1) | 2025.01.08 |
| ESP32 MQTT 메시지를 게시하고 토픽을 구독하는 방법 (0) | 2025.01.08 |
취업, 창업의 막막함, 외주 관리, 제품 부재!
당신의 고민은 무엇입니까? 현실과 동떨어진 교육, 실패만 반복하는 외주 계약,
아이디어는 있지만 구현할 기술이 없는 막막함.
우리는 알고 있습니다. 문제의 원인은 '명확한 학습, 실전 경험과 신뢰할 수 있는 기술력의 부재'에서 시작됩니다.
이제 고민을 멈추고, 캐어랩을 만나세요!
코딩(펌웨어), 전자부품과 디지털 회로설계, PCB 설계 제작, 고객(시장/수출) 발굴과 마케팅 전략으로 당신을 지원합니다.
제품 설계의 고수는 성공이 만든 게 아니라 실패가 만듭니다. 아이디어를 양산 가능한 제품으로!
귀사의 제품을 만드세요. 교육과 개발 실적으로 신뢰할 수 있는 파트너를 확보하세요.
캐어랩


