반응형
Request Sensor Data via SMS using Arduino and SIM900 GSM Shield
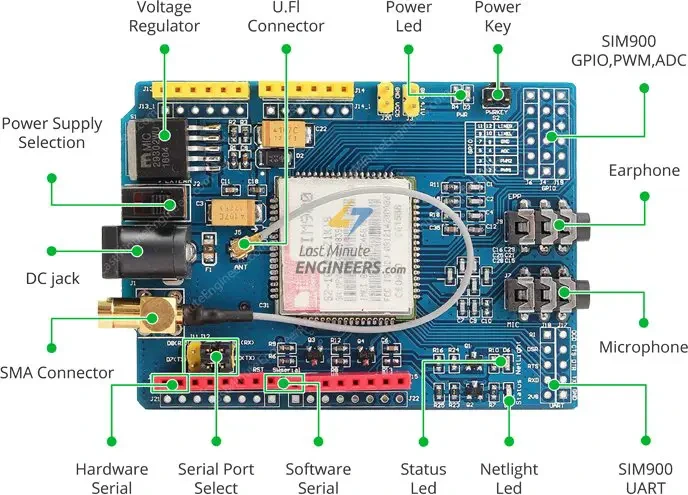
이 프로젝트에서는 아두이노로 SMS를 통해 센서 데이터를 요청하는 방법을 보여드리겠습니다. 예를 들어 DHT11 센서에서 온도와 습도를 요청하겠습니다. 아두이노로 SMS를 주고받기 위해 SIM900 GSM 쉴드를 사용하겠습니다.
// Include DHT library and Adafruit Sensor Library
#include "DHT.h"
#include <Adafruit_Sensor.h>
//Include Software Serial library to communicate with GSM
#include <SoftwareSerial.h>

// Arduino Pin  DHT is connected to
#define DHTPIN 2

// Uncomment whatever type of sensor you're using
//#define DHTTYPE DHT11   // DHT 11
#define DHTTYPE DHT22   // DHT 22  (AM2302)
//#define DHTTYPE DHT21   // DHT 21 (AM2301)

// Initialize DHT sensor for normal 16mhz Arduino
DHT dht(DHTPIN, DHTTYPE);

// Create global varibales to store temperature and humidity
float t; // temperature in celcius
float f; // temperature in fahrenheit
float h; // humidity

// Configure software serial port
SoftwareSerial SIM900(7, 8); // Arduino pin 7 -- SIM900 GSM GPRS TxD; pin 8 -- SIM900 GSM GPRS RXD

// Create variable to store incoming SMS characters
char incomingChar;

void setup() {
  dht.begin();

  Serial.begin(19200);
  SIM900.begin(19200);

  // Give time to your GSM shield log on to network
  delay(20000);
  Serial.print("SIM900 ready...");

  // AT command to set SIM900 to SMS mode
  SIM900.print("AT+CMGF=1\r");
  delay(100);
  // Set module to send SMS data to serial out upon receipt
  SIM900.print("AT+CNMI=2,2,0,0,0\r");
  delay(100);
}

void loop(){
  if (SMSRequest()){
    if(readData()){
      delay(10);
      // REPLACE THE X's WITH THE RECIPIENT'S MOBILE NUMBER
      // USE INTERNATIONAL FORMAT CODE FOR MOBILE NUMBERS
      SIM900.println("AT + CMGS = \"+XXXXXXXXXX\"");
      delay(100);
      // REPLACE WITH YOUR OWN SMS MESSAGE CONTENT
      String dataMessage = ("Temperature: " + String(t) + "*C " + " Humidity: " + String(h) + "%");
      // Uncomment to change message with farenheit temperature
      // String dataMessage = ("Temperature: " + String(f) + "*F " + " Humidity: " + String(h) + "%");

      // Send the SMS text message
      SIM900.print(dataMessage);
      delay(100);
      // End AT command with a ^Z, ASCII code 26
      SIM900.println((char)26);
      delay(100);
      SIM900.println();
      // Give module time to send SMS
      delay(5000);
    }
  }
  delay(10);
}

boolean readData() {
  //Read humidity
  h = dht.readHumidity();
  // Read temperature as Celsius
  t = dht.readTemperature();
  // Read temperature as Fahrenheit
  f = dht.readTemperature(true);

  // Compute temperature values in Celcius
  t = dht.computeHeatIndex(t,h,false);

  // Uncomment to compute temperature values in Fahrenheit
  //f = dht.computeHeatIndex(f,h,false);

  // Check if any reads failed and exit early (to try again).
  if (isnan(h) || isnan(t) || isnan(f)) {
    Serial.println("Failed to read from DHT sensor!");
    return false;
  }
  Serial.print("Humidity: ");
  Serial.print(h);
  Serial.print(" %\t");
  Serial.print("Temperature: ");
  Serial.print(t);
  Serial.print(" *C ");
  //Uncomment to print temperature in Farenheit
  //Serial.print(f);
  //Serial.print(" *F\t");
  return true;
}

boolean SMSRequest() {
  if(SIM900.available() >0) {
    incomingChar=SIM900.read();
    if(incomingChar=='S') {
      delay(10);
      Serial.print(incomingChar);
      incomingChar=SIM900.read();
      if(incomingChar =='T') {
        delay(10);
        Serial.print(incomingChar);
        incomingChar=SIM900.read();
        if(incomingChar=='A') {
          delay(10);
          Serial.print(incomingChar);
          incomingChar=SIM900.read();
          if(incomingChar=='T') {
            delay(10);
            Serial.print(incomingChar);
            incomingChar=SIM900.read();
            if(incomingChar=='E') {
              delay(10);
              Serial.print(incomingChar);
              Serial.print("...Request Received \n");
              return true;
            }
          }
        }
      }
    }
  }
  return false;
}
반응형
'아두이노우노 R4' 카테고리의 다른 글
| Lora 모듈: 15km 거리에서 릴레이 켜기 (0) | 2025.03.24 |
|---|---|
| Arduino 또는 ESP8266을 사용한 JSON 디코딩 및 인코딩 (9) | 2025.03.20 |
| 포모도로 기법과 아두이노로 실제 만드는 방법 (0) | 2025.03.06 |
| 막대에 LED 달아 회전하게 만들기 회로를 구성과 부품 (0) | 2025.03.05 |
| 아두이노 활용 카드뉴스 만들기 (0) | 2025.02.26 |
| Node-Red IoT 대시보드 - 코딩이 필요 없습니다! (1) | 2025.02.08 |
| 아두이노 우노 R4 키보드로 컴퓨터 업무 자동화 (0) | 2025.01.31 |
| Arduino Uno R4 WiFi 볼 것 (0) | 2025.01.08 |
더욱 좋은 정보를 제공하겠습니다.~ ^^


