Arduino 또는 ESP8266으로 JSON 디코딩 및 인코딩
이 블로그 게시물에서는 Arduino와 이더넷 실드를 사용하여 ArduinoJson 라이브러리로 디코딩(JSON 문자열 구문 분석) 및 인코딩(JSON 문자열 생성)하는 방법을 알아봅니다. 이 가이드는 약간의 변경 사항이 있는 ESP8266 및 ESP32 Wi-Fi 모듈에서도 작동합니다.
중요: 이 튜토리얼은 ArduinoJSON 라이브러리 5.13.5와만 호환됩니다.
JSON이란?
JSON은 JavaScript Object Notation의 약자입니다. JSON은 데이터를 교환하기 위한 가벼운 텍스트 기반 오픈 표준 디자인입니다.
JSON은 주로 네트워크 연결을 통해 구조화된 데이터를 직렬화하고 전송하는 데 사용됩니다. 즉, 서버와 클라이언트 간에 데이터를 전송합니다. API(Application Programming Interfaces) 및 공개 데이터를 제공하는 웹 서비스와 같은 서비스에서 자주 사용됩니다.
JSON 구문 기본 사항
JSON에서 데이터는 특정 방식으로 구조화됩니다. JSON은 { }, : ” ” [ ]와 같은 기호를 사용하며, 다음과 같은 구문을 갖습니다.
- 데이터는 키/값 쌍으로 표현됩니다.
- 콜론(:)은 키에 값을 할당합니다.
- 키/값 쌍은 쉼표(,)로 구분됩니다.
- 중괄호는 객체를 보관합니다({ })
- 대괄호는 배열을 보관합니다([ ])
예를 들어 JSON으로 데이터를 표현하려면 키/값 쌍이 다음과 같이 제공됩니다.
{"key1":"value1", "key2":"value2", "key3":"value3"}
JSON 예제
실제 사례에서 사용자에 대한 구조적 데이터가 필요할 수 있습니다.
{"name":"Rui", "country": "Portugal", "age":24}
또는 IoT 프로젝트에서 센서의 데이터를 구조화할 수 있습니다.
{"temperature":27.23, "humidity":62.05, "pressure":1013.25}
JSON에서 값은 다른 JSON 객체(스포츠) 또는 배열(반려동물)이 될 수 있습니다. 예를 들어:
{
  "name": "Rui",
  "sports": {
    "outdoor": "hiking",
    "indoor": "swimming"
  },
  "pets": [
    "Max",
    "Dique"
  ]
}
여기서 사용자에 대한 데이터를 구조화하고 있으며 "name", "sports" 및 "pets"라는 여러 키가 있습니다.
이름에는 Rui가 할당된 값이 있습니다. Rui는 연습하는 장소에 따라 다양한 스포츠를 연습할 수 있습니다. 따라서 Rui가 좋아하는 스포츠를 저장하기 위해 다른 JSON 객체를 만듭니다. 이 JSON 객체는 "sports" 키의 값입니다.
"pets" 키에는 Rui의 반려동물 이름이 포함된 배열이 있으며 내부에 "Max" 및 "Dique" 값이 있습니다.
대부분의 API는 JSON으로 데이터를 반환하고 대부분의 값은 JSON 객체 자체입니다. 다음 예는 날씨 API에서 제공하는 데이터를 보여줍니다.
{
  "coord":{
     "lon":-8.61,
     "lat":41.15
  },
  "weather":[
    {
      "id":803,
      "main":"Clouds",
      "description":"broken clouds",
      "icon":"04d"
    }
  ],
  "base":"stations",
  "main":{
    "temp":288.15,
    "pressure":1020,
    "humidity":93,
    "temp_min":288.15,
    "temp_max":288.15
  },
  (...)
}
이 API는 많은 정보를 제공합니다. 예를 들어, 첫 번째 줄은 경도와 위도가 포함된 좌표를 저장합니다.
이더넷 실드가 있는 Arduino
이 게시물의 예에서는 이더넷 실드가 있는 Arduino를 사용합니다. Arduino 보드에 실드를 장착하고 RJ45 케이블로 네트워크에 연결하여 인터넷 연결을 설정하기만 하면 됩니다(아래 그림 참조).
참고: 이 튜토리얼에서 제공하는 예제는 약간의 변경을 통해 ESP8266 및 ESP32에서도 작동합니다.
Arduino IDE 준비
Arduino IDE로 JSON 문자열을 디코딩하고 인코딩하는 가장 쉬운 방법은 ArduinoJson 라이브러리 5.13.5를 사용하는 것입니다. 이 라이브러리는 가장 직관적인 JSON 라이브러리로 설계되었으며, 가장 작은 풋프린트와 Arduino에 가장 효율적인 메모리 관리 기능을 제공합니다.
Arduino를 염두에 두고 작성되었지만 Arduino 라이브러리와 연결되어 있지 않으므로 다른 C++ 프로젝트에서 이 라이브러리를 사용할 수 있습니다. 또한 예제와 API 참조가 있는 라이브러리에 대한 설명서 웹사이트도 있습니다.
특징
- JSON 디코딩(주석 지원)
- JSON 인코딩(들여쓰기 옵션 있음)
- 우아한 API, 사용하기 매우 쉬움
- 고정 메모리 할당(malloc 없음)
- 데이터 중복 없음(복사 없음)
- 이식 가능(C++98로 작성)
- 독립형(외부 종속성 없음)
- 작은 풋프린트
- 헤더 전용 라이브러리
- MIT 라이선스
다음과 호환
- Arduino 보드: Uno, Due, Mini, Micro, Yun…
- ESP8266, ESP32 및 WeMos 보드
- Teensy, RedBearLab 보드, Intel Edison 및 Galileo
- PlatformIO, Particle 및 Energia
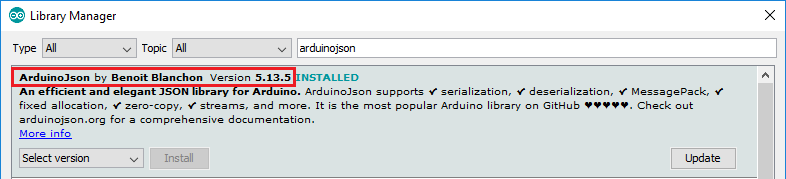
ArduinoJson 라이브러리 설치
이 프로젝트의 경우 Arduino IDE에 ArduinoJson 라이브러리를 설치해야 합니다.
- 여기를 클릭하여 ArduinoJson 버전 5.13.5를 다운로드하세요. 다운로드 폴더에 .zip 폴더가 있어야 합니다. 아니면 라이브러리 매니저에서 검색하여 설치합니다.
- .zip 폴더의 압축을 풀면 ArduinoJson-master 폴더가 나옵니다.
- 폴더 이름을 ArduinoJson-master에서 ArduinoJson으로 바꿉니다.
- ArduinoJson 폴더를 Arduino IDE 설치 라이브러리 폴더로 옮깁니다.
- 마지막으로 Arduino IDE를 다시 엽니다.
JSON 디코딩 - JSON 문자열 구문 분석
다음 JSON 문자열을 디코딩/구문 분석하는 것으로 시작해 보겠습니다.
{"sensor":"gps","time":1351824120,"data":[48.756080,2.302038]}
ArduinoJson 라이브러리를 가져옵니다.
#include <ArduinoJson.h>
Arduino JSON은 미리 할당된 메모리 풀을 사용하여 JsonObject 트리를 저장합니다. 이는 StaticJsonBuffer에서 수행합니다. ArduinoJson Assistant를 사용하여 정확한 버퍼 크기를 계산할 수 있지만 이 예에서는 200으로 충분합니다.
StaticJsonBuffer<200> jsonBuffer;
json[ ]이라는 char 배열을 만들어 샘플 JSON 문자열을 저장합니다.
char json[] = "{\"sensor\":\"gps\",\"time\":1351824120,\"data\":[48.756080,2.302038]}";
parseObject() 함수를 사용하여 JSON 문자열을 root라는 JsonObject로 디코딩/파싱합니다.
JsonObject& root = jsonBuffer.parseObject(json);
디코딩/파싱이 성공했는지 확인하려면 root.success()를 호출하면 됩니다.
if(!root.success()) {
  Serial.println("parseObject() failed");
  return false;
}
결과는 세 가지 이유로 false가 될 수 있습니다.
- JSON 문자열의 구문이 잘못되었습니다.
- JSON 문자열이 객체를 나타내지 않습니다.
- StaticJsonBuffer가 너무 작습니다. ArduinoJson Assistant를 사용하여 버퍼 크기를 계산합니다.
이제 객체나 배열이 메모리에 있으므로 데이터를 쉽게 추출할 수 있습니다. 가장 간단한 방법은 JsonObject root를 사용하는 것입니다.
const char* sensor = root["sensor"];
long time = root["time"];
double latitude = root["data"][0];
double longitude = root["data"][1];
코드 로직에서 디코딩된 변수인 sensor, time, latitude 또는 longitude를 사용할 수 있습니다.
OpenWeatherMap API
이더넷 실드가 있는 Arduino를 사용하는 실제 예로, OpenWeatherMap의 무료 API를 사용하여 선택한 위치의 당일 날씨 예보를 요청합니다.
API를 사용하는 법을 배우는 것은 현재 주가, 환율, 최신 뉴스, 교통 상황 업데이트 등 끊임없이 변화하는 다양한 정보에 액세스할 수 있기 때문에 훌륭한 기술입니다.
API 사용
OpenWeatherMap의 무료 플랜은 예제에 필요한 모든 것을 제공합니다. API를 사용하려면 APIID라고 하는 API 키가 필요합니다. APIID를 얻으려면:
- 브라우저를 열고 OpenWeatherMap으로 이동합니다.
- 가입 버튼을 누르고 무료 계정을 만듭니다.
- 계정이 생성되면 여러 탭이 있는 대시보드가 표시됩니다(아래 그림 참조)
- API 키 탭을 선택하고 고유 키를 복사합니다.
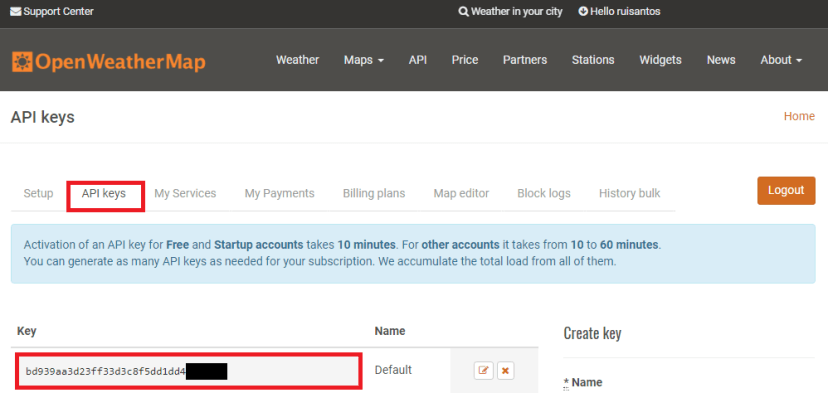
이것은 사이트에서 정보를 가져오는 데 필요한 고유 키입니다. 이 키를 어딘가에 복사하여 붙여넣습니다. 곧 필요할 것입니다.
선택한 위치의 날씨 정보를 가져오려면 다음 URL을 입력하고 중괄호 안의 섹션은 선택한 위치 정보와 고유 API 키로 바꾸세요.
http://api.openweathermap.org/data/2.5/weather?q={your city},{your country code}&APPID={your API Key}
{도시}를 데이터를 원하는 도시로, {국가 코드}를 해당 도시의 국가 코드로, {API 키}를 이전에 찾은 고유 API 키로 바꾸세요. 예를 들어 포르투갈의 포르투에 대한 API URL을 세부 정보로 바꾸면 다음과 같습니다.
http://api.openweathermap.org/data/2.5/weather?q=Porto,PT&APPID=801d2603e9f2e1c70e042e4------
참고: API를 사용하여 날씨 정보를 가져오는 방법에 대한 자세한 내용은 여기에서 확인할 수 있습니다.
URL을 브라우저에 복사하면 해당 지역의 날씨 정보에 해당하는 정보가 많이 나옵니다.
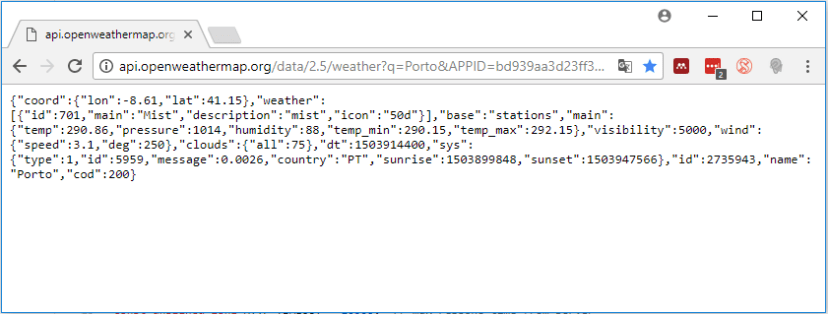
우리의 경우, 글을 쓰는 날의 포르투갈 포르투의 날씨를 반환합니다.
{
  "coord": {
    "lon": -8.61,
    "lat": 41.15
  },
  "weather": [
    {
      "id": 701,
      "main": "Mist",
      "description": "mist",
      "icon": "50d"
    }
  ],
  "base": "stations",
  "main": {
    "temp": 290.86,
    "pressure": 1014,
    "humidity": 88,
    "temp_min": 290.15,
    "temp_max": 292.15
  },
  (...)
}
Arduino로 API 요청하기
이제 로컬 날씨 데이터를 반환하는 URL이 있습니다. 이 작업을 자동화하고 Arduino 또는 ESP8266 프로젝트에서 해당 데이터에 액세스할 수 있습니다. 다음은 켈빈 온도와 습도를 반환하기 위해 이더넷 실드가 있는 Arduino에 업로드해야 하는 전체 스크립트입니다.
/*
 * Rui Santos
 * Complete Project Details https://randomnerdtutorials.com
 * Based on the Arduino Ethernet Web Client Example
 * and on the sketch "Sample Arduino Json Web Client" of the Arduino JSON library by Benoit Blanchon (bblanchon.github.io/ArduinoJson)
 */

#include <ArduinoJson.h>
#include <Ethernet.h>
#include <SPI.h>

EthernetClient client;

// Name address for Open Weather Map API
const char* server = "api.openweathermap.org";

// Replace with your unique URL resource
const char* resource = "REPLACE_WITH_YOUR_URL_RESOURCE";

// How your resource variable should look like, but with your own COUNTRY CODE, CITY and API KEY (that API KEY below is just an example):
//const char* resource = "/data/2.5/weather?q=Porto,pt&appid=bd939aa3d23ff33d3c8f5dd1";

const unsigned long HTTP_TIMEOUT = 10000;  // max respone time from server
const size_t MAX_CONTENT_SIZE = 512;       // max size of the HTTP response

byte mac[] = {0xDE, 0xAD, 0xBE, 0xEF, 0xFE, 0xED};

// The type of data that we want to extract from the page
struct clientData {
  char temp[8];
  char humidity[8];
};

// ARDUINO entry point #1: runs once when you press reset or power the board
void setup() {
  Serial.begin(9600);
  while (!Serial) {
    ;  // wait for serial port to initialize
  }
  Serial.println("Serial ready");
  if(!Ethernet.begin(mac)) {
    Serial.println("Failed to configure Ethernet");
    return;
  }
  Serial.println("Ethernet ready");
  delay(1000);
}

// ARDUINO entry point #2: runs over and over again forever
void loop() {
  if(connect(server)) {
    if(sendRequest(server, resource) && skipResponseHeaders()) {
      clientData clientData;
      if(readReponseContent(&clientData)) {
        printclientData(&clientData);
      }
    }
  }
  disconnect();
  wait();
}

// Open connection to the HTTP server
bool connect(const char* hostName) {
  Serial.print("Connect to ");
  Serial.println(hostName);

  bool ok = client.connect(hostName, 80);

  Serial.println(ok ? "Connected" : "Connection Failed!");
  return ok;
}

// Send the HTTP GET request to the server
bool sendRequest(const char* host, const char* resource) {
  Serial.print("GET ");
  Serial.println(resource);

  client.print("GET ");
  client.print(resource);
  client.println(" HTTP/1.1");
  client.print("Host: ");
  client.println(host);
  client.println("Connection: close");
  client.println();

  return true;
}

// Skip HTTP headers so that we are at the beginning of the response's body
bool skipResponseHeaders() {
  // HTTP headers end with an empty line
  char endOfHeaders[] = "\r\n\r\n";

  client.setTimeout(HTTP_TIMEOUT);
  bool ok = client.find(endOfHeaders);

  if (!ok) {
    Serial.println("No response or invalid response!");
  }
  return ok;
}

// Parse the JSON from the input string and extract the interesting values
// Here is the JSON we need to parse
/*{
    "coord": {
        "lon": -8.61,
        "lat": 41.15
    },
    "weather": [
        {
            "id": 800,
            "main": "Clear",
            "description": "clear sky",
            "icon": "01d"
        }
    ],
    "base": "stations",
    "main": {
        "temp": 296.15,
        "pressure": 1020,
        "humidity": 69,
        "temp_min": 296.15,
        "temp_max": 296.15
    },
    "visibility": 10000,
    "wind": {
        "speed": 4.6,
        "deg": 320
    },
    "clouds": {
        "all": 0
    },
    "dt": 1499869800,
    "sys": {
        "type": 1,
        "id": 5959,
        "message": 0.0022,
        "country": "PT",
        "sunrise": 1499836380,
        "sunset": 1499890019
    },
    "id": 2735943,
    "name": "Porto",
    "cod": 200
}*/

bool readReponseContent(struct clientData* clientData) {
  // Compute optimal size of the JSON buffer according to what we need to parse.
  // See https://bblanchon.github.io/ArduinoJson/assistant/
  const size_t bufferSize = JSON_ARRAY_SIZE(1) + JSON_OBJECT_SIZE(1) +
      2*JSON_OBJECT_SIZE(2) + JSON_OBJECT_SIZE(4) + JSON_OBJECT_SIZE(5) +
      JSON_OBJECT_SIZE(6) + JSON_OBJECT_SIZE(12) + 390;
  DynamicJsonBuffer jsonBuffer(bufferSize);

  JsonObject& root = jsonBuffer.parseObject(client);

  if (!root.success()) {
    Serial.println("JSON parsing failed!");
    return false;
  }

  // Here were copy the strings we're interested in using to your struct data
  strcpy(clientData->temp, root["main"]["temp"]);
  strcpy(clientData->humidity, root["main"]["humidity"]);
  // It's not mandatory to make a copy, you could just use the pointers
  // Since, they are pointing inside the "content" buffer, so you need to make
  // sure it's still in memory when you read the string

  return true;
}

// Print the data extracted from the JSON
void printclientData(const struct clientData* clientData) {
  Serial.print("Temp = ");
  Serial.println(clientData->temp);
  Serial.print("Humidity = ");
  Serial.println(clientData->humidity);
}

// Close the connection with the HTTP server
void disconnect() {
  Serial.println("Disconnect");
  client.stop();
}

// Pause for a 1 minute
void wait() {
  Serial.println("Wait 60 seconds");
  delay(60000);
}
참고: 리소스 변수를 고유한 OpenWeatherMap URL 리소스로 바꿔야 합니다.
const char* resource = "REPLACE_WITH_YOUR_URL_RESOURCE";
프로젝트의 코드 수정
이 예에서 Arduino는 원하는 서비스(이 경우 OpenWeatherMap API)에 HTTP GET 요청을 수행하지만 다른 웹 서비스를 요청하도록 변경할 수 있습니다. Arduino 코드를 줄별로 설명하지는 않습니다.
이 프로젝트의 경우 JSON 응답을 디코딩/파싱하기 위해 Arduino 코드에서 무엇을 변경해야 하는지 이해하는 것이 중요합니다. 다음 세 단계를 따르세요.
1단계 - 구조
API에서 추출하려는 정보를 저장할 수 있는 데이터 구조를 만듭니다. 이 경우 온도와 습도를 char 배열에 저장하고 싶습니다.
struct clientData {
  char temp[8];
  char humidity[8];
};
2단계 - JsonBuffer 크기
ArduinoJson Assistant로 이동하여 전체 OpenWeatherMap API 응답을 입력 필드에 복사합니다.
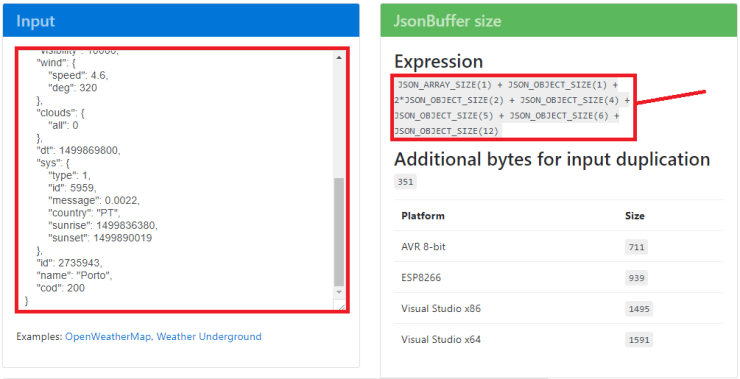
생성된 표현식을 복사합니다(앞의 그림 참조). 제 경우에는 다음과 같습니다.
JSON_ARRAY_SIZE(1) + JSON_OBJECT_SIZE(1) + 2*JSON_OBJECT_SIZE(2) + JSON_OBJECT_SIZE(4) + JSON_OBJECT_SIZE(5) + JSON_OBJECT_SIZE(6) + JSON_OBJECT_SIZE(12)
JSON_ARRAY_SIZE(1) + JSON_OBJECT_SIZE(1) + 2*JSON_OBJECT_SIZE(2) + JSON_OBJECT_SIZE(4) + JSON_OBJECT_SIZE(5) + JSON_OBJECT_SIZE(6) + JSON_OBJECT_SIZE(12)
ArduinoJson Assistant에서 생성된 JsonBuffer 크기로 readReponseContent() 함수를 편집하여 API에서 JSON 응답을 디코딩하는 데 적합한 메모리를 할당해야 합니다.
bool readReponseContent(struct clientData* clientData) {
  const size_t bufferSize = JSON_ARRAY_SIZE(1) + JSON_OBJECT_SIZE(1) +
    2*JSON_OBJECT_SIZE(2) + JSON_OBJECT_SIZE(4) + JSON_OBJECT_SIZE(5) +
    JSON_OBJECT_SIZE(6) + JSON_OBJECT_SIZE(12) + 390;

  DynamicJsonBuffer jsonBuffer(bufferSize);
  JsonObject& root = jsonBuffer.parseObject(client);
여전히 readReponseContent() 함수 내부에서 프로젝트에 필요한 변수를 구조체 데이터로 복사해야 합니다.
strcpy(clientData->temp, root["main"]["temp"]);
strcpy(clientData->humidity, root["main"]["humidity"]);
3단계 - 디코딩된 데이터 액세스
그런 다음 Arduino 코드에서 디코딩된 JSON 데이터에 쉽게 액세스하여 작업을 수행할 수 있습니다. 이 예에서는 Arduino IDE 직렬 모니터에 켈빈 온도와 습도를 간단히 인쇄합니다.
void printclientData(const struct clientData* clientData) {
  Serial.print("Temp = ");
  Serial.println(clientData->temp);
  Serial.print("Humidity = ");
  Serial.println(clientData->humidity);
}
데모
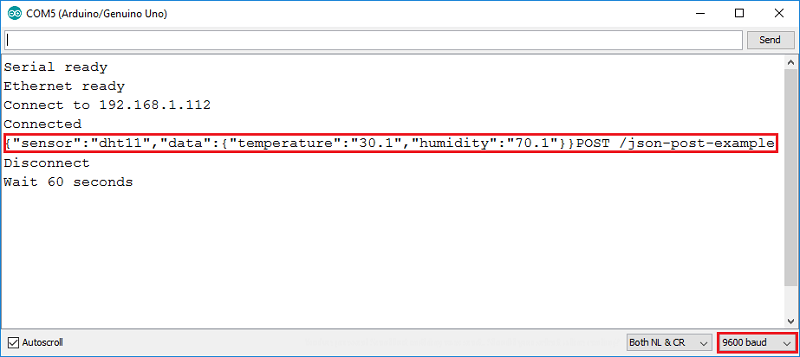
Arduino IDE 직렬 모니터를 9600의 전송 속도로 열면 60초마다 직렬 모니터에 켈빈 온도와 백분율 습도가 인쇄되는 것을 볼 수 있습니다.
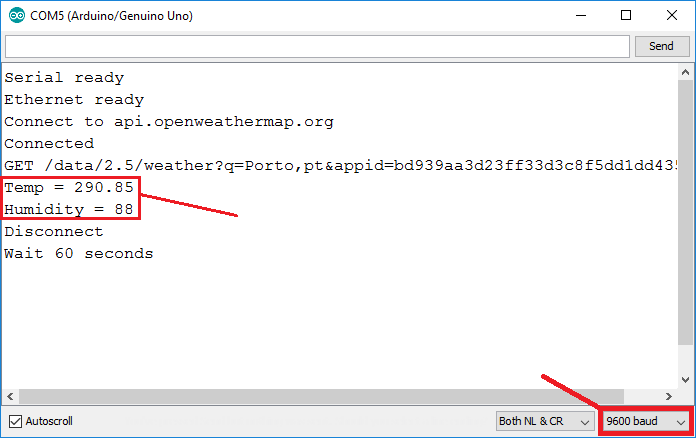
OpenWeatherMap API 응답에서 나머지 정보에 액세스할 수 있지만 데모 목적으로 온도와 습도만 디코딩했습니다.
JSON 인코딩 - JSON 문자열 생성
다음 JSON 문자열을 인코딩/생성하는 방법을 알아보겠습니다.
{"sensor":"gps","time":1351824120,"data":[48.756080,2.302038]}
인코딩에 대한 문서는 여기에서 읽을 수 있습니다.
ArduinoJson 라이브러리 가져오기:
#include <ArduinoJson.h>
Arduino JSON은 미리 할당된 메모리 풀을 사용하여 객체 트리를 저장하는데, 이는 StaticJsonBuffer에서 수행합니다. ArduinoJson Assistant를 사용하여 정확한 버퍼 크기를 계산할 수 있지만 이 예제에서는 200으로 충분합니다.
StaticJsonBuffer<200> jsonBuffer;
데이터를 보관할 root라는 JsonObject를 만듭니다. 그런 다음 gps와 1351824120 값을 각각 센서와 시간 키에 할당합니다.
JsonObject& root = jsonBuffer.createObject();
root["sensor"] = "gps";
root["time"] = 1351824120;
그런 다음 데이터 키 내부에 배열을 보관하려면 다음을 수행합니다.
JsonArray& data = root.createNestedArray("data");
data.add(48.756080);
data.add(2.302038);
디버깅 목적으로 생성된 JSON을 직렬 모니터에 인쇄해야 할 가능성이 매우 높습니다. 이를 위해 다음을 수행합니다.
root.printTo(Serial);
정보를 JSON 문자열로 인코딩한 후 다음 예와 같이 다른 장치나 웹 서비스에 게시할 수 있습니다.
Arduino와 Node-RED를 사용한 인코딩 예
이 예에서는 HTTP POST 요청을 수신할 수 있는 Node-RED 또는 유사한 소프트웨어가 필요합니다. 컴퓨터에 Node-RED를 설치할 수 있지만 Raspberry Pi에서 Node-RED를 실행하는 것이 좋습니다.
흐름 만들기
이 흐름에서는 HTTP POST 요청을 수신하고 수신 데이터를 디버그 창에 인쇄합니다. 다음 6단계에 따라 흐름을 만듭니다.
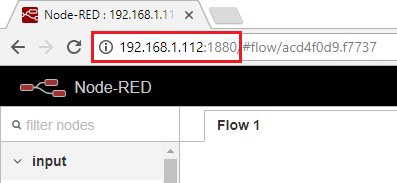
1) 브라우저에서 Node-RED 소프트웨어를 엽니다.
2) HTTP 입력 노드와 디버그 노드를 드래그합니다.

3) POST 메서드와 /json-post-example URL을 추가하여 HTTP 입력을 편집합니다.
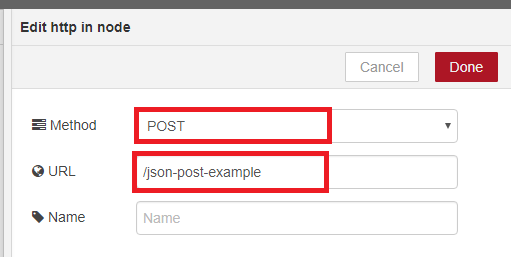
4) 디버그 노드에 대한 기본 설정을 그대로 둘 수 있습니다.
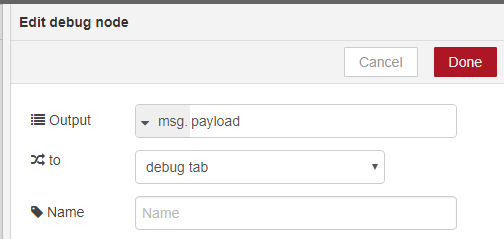
5) 노드를 연결합니다.

6) 애플리케이션을 저장하려면 오른쪽 상단 모서리에 있는 배포 버튼을 클릭해야 합니다.

애플리케이션이 저장되고 준비되었습니다.
Arduino로 JSON 데이터 보내기
Node-RED가 /json-post-example URL에서 POST 요청을 수신할 준비가 되면 이더넷 실드가 있는 Arduino에서 다음 코드 예제를 사용하여 데이터를 보낼 수 있습니다.
/*
 * Rui Santos
 * Complete Project Details https://randomnerdtutorials.com
 * Based on the Arduino Ethernet Web Client Example
 * and on the sketch "Sample Arduino Json Web Client" of the Arduino JSON library by Benoit Blanchon (bblanchon.github.io/ArduinoJson)
 */

#include <ArduinoJson.h>
#include <Ethernet.h>
#include <SPI.h>

EthernetClient client;

// Replace with your Raspberry Pi IP address
const char* server = "REPLACE_WITH_YOUR_RASPBERRY_PI_IP_ADDRESS";

// Replace with your server port number frequently port 80 - with Node-RED you need to use port 1880
int portNumber = 1880;

// Replace with your unique URL resource
const char* resource = "/json-post-example";

const unsigned long HTTP_TIMEOUT = 10000;  // max respone time from server
const size_t MAX_CONTENT_SIZE = 512;       // max size of the HTTP response

byte mac[] = {0xDE, 0xAD, 0xBE, 0xEF, 0xFE, 0xED};

// ARDUINO entry point #1: runs once when you press reset or power the board
void setup() {
  Serial.begin(9600);
  while(!Serial) {
    ;  // wait for serial port to initialize
  }
  Serial.println("Serial ready");
  if(!Ethernet.begin(mac)) {
    Serial.println("Failed to configure Ethernet");
    return;
  }
  Serial.println("Ethernet ready");
  delay(1000);
}

// ARDUINO entry point #2: runs over and over again forever
void loop() {
  if(connect(server, portNumber)) {
    if(sendRequest(server, resource) && skipResponseHeaders()) {
      Serial.print("HTTP POST request finished.");
    }
  }
  disconnect();
  wait();
}

// Open connection to the HTTP server (Node-RED running on Raspberry Pi)
bool connect(const char* hostName, int portNumber) {
  Serial.print("Connect to ");
  Serial.println(hostName);

  bool ok = client.connect(hostName, portNumber);

  Serial.println(ok ? "Connected" : "Connection Failed!");
  return ok;
}

// Send the HTTP POST request to the server
bool sendRequest(const char* host, const char* resource) {
  // Reserve memory space for your JSON data
  StaticJsonBuffer<200> jsonBuffer;

  // Build your own object tree in memory to store the data you want to send in the request
  JsonObject& root = jsonBuffer.createObject();
  root["sensor"] = "dht11";

  JsonObject& data = root.createNestedObject("data");
  data.set("temperature", "30.1");
  data.set("humidity", "70.1");

  // Generate the JSON string
  root.printTo(Serial);

  Serial.print("POST ");
  Serial.println(resource);

  client.print("POST ");
  client.print(resource);
  client.println(" HTTP/1.1");
  client.print("Host: ");
  client.println(host);
  client.println("Connection: close\r\nContent-Type: application/json");
  client.print("Content-Length: ");
  client.print(root.measureLength());
  client.print("\r\n");
  client.println();
  root.printTo(client);

  return true;
}

// Skip HTTP headers so that we are at the beginning of the response's body
bool skipResponseHeaders() {
  // HTTP headers end with an empty line
  char endOfHeaders[] = "\r\n\r\n";

  client.setTimeout(HTTP_TIMEOUT);
  bool ok = client.find(endOfHeaders);

  if(!ok) {
    Serial.println("No response or invalid response!");
  }
  return ok;
}

// Close the connection with the HTTP server
void disconnect() {
  Serial.println("Disconnect");
  client.stop();
}

// Pause for a 1 minute
void wait() {
  Serial.println("Wait 60 seconds");
  delay(60000);
}
참고: server 변수를 Raspberry Pi IP 주소로 바꿔야 합니다.
const char* server = "REPLACE_WITH_YOUR_RASPBERRY_PI_IP_ADDRESS";
프로젝트 코드 수정
이 예제에서 Arduino는 Node-RED에 HTTP POST 요청을 수행하지만 다른 웹 서비스나 서버를 요청하도록 변경할 수 있습니다. Arduino 코드를 줄별로 설명하지는 않겠습니다. 이 프로젝트에서는 JSON 요청을 인코딩/생성하기 위해 Arduino 코드에서 무엇을 변경해야 하는지 이해하는 것이 중요합니다.
sendRequest() 함수
이 프로젝트에서는 자체 JSON 데이터 구조로 sendRequest() 함수를 수정할 수 있습니다.
bool sendRequest(const char* host, const char* resource) {
먼저 JSON 데이터를 위한 메모리 공간을 예약합니다. ArduinoJson Assistant를 사용하여 정확한 버퍼 크기를 계산할 수 있지만 이 예에서는 200으로 충분합니다.
StaticJsonBuffer<200> jsonBuffer;
데이터를 보관하고 키에 값을 할당하는 root라는 JsonObject를 만듭니다(이 예에서는 센서 키가 있습니다).
JsonObject& root = jsonBuffer.createObject();
root["sensor"] = "dht11";
배열 내부에 데이터를 보관하려면 다음을 수행합니다.
JsonObject& data = root.createNestedObject("data");
data.set("temperature", "30.1");
data.set("humidity", "70.1");
디버깅 목적으로 Arduino IDE 직렬 모니터에 생성된 JSON 문자열을 인쇄합니다.
root.printTo(Serial);
나머지 sendRequest() 함수는 POST 요청입니다.
client.print("POST ");
client.print(resource);
client.println(" HTTP/1.1");
client.print("Host: ");
client.println(host);
client.println("Connection: close\r\nContent-Type: application/json");
client.print("Content-Length: ");
client.print(root.measureLength());
client.print("\r\n");
client.println();
root.printTo(client);
root.measureLength()를 사용하여 생성된 JSON의 길이를 확인할 수 있습니다. root.printTo(client)는 JSON 데이터를 이더넷 클라이언트로 전송합니다.
데모
Arduino IDE 직렬 모니터를 9600의 전송 속도로 열면 60초마다 직렬 모니터에 JSON 객체가 인쇄되는 것을 볼 수 있습니다.
Node-RED 디버그 탭에서 동일한 JSON 객체가 60초마다 수신되는 것을 볼 수 있습니다.
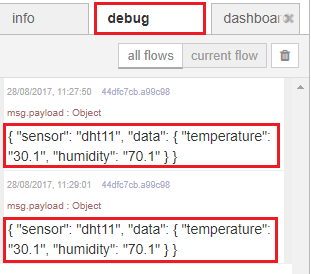
마지막으로 Node-RED에서 수신된 데이터로 유용한 작업을 수행하는 함수를 만들지만 데모 목적으로 샘플 데이터만 인쇄합니다.
마무리
이 튜토리얼에서는 JSON 데이터를 디코딩하고 인코딩하는 방법에 대한 몇 가지 예를 보여주었습니다. 이러한 기본 단계를 따르면 장치 간에 데이터를 교환해야 하는 고급 프로젝트를 빌드할 수 있습니다.
이 튜토리얼이 유용했기를 바랍니다.
참고 사이트 https://randomnerdtutorials.com/decoding-and-encoding-json-with-arduino-or-esp8266/
'아두이노우노 R4' 카테고리의 다른 글
| Request Sensor Data via SMS using Arduino and SIM900 GSM Shield (0) | 2025.04.22 |
|---|---|
| Lora 모듈: 15km 거리에서 릴레이 켜기 (0) | 2025.03.24 |
| 포모도로 기법과 아두이노로 실제 만드는 방법 (0) | 2025.03.06 |
| 막대에 LED 달아 회전하게 만들기 회로를 구성과 부품 (0) | 2025.03.05 |
| 아두이노 활용 카드뉴스 만들기 (0) | 2025.02.26 |
| Node-Red IoT 대시보드 - 코딩이 필요 없습니다! (1) | 2025.02.08 |
| 아두이노 우노 R4 키보드로 컴퓨터 업무 자동화 (0) | 2025.01.31 |
| Arduino Uno R4 WiFi 볼 것 (0) | 2025.01.08 |
더욱 좋은 정보를 제공하겠습니다.~ ^^


