이 가이드에서는 ESPAsyncWebServer 라이브러리를 사용하여 Wi-Fi 관리자를 생성하고 설정하는 방법을 설명합니다. 이 Wi-Fi 관리자는 웹 서버 프로젝트 또는 Wi-Fi 네트워크 연결이 필요한 모든 프로젝트에서 사용할 수 있도록 수정할 수 있습니다.
Wi-Fi 관리자를 사용하면 네트워크 자격 증명(SSID 및 비밀번호)을 하드코딩하지 않고도 ESP32 보드를 다양한 액세스 포인트(네트워크)에 연결하고 보드에 새 코드를 업로드할 수 있습니다. ESP는 자동으로 마지막으로 저장된 네트워크에 연결되거나, 네트워크 자격 증명을 구성하는 데 사용할 수 있는 액세스 포인트를 설정합니다.
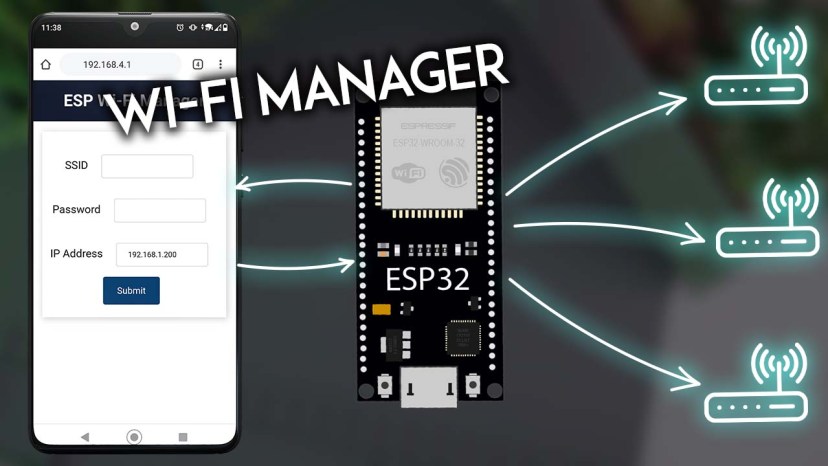
ESP32: 간단한 Wi-Fi 관리자 만들기 (AsyncWebServer 라이브러리 사용)
이 프로젝트의 작동 방식을 더 잘 이해하려면 다음 튜토리얼을 읽어보실 것을 권장합니다.
- Arduino IDE를 사용하여 ESP32/ESP8266 웹 서버의 HTML 폼에 데이터 입력
- ESP32를 웹 서버용 액세스 포인트(AP)로 설정하는 방법
- ESP32 고정 IP 주소
저희는 다음 프로젝트에서도 이와 같은 Wi-Fi 관리자 방식을 사용합니다.
작동 방식
다음 다이어그램을 살펴보면 우리가 만들 Wi-Fi 관리자가 어떻게 작동하는지 이해할 수 있습니다.

ESP32 ESP8266 Wi-Fi 관리자 웹 서버 작동 방식
- ESP가 처음 시작될 때, 읽기를 시도합니다.ssid.txt,pass.txt그리고ip.txt파일* ( 1 );
- 파일이 비어있는 경우( 2 )(보드를 처음 실행할 때 파일이 비어있음), 보드는 액세스 포인트로 설정됩니다( 3 ).
- Wi-Fi를 지원하는 기기와 브라우저를 사용하여 새로 생성된 액세스 포인트(기본 이름)에 연결할 수 있습니다.ESP-와이파이-매니저);
- ESP-WIFI-MANAGER와 연결이 설정되면 기본 IP 주소로 이동할 수 있습니다.192.168.4.1SSID와 암호를 구성할 수 있는 웹 페이지를 열려면( 4 )
- 양식에 입력된 SSID, 비밀번호 및 IP 주소는 해당 파일에 저장됩니다.ssid.txt,pass.txt, 그리고ip.txt( 5 );
- 그 후 ESP 보드가 재시작됩니다( 6 ).
- 이번에는 재시작 후 파일이 비어 있지 않으므로 ESP는 사용자가 양식에 입력한 설정을 사용하여 스테이션 모드에서 네트워크에 연결하려고 시도합니다( 7 ).
- 연결이 설정되면 프로세스가 성공적으로 완료되고 원하는 작업을 수행할 수 있는 메인 웹 서버 페이지에 액세스할 수 있습니다(센서 판독값 제어, 출력 제어, 텍스트 표시 등)( 9 ). 그렇지 않으면 액세스 포인트( 3 ) 가 설정 되고 기본 IP 주소에 액세스할 수 있습니다.192.168.4.1) 다른 SSID/비밀번호 조합을 추가하려면.
* 또한 게이트웨이 필드와게이트웨이.txtIP 주소 게이트웨이를 저장할 파일입니다(다이어그램에는 표시되지 않음).
Wi-Fi 관리자 설정 방법을 보여드리기 위해, 하나의 출력(GPIO2 - 내장 LED)을 제어하는 웹 서버를 설정해 보겠습니다. Wi-Fi 관리자는 ESPAsyncWebServer 라이브러리로 구축된 모든 웹 서버 프로젝트 또는 ESP가 Wi-Fi 네트워크에 연결되어야 하는 모든 프로젝트에 적용할 수 있습니다.
필수 조건
아두이노 IDE를 사용하여 ESP32 보드를 프로그래밍할 것입니다. 따라서 ESP32 보드 확장 프로그램이 설치되어 있는지 확인하십시오.
- 아두이노 IDE에 ESP32 보드 설치하기 (윈도우, Mac OS X, 리눅스)
- VS Code와 PlatformIO를 사용하여 ESP32를 프로그래밍하려면 다음 튜토리얼을 따르세요.
- VS Code와 PlatformIO IDE를 사용하여 ESP32 및 ESP8266 시작하기 (Windows, Mac OS X, Linux Ubuntu)
라이브러리 설치 (아두이노 IDE)
다음 라이브러리를 사용하여 웹 서버를 구축하겠습니다.
- ESPAsyncWebServer
- 비동기TCP
이 라이브러리들은 아두이노 라이브러리 관리자에 설치할 수 있습니다. 왼쪽 사이드바의 라이브러리 아이콘을 클릭하여 라이브러리 관리자를 여세요.
ESPAsyncWebServer를 검색하고 ESP32Async의 ESPAsyncWebServer를 설치하십시오.

ESPAsyncWebServer ESP32 Arduino IDE 설치
그런 다음 AsyncTCP 라이브러리를 설치하세요. AsyncTCP를 검색하고 ESP32Async의 AsyncTCP를 설치하세요.

ESP32 아두이노 IDE에 AsyncTCP 설치하기
파일 시스템 업로더
진행하기 전에 아두이노 IDE에 ESP32 업로더 플러그인이 설치되어 있어야 합니다.
아두이노 IDE 2: ESP32 LittleFS 업로더 설치 (파일 시스템에 파일 업로드)
파일 정리하기
프로젝트를 체계적으로 관리하고 이해하기 쉽게 하기 위해 웹 서버를 구축하는 데 필요한 네 가지 파일을 만들겠습니다.
- 웹 서버를 처리하는 아두이노 스케치 ;
- index.html : 스테이션 모드에서 출력을 제어하기 위해 웹 페이지의 내용을 정의하는 데 사용합니다(또는 구축하려는 다른 웹 페이지를 정의할 수도 있습니다).
- style.css : 웹 페이지의 스타일을 지정하는 파일입니다.
- wifimanager.html : ESP가 액세스 포인트 모드일 때 Wi-Fi 관리자를 표시하는 웹 페이지의 콘텐츠를 정의합니다.

ESP32 ESP8266 Wi-Fi 관리자 프로젝트 파일
이전 그림과 같이 HTML 및 CSS 파일은 Arduino 스케치 폴더 안의 ' data' 라는 폴더에 저장해야 합니다 . 이 파일들을 ESP32 파일 시스템(LittleFS)에 업로드할 것입니다.
프로젝트의 모든 파일을 다운로드할 수 있습니다.
HTML 파일 생성
이 프로젝트에는 두 개의 HTML 파일이 필요합니다. 하나는 출력을 제어하는 메인 페이지(index.html)를 구축하기 위한 것이고, 다른 하나는 Wi-Fi 관리자 페이지(wifimanager.html)를 구축하기 위한 것입니다.
index.html
다음은 index.html 파일에 복사해야 할 텍스트입니다.
<!DOCTYPE html>
<html>
  <head>
    <title>ESP WEB SERVER</title>
    <meta name="viewport" content="width=device-width, initial-scale=1">
    <link rel="stylesheet" type="text/css" href="style.css">
    <link rel="icon" type="image/png" href="favicon.png">
    <link rel="stylesheet" href="https://use.fontawesome.com/releases/v5.7.2/css/all.css" integrity="sha384-fnmOCqbTlWIlj8LyTjo7mOUStjsKC4pOpQbqyi7RrhN7udi9RwhKkMHpvLbHG9Sr" crossorigin="anonymous">
  </head>
  <body>
    <div class="topnav">
      <h1>ESP WEB SERVER</h1>
    </div>
    <div class="content">
      <div class="card-grid">
        <div class="card">
          <p class="card-title"><i class="fas fa-lightbulb"></i> GPIO 2</p>
          <p>
            <a href="on"><button class="button-on">ON</button></a>
            <a href="off"><button class="button-off">OFF</button></a>
          </p>
          <p class="state">State: %STATE%</p>
        </div>
      </div>
    </div>
  </body>
</html>
이 HTML 파일이 어떻게 작동하는지는 이 튜토리얼의 목적이 아니므로 설명하지 않겠습니다. 이 튜토리얼의 목적은 Wi-Fi 관리자와 관련된 부분을 설명하는 것입니다.
wifimanager.html
Wi-Fi 관리자 웹 페이지는 다음과 같습니다.

ESP32 ESP8266 Wi-Fi 관리자 필드
다음 내용을 wifimanager.html 파일에 복사하십시오. 이렇게 하면 세 개의 입력 필드와 제출 버튼이 있는 양식이 포함된 웹 페이지가 생성됩니다.
<!DOCTYPE html>
<html>
<head>
  <title>ESP Wi-Fi Manager</title>
  <meta name="viewport" content="width=device-width, initial-scale=1">
  <link rel="icon" href="data:,">
  <link rel="stylesheet" type="text/css" href="style.css">
</head>
<body>
  <div class="topnav">
    <h1>ESP Wi-Fi Manager</h1>
  </div>
  <div class="content">
    <div class="card-grid">
      <div class="card">
        <form action="/" method="POST">
          <p>
            <label for="ssid">SSID</label>
            <input type="text" id ="ssid" name="ssid"><br>
            <label for="pass">Password</label>
            <input type="text" id ="pass" name="pass"><br>
            <label for="ip">IP Address</label>
            <input type="text" id ="ip" name="ip" value="192.168.1.200"><br>
            <label for="gateway">Gateway Address</label>
            <input type="text" id ="gateway" name="gateway" value="192.168.1.1"><br>
            <input type ="submit" value ="Submit">
          </p>
        </form>
      </div>
    </div>
  </div>
</body>
</html>
이 HTML 파일에서는 서버로 제출된 데이터를 사용하여 HTTP POST 요청을 보내는 HTML 폼을 생성합니다.
<form action="/" method="POST">
해당 양식에는 SSID, 비밀번호, IP 주소라는 세 개의 입력 필드와 그에 해당하는 레이블이 있습니다.
다음은 SSID 입력 필드입니다.
<label for="ssid">SSID</label>
<input type="text" id ="ssid" name="ssid"><br>
여기는 비밀번호를 입력하는 입력란입니다.
<label for="pass">Password</label>
<input type="text" id ="pass" name="pass"><br>
스테이션 모드에서 ESP에 할당할 IP 주소를 입력하는 필드가 있습니다. 기본값으로 192.168.1.200을 설정합니다(다른 기본 IP 주소를 설정하거나 값 매개변수를 삭제할 수 있습니다—이 경우 기본값이 적용되지 않습니다).
<input type="text" id ="ip" name="ip" value="192.168.1.200">
마지막으로 게이트웨이 주소를 입력하는 필드가 있습니다. 기본 IP 주소가 192.168.1.200인 경우 게이트웨이는 기본적으로 192.168.1.1로 설정할 수 있습니다.
<input type="text" id ="gateway" name="gateway" value="192.168.1.1"><br>
CSS 파일
다음 스타일을 복사하여 붙여넣으세요.스타일.css파일입니다. 이러한 스타일이 어떻게 작동하는지는 설명하지 않겠습니다. 다른 ESP 웹 서버 프로젝트에서 유사한 스타일이 어떻게 작동하는지는 이미 설명했습니다.
html {
  font-family: Arial, Helvetica, sans-serif;
  display: inline-block;
  text-align: center;
}

h1 {
  font-size: 1.8rem;
  color: white;
}

p {
  font-size: 1.4rem;
}

.topnav {
  overflow: hidden;
  background-color: #0A1128;
}

body {
  margin: 0;
}

.content {
  padding: 5%;
}

.card-grid {
  max-width: 800px;
  margin: 0 auto;
  display: grid;
  grid-gap: 2rem;
  grid-template-columns: repeat(auto-fit, minmax(300px, 1fr));
}

.card {
  background-color: white;
  box-shadow: 2px 2px 12px 1px rgba(140,140,140,.5);
}

.card-title {
  font-size: 1.2rem;
  font-weight: bold;
  color: #034078
}

input[type=submit] {
  border: none;
  color: #FEFCFB;
  background-color: #034078;
  padding: 15px 15px;
  text-align: center;
  text-decoration: none;
  display: inline-block;
  font-size: 16px;
  width: 100px;
  margin-right: 10px;
  border-radius: 4px;
  transition-duration: 0.4s;
  }

input[type=submit]:hover {
  background-color: #1282A2;
}

input[type=text], input[type=number], select {
  width: 50%;
  padding: 12px 20px;
  margin: 18px;
  display: inline-block;
  border: 1px solid #ccc;
  border-radius: 4px;
  box-sizing: border-box;
}

label {
  font-size: 1.2rem;
}
.value{
  font-size: 1.2rem;
  color: #1282A2;
}
.state {
  font-size: 1.2rem;
  color: #1282A2;
}
button {
  border: none;
  color: #FEFCFB;
  padding: 15px 32px;
  text-align: center;
  font-size: 16px;
  width: 100px;
  border-radius: 4px;
  transition-duration: 0.4s;
}
.button-on {
  background-color: #034078;
}
.button-on:hover {
  background-color: #1282A2;
}
.button-off {
  background-color: #858585;
}
.button-off:hover {
  background-color: #252524;
}
웹 서버 설정
VS Code에서 platformIO 확장 프로그램을 사용 중이라면, platformio.ini 파일을 아래와 같이 편집해야 합니다. Arduino IDE를 사용 중이라면 이 부분을 무시해도 됩니다.
platformio.ini ESP32:
[env:esp32doit-devkit-v1]
platform = espressif32
board = esp32doit-devkit-v1
framework = arduino
monitor_speed=115200
lib_deps = ESP Async WebServer
Code
다음 코드를 Arduino IDE에 복사하거나 VS Code를 사용하는 경우 main.cpp 파일에 복사하세요.
/*********
  Rui Santos & Sara Santos - Random Nerd Tutorials
  Complete instructions at https://RandomNerdTutorials.com/esp32-wi-fi-manager-asyncwebserver/
  Permission is hereby granted, free of charge, to any person obtaining a copy of this software and associated documentation files.
  The above copyright notice and this permission notice shall be included in all copies or substantial portions of the Software.
*********/
#include <Arduino.h>
#include <WiFi.h>
#include <ESPAsyncWebServer.h>
#include <AsyncTCP.h>
#include "LittleFS.h"

// Create AsyncWebServer object on port 80
AsyncWebServer server(80);

// Search for parameter in HTTP POST request
const char* PARAM_INPUT_1 = "ssid";
const char* PARAM_INPUT_2 = "pass";
const char* PARAM_INPUT_3 = "ip";
const char* PARAM_INPUT_4 = "gateway";

//Variables to save values from HTML form
String ssid;
String pass;
String ip;
String gateway;

// File paths to save input values permanently
const char* ssidPath = "/ssid.txt";
const char* passPath = "/pass.txt";
const char* ipPath = "/ip.txt";
const char* gatewayPath = "/gateway.txt";

IPAddress localIP;
//IPAddress localIP(192, 168, 1, 200); // hardcoded

// Set your Gateway IP address
IPAddress localGateway;
//IPAddress localGateway(192, 168, 1, 1); //hardcoded
IPAddress subnet(255, 255, 0, 0);

// Timer variables
unsigned long previousMillis = 0;
const long interval = 10000;  // interval to wait for Wi-Fi connection (milliseconds)

// Set LED GPIO
const int ledPin = 2;
// Stores LED state

String ledState;

// Initialize LittleFS
void initLittleFS() {
  if (!LittleFS.begin(true)) {
    Serial.println("An error has occurred while mounting LittleFS");
  }
  Serial.println("LittleFS mounted successfully");
}

// Read File from LittleFS
String readFile(fs::FS &fs, const char * path){
  Serial.printf("Reading file: %s\r\n", path);

  File file = fs.open(path);
  if(!file || file.isDirectory()){
    Serial.println("- failed to open file for reading");
    return String();
  }

  String fileContent;
  while(file.available()){
    fileContent = file.readStringUntil('\n');
    break;
  }
  return fileContent;
}

// Write file to LittleFS
void writeFile(fs::FS &fs, const char * path, const char * message){
  Serial.printf("Writing file: %s\r\n", path);

  File file = fs.open(path, FILE_WRITE);
  if(!file){
    Serial.println("- failed to open file for writing");
    return;
  }
  if(file.print(message)){
    Serial.println("- file written");
  } else {
    Serial.println("- write failed");
  }
}

// Initialize WiFi
bool initWiFi() {
  if(ssid=="" || ip==""){
    Serial.println("Undefined SSID or IP address.");
    return false;
  }

  WiFi.mode(WIFI_STA);
  localIP.fromString(ip.c_str());
  localGateway.fromString(gateway.c_str());


  if (!WiFi.config(localIP, localGateway, subnet)){
    Serial.println("STA Failed to configure");
    return false;
  }
  WiFi.begin(ssid.c_str(), pass.c_str());
  Serial.println("Connecting to WiFi...");

  unsigned long currentMillis = millis();
  previousMillis = currentMillis;

  while(WiFi.status() != WL_CONNECTED) {
    currentMillis = millis();
    if (currentMillis - previousMillis >= interval) {
      Serial.println("Failed to connect.");
      return false;
    }
  }

  Serial.println(WiFi.localIP());
  return true;
}

// Replaces placeholder with LED state value
String processor(const String& var) {
  if(var == "STATE") {
    if(digitalRead(ledPin)) {
      ledState = "ON";
    }
    else {
      ledState = "OFF";
    }
    return ledState;
  }
  return String();
}

void setup() {
  // Serial port for debugging purposes
  Serial.begin(115200);

  initLittleFS();

  // Set GPIO 2 as an OUTPUT
  pinMode(ledPin, OUTPUT);
  digitalWrite(ledPin, LOW);

  // Load values saved in LittleFS
  ssid = readFile(LittleFS, ssidPath);
  pass = readFile(LittleFS, passPath);
  ip = readFile(LittleFS, ipPath);
  gateway = readFile (LittleFS, gatewayPath);
  Serial.println(ssid);
  Serial.println(pass);
  Serial.println(ip);
  Serial.println(gateway);

  if(initWiFi()) {
    // Route for root / web page
    server.on("/", HTTP_GET, [](AsyncWebServerRequest *request) {
      request->send(LittleFS, "/index.html", "text/html", false, processor);
    });
    server.serveStatic("/", LittleFS, "/");

    // Route to set GPIO state to HIGH
    server.on("/on", HTTP_GET, [](AsyncWebServerRequest *request) {
      digitalWrite(ledPin, HIGH);
      request->send(LittleFS, "/index.html", "text/html", false, processor);
    });

    // Route to set GPIO state to LOW
    server.on("/off", HTTP_GET, [](AsyncWebServerRequest *request) {
      digitalWrite(ledPin, LOW);
      request->send(LittleFS, "/index.html", "text/html", false, processor);
    });
    server.begin();
  }
  else {
    // Connect to Wi-Fi network with SSID and password
    Serial.println("Setting AP (Access Point)");
    // NULL sets an open Access Point
    WiFi.softAP("ESP-WIFI-MANAGER", NULL);

    IPAddress IP = WiFi.softAPIP();
    Serial.print("AP IP address: ");
    Serial.println(IP);

    // Web Server Root URL
    server.on("/", HTTP_GET, [](AsyncWebServerRequest *request){
      request->send(LittleFS, "/wifimanager.html", "text/html");
    });

    server.serveStatic("/", LittleFS, "/");

    server.on("/", HTTP_POST, [](AsyncWebServerRequest *request) {
      int params = request->params();
      for(int i=0;i<params;i++){
        const AsyncWebParameter* p = request->getParam(i);
        if(p->isPost()){
          // HTTP POST ssid value
          if (p->name() == PARAM_INPUT_1) {
            ssid = p->value().c_str();
            Serial.print("SSID set to: ");
            Serial.println(ssid);
            // Write file to save value
            writeFile(LittleFS, ssidPath, ssid.c_str());
          }
          // HTTP POST pass value
          if (p->name() == PARAM_INPUT_2) {
            pass = p->value().c_str();
            Serial.print("Password set to: ");
            Serial.println(pass);
            // Write file to save value
            writeFile(LittleFS, passPath, pass.c_str());
          }
          // HTTP POST ip value
          if (p->name() == PARAM_INPUT_3) {
            ip = p->value().c_str();
            Serial.print("IP Address set to: ");
            Serial.println(ip);
            // Write file to save value
            writeFile(LittleFS, ipPath, ip.c_str());
          }
          // HTTP POST gateway value
          if (p->name() == PARAM_INPUT_4) {
            gateway = p->value().c_str();
            Serial.print("Gateway set to: ");
            Serial.println(gateway);
            // Write file to save value
            writeFile(LittleFS, gatewayPath, gateway.c_str());
          }
          //Serial.printf("POST[%s]: %s\n", p->name().c_str(), p->value().c_str());
        }
      }
      request->send(200, "text/plain", "Done. ESP will restart, connect to your router and go to IP address: " + ip);
      delay(3000);
      ESP.restart();
    });
    server.begin();
  }
}

void loop() {

}
코드 작동 방식
코드를 살펴보고 Wi-Fi 관리자가 어떻게 작동하는지 알아보겠습니다.
다음 변수들은 폼 제출 시 전송되는 HTTP POST 요청에서 SSID, 비밀번호, IP 주소 및 게이트웨이를 검색하는 데 사용됩니다.
// Search for parameter in HTTP POST request
const char* PARAM_INPUT_1 = "ssid";
const char* PARAM_INPUT_2 = "pass";
const char* PARAM_INPUT_3 = "ip";
const char* PARAM_INPUT_4 = "gateway";
ssid, pass, ip, gateway 변수는 양식에 제출된 SSID, 비밀번호, IP 주소 및 게이트웨이의 값을 저장합니다.
//Variables to save values from HTML form
String ssid;
String pass;
String ip;
String gateway;
제출된 SSID, 비밀번호, IP 주소 및 게이트웨이는 ESP 파일 시스템의 파일에 저장됩니다. 다음 변수들은 해당 파일들의 경로를 참조합니다.
// File paths to save input values permanently
const char* ssidPath = "/ssid.txt";
const char* passPath = "/pass.txt";
const char* ipPath = "/ip.txt";
const char* gatewayPath = "/gateway.txt";
스테이션 IP 주소와 게이트웨이는 Wi-Fi 관리자 양식에 제출됩니다. 서브넷은 하드코딩되어 있지만, 필요한 경우 서브넷을 포함하는 필드를 추가하여 이 프로젝트를 쉽게 수정할 수 있습니다.
IPAddress localIP;
//IPAddress localIP(192, 168, 1, 200); // hardcoded

// Set your Gateway IP address
IPAddress localGateway;
//IPAddress localGateway(192, 168, 1, 1); //hardcoded
IPAddress subnet(255, 255, 0, 0);
initWiFi()
initWiFi() 함수는 ESP 보드가 네트워크에 성공적으로 연결되었는지 여부를 나타내는 부울 값(true 또는 false)을 반환합니다.
bool initWiFi() {
  if(ssid=="" || ip==""){
    Serial.println("Undefined SSID or IP address.");
    return false;
  }

  WiFi.mode(WIFI_STA);
  localIP.fromString(ip.c_str());

  if (!WiFi.config(localIP, gateway, subnet)){
    Serial.println("STA Failed to configure");
    return false;
  }
  WiFi.begin(ssid.c_str(), pass.c_str());
  Serial.println("Connecting to WiFi...");

  unsigned long currentMillis = millis();
  previousMillis = currentMillis;

  while(WiFi.status() != WL_CONNECTED) {
    currentMillis = millis();
    if (currentMillis - previousMillis >= interval) {
      Serial.println("Failed to connect.");
      return false;
    }
  }

  Serial.println(WiFi.localIP());
  return true;
}
먼저, ssid와 ip 변수가 비어 있는지 확인합니다. 비어 있다면 네트워크에 연결할 수 없으므로 false를 반환합니다.
if(ssid=="" || ip==""){
그렇지 않은 경우, ssid 및 pass 변수에 저장된 SSID와 비밀번호를 사용하여 네트워크에 연결하고 IP 주소를 설정합니다.
WiFi.mode(WIFI_STA);
localIP.fromString(ip.c_str());

if (!WiFi.config(localIP, gateway, subnet)){
  Serial.println("STA Failed to configure");
  return false;
}
WiFi.begin(ssid.c_str(), pass.c_str());
Serial.println("Connecting to WiFi...");
10초(간격 변수) 이내에 Wi-Fi에 연결할 수 없는 경우 false를 반환합니다.
unsigned long currentMillis = millis();
previousMillis = currentMillis;

while(WiFi.status() != WL_CONNECTED) {
  currentMillis = millis();
  if (currentMillis - previousMillis >= interval) {
    Serial.println("Failed to connect.");
    return false;
  }
위의 조건 중 어느 것도 충족되지 않는다면, 이는 ESP가 스테이션 모드에서 네트워크에 성공적으로 연결되었음을 의미합니다(true를 반환함).
return true;
setup()
setup() 함수에서 파일을 읽기 시작하여 이전에 저장된 SSID, 비밀번호, IP 주소 및 게이트웨이를 가져옵니다.
ssid = readFile(LittleFS, ssidPath);
pass = readFile(LittleFS, passPath);
ip = readFile(LittleFS, ipPath);
gateway = readFile (LittleFS, gatewayPath);
ESP가 스테이션 모드에서 성공적으로 연결되면(initWiFi() 함수가 true를 반환함), 웹 서버 요청을 처리하는 명령어(또는 ESP가 인터넷에 연결되어야 하는 기타 코드)를 설정할 수 있습니다:
if(initWiFi()) {
  // Route for root / web page
  server.on("/", HTTP_GET, [](AsyncWebServerRequest *request) {
    request->send(LittleFS, "/index.html", "text/html", false, processor);
  });
  server.serveStatic("/", LittleFS, "/");

  // Route to set GPIO state to HIGH
  server.on("/on", HTTP_GET, [](AsyncWebServerRequest *request) {
    digitalWrite(ledPin, HIGH);
    request->send(LittleFS, "/index.html", "text/html", false, processor);
  });

  // Route to set GPIO state to LOW
  server.on("/off", HTTP_GET, [](AsyncWebServerRequest *request) {
    digitalWrite(ledPin, LOW);
    request->send(LittleFS, "/index.html", "text/html", false, processor);
  });
  server.begin();
}
그렇지 않은 경우 initWiFi() 함수는 false를 반환합니다. ESP는 액세스 포인트를 설정합니다:
else {
  // Connect to Wi-Fi network with SSID and password
  Serial.println("Setting AP (Access Point)");
  // NULL sets an open Access Point
  WiFi.softAP("ESP-WIFI-MANAGER", NULL);

  IPAddress IP = WiFi.softAPIP();
  Serial.print("AP IP address: ");
  Serial.println(IP);
액세스 포인트를 설정하려면 softAP() 메서드를 사용하고, 인수로 액세스 포인트 이름과 암호를 전달합니다. 액세스 포인트를 공개 상태로 설정하려면 암호를 NULL로 지정합니다. 원한다면 암호를 추가할 수 있습니다. 액세스 포인트 설정에 대해 자세히 알아보려면 다음 튜토리얼 중 하나를 참조하세요:
ESP32 액세스 포인트(AP)에 웹 서버용 고정 IP 주소를 설정하는 방법
액세스 포인트에 접속하면 웹 페이지가 표시되어 네트워크 인증 정보를 입력할 수 있는 양식이 나타납니다. 따라서 ESP는 루트 / URL에 대한 요청을 수신할 때 wifimanager.html 파일을 전송해야 합니다.
// Web Server Root URL
server.on("/", HTTP_GET, [](AsyncWebServerRequest *request){
  request->send(LittleFS, "/wifimanager.html", "text/html");
});
또한 양식이 HTTP POST 요청을 통해 제출될 때 발생하는 상황을 처리해야 합니다. 다음 코드 줄은 제출된 값을 ssid, pass, ip 변수에 저장하고 해당 변수들을 각각 대응하는 파일에 저장합니다.
server.on("/", HTTP_POST, [](AsyncWebServerRequest *request) {
  int params = request->params();
  for(int i=0;i<params;i++){
    AsyncWebParameter* p = request->getParam(i);
    if(p->isPost()){
      // HTTP POST ssid value
      if (p->name() == PARAM_INPUT_1) {
        ssid = p->value().c_str();
        Serial.print("SSID set to: ");
        Serial.println(ssid);
        // Write file to save value
        writeFile(LittleFS, ssidPath, ssid.c_str());
      }
      // HTTP POST pass value
      if (p->name() == PARAM_INPUT_2) {
        pass = p->value().c_str();
        Serial.print("Password set to: ");
        Serial.println(pass);
        // Write file to save value
        writeFile(LittleFS, passPath, pass.c_str());
      }
      // HTTP POST ip value
      if (p->name() == PARAM_INPUT_3) {
        ip = p->value().c_str();
        Serial.print("IP Address set to: ");
        Serial.println(ip);
        // Write file to save value
        writeFile(LittleFS, ipPath, ip.c_str());
      }
     // HTTP POST gateway value
      if (p->name() == PARAM_INPUT_4) {
        gateway = p->value().c_str();
        Serial.print("Gateway set to: ");
        Serial.println(gateway);
        // Write file to save value
        writeFile(LittleFS, gatewayPath, gateway.c_str());
      }
      //Serial.printf("POST[%s]: %s\n", p->name().c_str(), p->value().c_str());
    }
  }
양식을 제출하신 후, ESP가 양식 정보를 수신했음을 알 수 있도록 간단한 메시지를 보내주시기 바랍니다.
request->send(200, "text/plain", "Done. ESP will restart, connect to your router and go to IP address: " + ip);
3초 후 ESP 보드를 재시작하십시오.ESP.restart():
delay(3000);
ESP.restart();
코드 작동 방식에 대한 간략한 요약입니다.
이 아이디어는 ESPAsyncWebServer 라이브러리로 구축된 다른 웹 서버 프로젝트에도 적용할 수 있습니다.
코드 및 파일 업로드
데이터 폴더 에 있는 파일을 ESP32에 업로드하세요. Arduino IDE에서 Windows는 [ Ctrl ] + [ Shift ] + [ P ], macOS는 [ ⌘ ] + [ Shift ] + [ P ]를 눌러 명령 팔레트를 엽니다. "Upload LittleFS to Pico/ESP8266/ESP32" 명령을 찾아 클릭하세요.

LittleFS를 Pico ESP8266 ESP32 Arduino IDE에 업로드하세요.
이 옵션이 보이지 않는다면 파일 시스템 업로더 플러그인을 설치하지 않았기 때문입니다. 이 튜토리얼을 참조하세요.
중요: 파일 시스템에 업로드하기 전에 시리얼 모니터를 닫아 두십시오. 그렇지 않으면 업로드가 실패합니다.
VS Code와 PlatformIO 확장 프로그램을 사용 중이라면 다음 튜토리얼 중 하나를 따라 보드에 파일을 업로드하는 방법을 알아보세요.
VS Code와 PlatformIO를 사용하여 ESP32에 LittleFS 파일 시스템에 파일 업로드하기
파일 업로드가 완료되면 코드를 보드에 업로드하세요.

아두이노 IDE 2 업로드 버튼
데모
모든 파일과 스케치를 성공적으로 업로드한 후 시리얼 모니터를 열 수 있습니다. 코드를 처음 실행하는 경우 ssid.txt, pass.txt, ip.txt 파일을 읽으려 시도하지만 해당 파일들이 아직 생성되지 않았기 때문에 실패합니다. 따라서 액세스 포인트를 시작합니다.
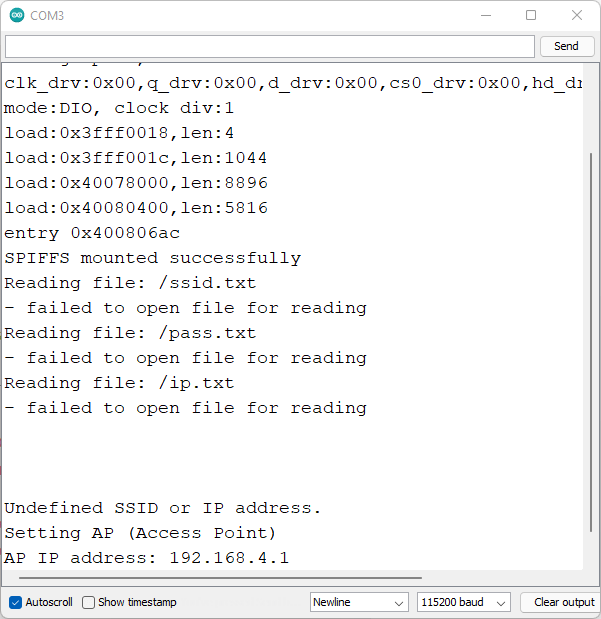
ESP-Wi-Fi 관리자가 액세스 포인트 시리얼 모니터를 설정합니다.
컴퓨터나 스마트폰에서 네트워크 설정으로 이동하여 ESP-WIFI-MANAGER 액세스 포인트에 연결하세요.

ESP32 ESP8266 액세스 포인트 Wi-Fi 관리자에 연결
그런 다음 브라우저를 열고 다음 주소로 이동하세요.192.168.4.1Wi-Fi 관리자 웹 페이지가 열릴 것입니다.
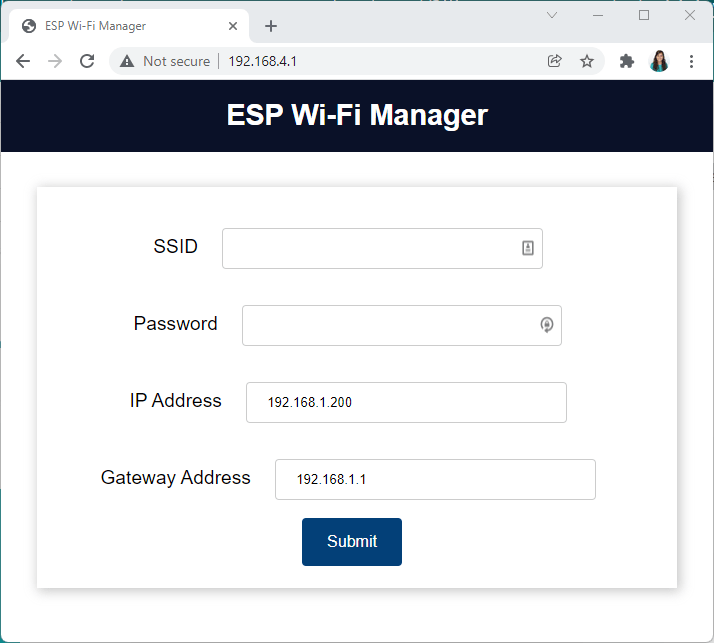
ESP32 ESP8266 Wi-Fi 관리자 필드
네트워크 자격 증명(SSID, 비밀번호, 로컬 네트워크에서 사용 가능한 IP 주소)을 입력하십시오.
그 후, 다음 페이지로 이동합니다.

ESP32 ESP8266이 스테이션 Wi-Fi 관리자에 성공적으로 연결되었습니다.
동시에 ESP는 시리얼 모니터에 입력한 매개변수가 해당 파일에 성공적으로 저장되었음을 나타내는 메시지를 출력해야 합니다.
몇 초 후 ESP가 재시작됩니다. 올바른 SSID와 비밀번호를 입력했다면 스테이션 모드로 시작됩니다.
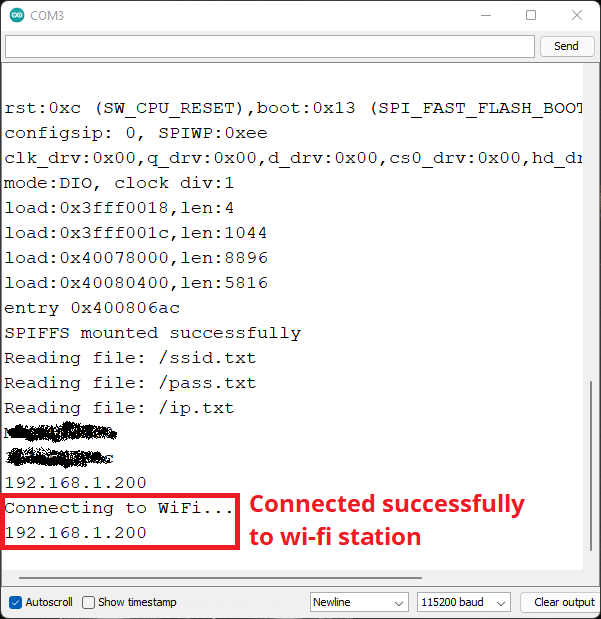
ESP32 ESP8266이 Wi-Fi 스테이션에 성공적으로 연결되었습니다.
이번에는 로컬 네트워크에서 브라우저를 열고 ESP의 IP 주소를 입력하세요. 그러면 출력을 제어할 수 있는 웹 페이지에 접속할 수 있을 것입니다.
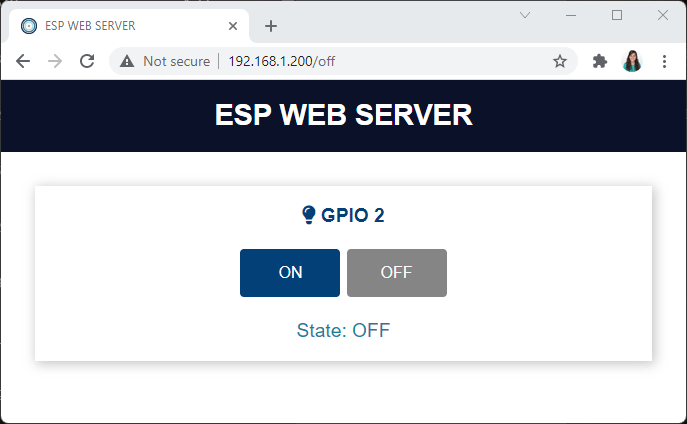
ESP32 ESP8266 제어 출력 웹 서버
마무리
이 튜토리얼에서는 웹 서버 프로젝트 또는 ESP 보드를 인터넷에 연결해야 하는 모든 프로젝트에 Wi-Fi 관리자를 설정하는 방법을 배웠습니다. Wi-Fi 관리자를 사용하면 네트워크 자격 증명을 하드코딩할 필요 없이 ESP 보드를 다양한 네트워크에 쉽게 연결할 수 있습니다. Wi-Fi 관리자는 ESPAsyncWebServer 라이브러리로 구축된 모든 웹 서버 프로젝트에 적용할 수 있습니다.
저희 독자 중 한 분이 더 많은 필드와 기능을 추가하여 이 프로젝트의 고급 버전을 만들었습니다. 해당 프로젝트는 여기에서 확인하실 수 있습니다.
언제나 그렇듯이 이 튜토리얼의 원본 문서로 가시려면 이 링크를 따라가세요. 늘 좋은 튜토리얼을 작성해주신 분들에게 감사합니다. ^^
참고 사항: 문제가 생겼다면 참고하세요. 원문으로 가서 댓글 타레를 읽으셔도 됩니다. 즐겁게 개발하세요. ^^
다른 웹페이지에서 상태가 변경될 경우 열려 있는 웹페이지의 현재 상태로 상태 전환이 제대로 되지 않는 단점이 있었습니다.
웹소켓을 사용하면 가능합니다. 다음 링크를 참고하세요: https://randomnerdtutorials.com/esp32-websocket-server-arduino/
OTA 기능을 추가하고 싶으시다면 AsyncElegantOTA 라이브러리를 사용하면 아주 쉽게 구현할 수 있습니다. 다음 예제를 참고해 주세요: https://randomnerdtutorials.com/esp32-ota-over-the-air-arduino/
고정 IP에서 DHCP로 또는 그 반대로 변경 하거나 고정 IP를 변경하고 싶다면, Wi-Fi SSID와 비밀번호 입력란을 삭제하고 AP 모드로 다시 시작하는 것이 도움이 될 수 있습니다. 이번 주에 이 옵션을 추가하겠습니다. https://github.com/ldijkman/randomnerd_esp32_wifi_manager
http://ip 또는 url/resetwifitoap를 추가했습니다 . 이 링크는 ssid.txt와 pass.txt 파일을 삭제하고 ESP32를 재시작하여 AP 액세스 포인트에 직접 다시 연결하고 설정을 다시 구성합니다. https://github.com/ldijkman/randomnerd_esp32_wifi_manager
안녕하세요. 네, 맞습니다. 하지만 Luberth Dijkman님이 말씀하신 것처럼 "브라우저를 통해 pass.txt, ssid.txt, url 파일을 읽을 수 있다면 이미 로컬 네트워크에 연결되어 있는 것이므로 Wi-Fi 자격 증명을 알고 있을 것입니다." 또는 자격 증명을 EEPROM에 저장하거나 Preferences 라이브러리를 사용할 수도 있습니다. 다음 링크를 참조하세요. – https://randomnerdtutorials.com/esp32-save-data-permanently-preferences/ – https://randomnerdtutorials.com/esp32-flash-memory/ 또한 ESP32가 액세스 포인트 모드일 때 사용할 비밀번호를 추가할 수도 있습니다. https://randomnerdtutorials.com/esp32-access-point-ap-web-server/
'ESP32' 카테고리의 다른 글
| DS3231 모듈을 사용한 ESP32 실시간 시계 (1) | 2025.12.26 |
|---|---|
| ESP32와 OLED 디스플레이를 이용한 인터넷 시계 (0) | 2025.12.26 |
| ESP32 타이머 구조와 타이머 인터럽트 실행 방법 (4) | 2025.12.24 |
| ESP32 타이머 및 타이머 인터럽트 (0) | 2025.12.24 |
| ESP32 BLE(Bluetooth Low Energy)를 이용한 Wi-Fi 프로비저닝 (0) | 2025.12.22 |
| ESP32 펌웨어 크기로 OTA 안되는 문제 해결방법 (0) | 2025.12.16 |
| ESP32 OTA 자동 업데이터 (0) | 2025.12.15 |
| ESP32 제품군 설명: 기술적 차이점과 각 제품의 적용 분야 (1) | 2025.12.14 |
취업, 창업의 막막함, 외주 관리, 제품 부재!
당신의 고민은 무엇입니까? 현실과 동떨어진 교육, 실패만 반복하는 외주 계약,
아이디어는 있지만 구현할 기술이 없는 막막함.
우리는 알고 있습니다. 문제의 원인은 '명확한 학습, 실전 경험과 신뢰할 수 있는 기술력의 부재'에서 시작됩니다.
이제 고민을 멈추고, 캐어랩을 만나세요!
코딩(펌웨어), 전자부품과 디지털 회로설계, PCB 설계 제작, 고객(시장/수출) 발굴과 마케팅 전략으로 당신을 지원합니다.
제품 설계의 고수는 성공이 만든 게 아니라 실패가 만듭니다. 아이디어를 양산 가능한 제품으로!
귀사의 제품을 만드세요. 교육과 개발 실적으로 신뢰할 수 있는 파트너를 확보하세요.
캐어랩


