BLE는 ESP32의 저렴하고 저전력이라는 장점을 활용하여 완전히 새로운 가능성을 열어주는 흥미로운 기술입니다! 아두이노 플랫폼을 사용하면 ESP32 장치를 BLE 클라이언트 또는 BLE 서버로 작동하도록 설정할 수 있습니다.
이 글에서는 ESP32를 BLE 클라이언트로 사용하는 방법에 대해 알아보겠습니다. 그럼 이제 이 기술이 무엇인지 자세히 살펴보겠습니다!

먼저 이 글에 필요한 몇 가지 핵심 개념을 정의해 보겠습니다.
BLE는 Bluetooth Low Energy의 약자입니다. 이름에서 알 수 있듯이 BLE는 기존 블루투스 기술의 전력 소모를 줄인 버전 입니다 . 블루투스 기술은 개인 영역 네트워크(PAN)에서 단거리 무선 통신에 사용되는 기술입니다.
스마트워치를 스마트폰에 연결하거나 스마트폰으로 호텔 객실에 디지털 키를 사용하여 출입할 때 BLE 기술을 가장 익숙하게 느끼실 겁니다. BLE 기술은 이제 우리 일상생활 곳곳에 거의 보편화되었습니다!
BLE 비콘 스캐너 관련 글 에서 ESP32가 BLE 기술을 사용하여 주변 기기에 자신의 존재를 주기적으로 알리는 비콘 또는 라이트하우스 역할을 간단하게 수행할 수 있는 방법을 설명했습니다. 이러한 활용 방식은 근접 알림, 근접 인식 등이 필요한 애플리케이션을 개발하는 데 매우 적합합니다.
이 글에서는 그 개념을 좀 더 발전시켜 보겠습니다. ESP32와 아두이노를 BLE 기술과 함께 사용하여 기기들이 서로 통신할 수 있는 클라이언트-서버 방식의 아키텍처를 구축할 수 있습니다! ESP32 BLE 클라이언트는 주변 기기들을 스캔하여 특정 기기(BLE 서버)를 찾습니다. 그런 다음 ESP32 BLE 클라이언트는 BLE 서버에 연결하고, 마지막으로 BLE 서버에서 데이터를 가져옵니다. 이러한 유형의 통신을 흔히 지점 간 통신(P2P)이라고 합니다. 또는 앞서 언급했듯이 개인 영역 네트워크(PAN)라고도 합니다.
아래 코드에서는 클라이언트-서버 아키텍처의 ESP32 BLE 클라이언트 부분에 초점을 맞춰 코드를 작성해 보겠습니다.
아래 예시 스케치의 프로세스 흐름은 다음과 같습니다…
- BLE 클라이언트 생성
- 연결하려는 BLE 서버를 검색합니다.
- BLE 서버에 연결하세요
- 들어오는 데이터를 수신합니다.
이 글을 끝까지 읽으시면 ESP32 장치를 사용하여 BLE 클라이언트 서버 프로젝트를 성공적으로 구축할 수 있게 될 것입니다. 자, 시작해 볼까요!
ESP32 BLE 클라이언트 테스트 코드
다음은 ESP32를 사용하여 BLE 클라이언트를 생성하고 사용하는 전체 예제 스케치입니다. 아래 섹션에서 이 코드를 단계별로 함께 살펴보겠습니다. 하지만 최종 결과물을 바로 확인하고 싶다면 이 스케치를 ESP32에 업로드하고 바로 실행해 볼 수 있습니다!
//  BLE Client Example Sketch
//
//  Programming Electronics Academy
//

#include <BLEDevice.h>            // sets up BLE device constructs

// The remote service we wish to connect to.
static BLEUUID serviceUUID("4fafc201-1fb5-459e-8fcc-c5c9c331914b");

// The characteristic of the remote service we are interested in.
static BLEUUID    charUUID("beb5483e-36e1-4688-b7f5-ea07361b26a8");
static boolean doConnect = false;
static boolean connected = false;
static boolean doScan = false;

static BLERemoteCharacteristic* pRemoteCharacteristic;
static BLEAdvertisedDevice* myDevice;
static void notifyCallback(

  BLERemoteCharacteristic* pBLERemoteCharacteristic,
  uint8_t* pData,
  size_t length,
  bool isNotify) {

    Serial.print("Notify callback for characteristic ");
    Serial.print(pBLERemoteCharacteristic->getUUID().toString().c_str());
    Serial.print(" of data length ");
    Serial.println(length);
    Serial.print("data: ");
    Serial.println((char*)pData);

}

class MyClientCallback : public BLEClientCallbacks {
  void onConnect(BLEClient* pclient) {

  }

  void onDisconnect(BLEClient* pclient) {
    connected = false;

    Serial.println("onDisconnect");

  }

};

bool connectToServer() {
    Serial.print("Forming a connection to ");
    Serial.println(myDevice->getAddress().toString().c_str());
    BLEClient*  pClient  = BLEDevice::createClient();
    Serial.println(" - Created client");
    pClient->setClientCallbacks(new MyClientCallback());

    // Connect to the remove BLE Server.
    pClient->connect(myDevice);
    Serial.println(" - Connected to server");

    // Obtain a reference to the service we are after in the remote BLE server.
    BLERemoteService* pRemoteService = pClient->getService(serviceUUID);
    if (pRemoteService == nullptr) {

      Serial.print("Failed to find our service UUID: ");
      Serial.println(serviceUUID.toString().c_str());
      pClient->disconnect();

      return false;

    }

    Serial.println(" - Found our service");

    // Obtain a reference to the characteristic in the service of the remote BLE server.
    pRemoteCharacteristic = pRemoteService->getCharacteristic(charUUID);

    if (pRemoteCharacteristic == nullptr) {
      Serial.print("Failed to find our characteristic UUID: ");
      Serial.println(charUUID.toString().c_str());
      pClient->disconnect();

      return false;

    }

    Serial.println(" - Found our characteristic");
    // Read the value of the characteristic.
    if(pRemoteCharacteristic->canRead()) {

      String value = pRemoteCharacteristic->readValue();

      Serial.print("The characteristic value was: ");
      Serial.println(value.c_str());

    }

    if(pRemoteCharacteristic->canNotify())
      pRemoteCharacteristic->registerForNotify(notifyCallback);
    connected = true;
    return true;

}

// Scan for BLE servers and find the first one that advertises the service we are looking for.
class MyAdvertisedDeviceCallbacks: public BLEAdvertisedDeviceCallbacks {

  // Called for each advertising BLE server.
  void onResult(BLEAdvertisedDevice advertisedDevice) {

    Serial.print("BLE Advertised Device found: ");
    Serial.println(advertisedDevice.toString().c_str());

    // We have found a device, let us now see if it contains the service we are looking for.
    if (advertisedDevice.haveServiceUUID() && advertisedDevice.isAdvertisingService(serviceUUID)) {

      BLEDevice::getScan()->stop();
      myDevice = new BLEAdvertisedDevice(advertisedDevice);
      doConnect = true;
      doScan = true;

    } // Found our server

  } // onResult

}; // MyAdvertisedDeviceCallbacks

void setup() {

  Serial.begin(115200);
  Serial.println("Starting Arduino BLE Client application...");
  BLEDevice::init("");

  // Retrieve a Scanner and set the callback we want to use to be informed when we
  // have detected a new device.  Specify that we want active scanning and start the
  // scan to run for 5 seconds.

  BLEScan* pBLEScan = BLEDevice::getScan();
  pBLEScan->setAdvertisedDeviceCallbacks(new MyAdvertisedDeviceCallbacks());
  pBLEScan->setInterval(1349);
  pBLEScan->setWindow(449);
  pBLEScan->setActiveScan(true);
  pBLEScan->start(5, false);

} // End of setup.

// This is the Arduino main loop function that runs repeatedly.

void loop() {

  // If the flag "doConnect" is true then we have scanned for and found the desired
  // BLE Server with which we wish to connect.  Now we connect to it.  Once we are
  // connected we set the connected flag to be true.

  if (doConnect == true) {

    if (connectToServer()) {
      Serial.println("We are now connected to the BLE Server.");
    } else {

      Serial.println("We have failed to connect to the server; there is nothin more we will do.");

    }

    doConnect = false;

  }

  // If we are connected to a peer BLE Server, update the characteristic each time we are reached
  // with the current time since boot.

  if (connected) {

    String newValue = "Time since boot: " + String(millis()/1000);
    Serial.println("Setting new characteristic value to \"" + newValue + "\"");

    // Set the characteristic's value to be the array of bytes that is actually a string.
    pRemoteCharacteristic->writeValue(newValue.c_str(), newValue.length());

  }else if(doScan){

    BLEDevice::getScan()->start(0);  // this is just an example to re-start the scan after disconnect

  }

  delay(1000); // Delay a second between loops.

}
ESP32 BLE 클라이언트 코드 둘러보기
아두이노 개발 환경의 가장 큰 장점 중 하나는 사용할 수 있는 훌륭한 오픈 소스 라이브러리가 매우 많다는 것입니다! 프로그램 초반에는 이러한 라이브러리 중 하나인 BLE 장치 라이브러리를 활용해 보겠습니다.
그러니 "BLEDevice"라는 참조를 볼 때마다 해당 라이브러리가 코드 어디에서 사용되고 있는지 알 수 있다는 점을 기억하세요. 그리고 이는 아두이노 플랫폼이 얼마나 훌륭한지 다시 한번 상기시켜주는 사례입니다. 바로 다른 개발자들이 공유한 라이브러리를 활용할 수 있다는 점이죠!
#include <BLEDevice.h> // sets up BLE device constructs
이제 검색할 BLE 서버에 대한 몇 가지 고유 식별자를 정의해야 합니다. BLE 장치는 종종 다른 식별 특성과 함께 장치에 대한 고유 식별자(UUID)를 브로드캐스트합니다.
UUID는 범용 고유 식별자입니다. 장치 서비스와 장치 특성에 각각 UUID가 있습니다. BLE 아키텍처는 계층적 구조로 정의되어 있습니다. 따라서 BLE 장치는 서비스를 가지고 있으며, 이러한 서비스는 특성을 가집니다. 장치가 지원하는 각 서비스와 각 특성에는 고유한 식별자(UUID)가 있습니다.
BLE Services
디바이스 프로파일은 BLE 아키텍처의 최상위 레벨입니다. BLE 디바이스 프로파일은 하나 또는 여러 개의 BLE 서비스를 포함할 수 있습니다.
BLE Characteristics
BLE 서비스는 서비스에 필요한 실제 데이터를 담고 있는 특성을 가지고 있습니다. 모든 BLE 서비스는 하나 또는 여러 개의 BLE 특성을 가질 수 있습니다. 일반적인 BLE 특성의 예로는 BLE 서버에 연결된 센서에서 읽은 습도 또는 온도 측정값이 있습니다.
아래에는 BLE 클라이언트가 검색할 BLE 서버의 BLE 서비스 UUID와 BLE 특성 UUID를 정의했습니다. 제조사에서 제공하는 센서의 경우 해당 기기의 UUID가 제공됩니다. 하지만 이 예시에서는 자체 UUID를 생성해야 했습니다. 이를 위해 다음 무료 UUID 생성기를 사용했습니다:
// The remote service we wish to connect to.

static BLEUUID serviceUUID("4fafc201-1fb5-459e-8fcc-c5c9c331914b");

// The characteristic of the remote service we are interested in.

static BLEUUID charUUID("beb5483e-36e1-4688-b7f5-ea07361b26a8");
static boolean doConnect = false;
static boolean connected = false;
static boolean doScan = false;
static BLERemoteCharacteristic* pRemoteCharacteristic;
static BLEAdvertisedDevice* myDevice;
이제 BLE 서버에 연결되었을 때 실행할 콜백 함수 몇 개를 만들어야 합니다.
콜백 함수는 다른 함수에서 특정 이벤트가 발생했을 때 실행되는 함수입니다. 아래에 정의된 첫 번째 콜백 함수는 BLE 서버에서 데이터를 가져오는 데 사용되는 BLE 객체에 매개변수로 전달됩니다. 이 콜백 함수의 주요 역할은 원격 특성 알림을 처리하는 것입니다. 아래에 정의된 두 번째 콜백 함수는 BLE 장치 객체에 매개변수로 전달됩니다. 이 두 번째 콜백 함수의 주요 역할은 BLE 서버와의 연결 및 연결 해제 알림을 처리하는 것입니다.
static void notifyCallback(

  BLERemoteCharacteristic* pBLERemoteCharacteristic,
  uint8_t* pData,
  size_t length,
  bool isNotify) {

    Serial.print("Notify callback for characteristic ");
    Serial.print(pBLERemoteCharacteristic->getUUID().toString().c_str());
    Serial.print(" of data length ");
    Serial.println(length);
    Serial.print("data: ");
    Serial.println((char*)pData);

}

class MyClientCallback : public BLEClientCallbacks {

  void onConnect(BLEClient* pclient) {

  }

  void onDisconnect(BLEClient* pclient) {
    connected = false;
    Serial.println("onDisconnect");

  }

};
이제 BLE 서버에 연결하는 작업을 처리할 함수를 만들어야 합니다. 원하는 BLE 서버를 검색하여 찾으면 이 함수가 호출되어 해당 BLE 서버에 연결됩니다.
bool connectToServer() {

    Serial.print("Forming a connection to ");
    Serial.println(myDevice->getAddress().toString().c_str());

    BLEClient*  pClient  = BLEDevice::createClient();
    Serial.println(" - Created client");
    pClient->setClientCallbacks(new MyClientCallback());

    // Connect to the remove BLE Server.

    pClient->connect(myDevice);
    Serial.println(" - Connected to server");

    // Obtain a reference to the service we are after in the remote BLE server.

    BLERemoteService* pRemoteService = pClient->getService(serviceUUID);
    if (pRemoteService == nullptr) {

      Serial.print("Failed to find our service UUID: ");
      Serial.println(serviceUUID.toString().c_str());
      pClient->disconnect();
      return false;

    }

    Serial.println(" - Found our service");

    // Obtain a reference to the characteristic in the service of the remote BLE server.
    pRemoteCharacteristic = pRemoteService->getCharacteristic(charUUID);
    if (pRemoteCharacteristic == nullptr) {

      Serial.print("Failed to find our characteristic UUID: ");
      Serial.println(charUUID.toString().c_str());
      pClient->disconnect();
      return false;

    }

    Serial.println(" - Found our characteristic");

    // Read the value of the characteristic.
    if(pRemoteCharacteristic->canRead()) {

      String value = pRemoteCharacteristic->readValue();
      Serial.print("The characteristic value was: ");
      Serial.println(value.c_str());

    }

    if(pRemoteCharacteristic->canNotify())
      pRemoteCharacteristic->registerForNotify(notifyCallback);

    connected = true;
    return true;

}
이제 BLE 스캔 객체에 대한 콜백 함수를 만들 수 있습니다.
이 콜백 함수의 주요 역할은 우리가 특별히 찾고 있는 서비스를 광고하는 최초의 BLE 서버(흔히 광고된 장치라고 함)를 찾고, 특정 BLE 서버를 찾으면 스캔을 중지하는 것입니다.
// Scan for BLE servers and find the first one that advertises the service we are looking for.

class MyAdvertisedDeviceCallbacks: public BLEAdvertisedDeviceCallbacks {

  // Called for each advertising BLE server.

  void onResult(BLEAdvertisedDevice advertisedDevice) {

    Serial.print("BLE Advertised Device found: ");
    Serial.println(advertisedDevice.toString().c_str());

    // We have found a device, let us now see if it contains the service we are looking for.

    if (advertisedDevice.haveServiceUUID() && advertisedDevice.isAdvertisingService(serviceUUID)) {
      BLEDevice::getScan()->stop();
      myDevice = new BLEAdvertisedDevice(advertisedDevice);
      doConnect = true;
      doScan = true;

    } // Found our server

  } // onResult

}; // MyAdvertisedDeviceCallbacks
이것으로 스케치가 제대로 작동하는 데 필요한 모든 선언과 함수 정의가 완료되었습니다! 소화하기 어려운 정보가 많다고 느껴지셨다면, 맞습니다! 휴! 🙂
아두이노 setup() 함수
이미 알고 계시겠지만, 아두이노 환경에서 ESP32를 시작하면 가장 먼저 실행되는 것이 setup() 함수입니다. 그리고 setup() 함수에서 가장 먼저 해야 할 일은 115200bps의 전송 속도를 사용하여 시리얼 모니터와의 시리얼 통신을 초기화하는 것입니다.
Serial.begin(115200);
이제 새 BLE 스캔 장치를 생성하고, 스캔이 완료될 때 호출될 BLE 콜백 함수를 MyAdvertisedDeviceCallbacks로 설정하고, BLE 스캔 매개변수를 설정합니다.
Serial.println("Starting Arduino BLE Client application...");

  BLEDevice::init("");

  // Retrieve a Scanner and set the callback we want to use to be informed when we
  // have detected a new device.  Specify that we want active scanning and start the
  // scan to run for 5 seconds.

  BLEScan* pBLEScan = BLEDevice::getScan();
  pBLEScan->setAdvertisedDeviceCallbacks(new MyAdvertisedDeviceCallbacks());
  pBLEScan->setInterval(1349);
  pBLEScan->setWindow(449);
  pBLEScan->setActiveScan(true);
  pBLEScan->start(5, false);
아두이노의 loop() 함수
아두이노 메인 루프에서 "doConnect" 플래그가 true이면 BLE 서버를 검색하여 성공적으로 찾은 것입니다. 따라서 해당 BLE 서버에 연결할 수 있습니다. BLE 서버에 연결되면 스케치가 실행된 이후 경과된 시간을 1초에 한 번씩 특성 변수에 업데이트합니다.
// If the flag "doConnect" is true then we have scanned for and found the desired

  // BLE Server with which we wish to connect.  Now we connect to it.  Once we are
  // connected we set the connected flag to be true.

  if (doConnect == true) {
    if (connectToServer()) {

      Serial.println("We are now connected to the BLE Server.");
    } else {
      Serial.println("We have failed to connect to the server; there is nothin more we will do.");

    }

    doConnect = false;

  }

  // If we are connected to a peer BLE Server, update the characteristic each time we are reached
  // with the current time since boot.

  if (connected) {

    String newValue = "Time since boot: " + String(millis()/1000);
    Serial.println("Setting new characteristic value to \"" + newValue + "\"");

    // Set the characteristic's value to be the array of bytes that is actually a string.

    pRemoteCharacteristic->writeValue(newValue.c_str(), newValue.length());

  }else if(doScan){

    BLEDevice::getScan()->start(0);  // this is just an example to re-start the scan after disconnect

  }

  delay(1000); // Delay a second between loops.
아두이노 BLE 서버 스케치
BLE 클라이언트 스케치를 테스트하려면 먼저 BLE 서버를 생성하고 시작해야 합니다!
다음 코드는 ESP32를 사용하여 BLE 서버를 구축하기 위한 전체 예제 스케치입니다. ESP32를 컴퓨터에 연결한 후, 전체 스케치를 ESP32에 업로드하십시오. 스케치 업로드가 완료되면 ESP32의 리셋(RST) 버튼을 누르십시오.
//  BLE Server Example Sketch
//
//  Programming Electronics Academy
//

#include
#include
#include

// See the following for generating UUIDs:
// https://www.uuidgenerator.net/

#define SERVICE_UUID        "4fafc201-1fb5-459e-8fcc-c5c9c331914b"
#define CHARACTERISTIC_UUID "beb5483e-36e1-4688-b7f5-ea07361b26a8"

void setup() {

  Serial.begin(115200);
  Serial.println("Starting BLE server setup!");
  BLEDevice::init("PEA - BLE Server Test");
  BLEServer *pServer = BLEDevice::createServer();
  BLEService *pService = pServer->createService(SERVICE_UUID);
  BLECharacteristic *pCharacteristic = pService->createCharacteristic(

                                         CHARACTERISTIC_UUID,
                                         BLECharacteristic::PROPERTY_READ |
                                         BLECharacteristic::PROPERTY_WRITE

                                       );

  pCharacteristic->setValue("We love Programming Electronics Academy!");
  pService->start();
  BLEAdvertising *pAdvertising = BLEDevice::getAdvertising();
  pAdvertising->addServiceUUID(SERVICE_UUID);
  pAdvertising->setScanResponse(true);
  pAdvertising->setMinPreferred(0x06);  // functions that help with iPhone connections issue
  pAdvertising->setMinPreferred(0x12);
  BLEDevice::startAdvertising();

  Serial.println("Characteristic defined! Now you can read it in your phone!");

}

void loop() {

  // put your main code here, to run repeatedly:
  delay(2000);

}
아두이노 BLE 클라이언트 스케치 테스트
ESP32 BLE 서버 스케치를 실행한 후, 별도의 ESP32 보드에 ESP32 BLE 클라이언트 스케치를 업로드하십시오. BLE 클라이언트 스케치 업로드가 완료되면 ESP32 보드의 리셋(RST) 버튼을 누르십시오. 그러면 시리얼 모니터에 다음 내용이 표시됩니다.
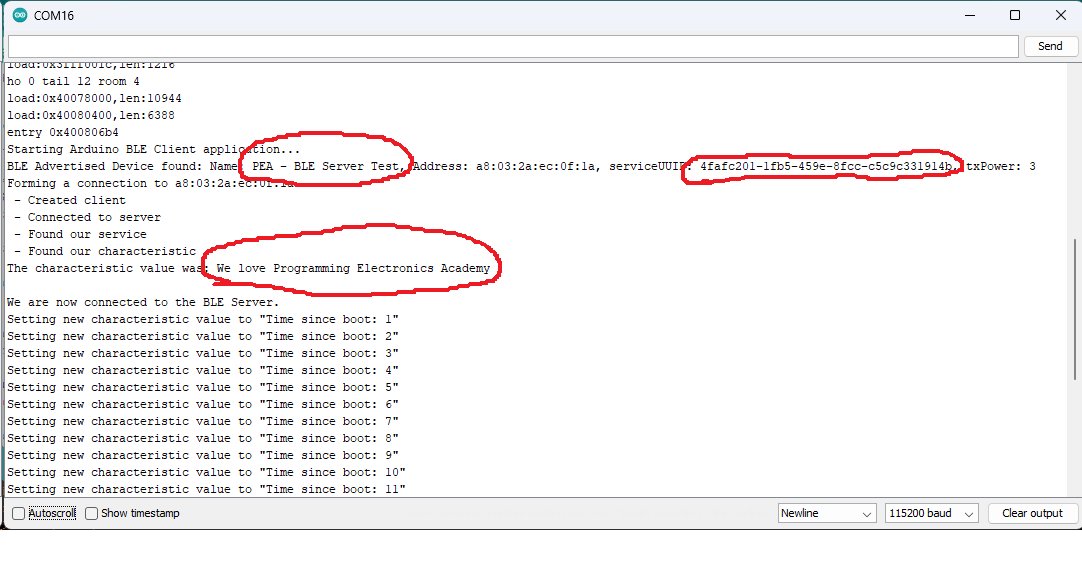
ESP32 BLE 클라이언트 - 시리얼 모니터
출력에서 볼 수 있듯이 ESP32 BLE 클라이언트는 변수 선언에서 정의한 서비스 UUID를 가진 "PEA – BLE Server Test"라는 이름의 ESP32 BLE 서버를 찾았습니다. ESP32 BLE 클라이언트는 이 서비스에 연결되어 "We love Programming Electronics Academy"라는 문자열 값을 포함하는 특성 UUID를 찾았습니다. 연결이 설정되면 ESP32 BLE 클라이언트는 아두이노 메인 루프() 함수에서 초당 한 번씩 해당 특성 값을 반복적으로 업데이트합니다.
이게 전부입니다! ESP32 장치와 Arduino IDE를 사용하면 이렇게 간단하게 BLE 클라이언트를 만들 수 있습니다!
여기서 다음 목적지는 어디인가요?
ESP32 장치를 사용하여 BLE 클라이언트를 만들면 ESP32 프로젝트에 완전히 새로운 가능성을 열어줄 수 있습니다. 이 기능은 특히 ESP32를 사용하여 주변 센서(온도, 습도 등)에서 데이터를 수집할 때 유용합니다.
연습 삼아 ESP32 BLE 서버에 10번의 요청이 있을 때마다 카운터가 0으로 초기화되도록 코드를 수정해 보세요.
ESP32 BLE (Bluetooth Low Energy) Tutorial Using Arduino IDE – Linux Hint
linuxhint.com
'ESP32' 카테고리의 다른 글
| 배터리로 ESP32에 전원을 공급하는 방법 (0) | 2026.03.10 |
|---|---|
| ESP32를 이용한 장애물 회피 로봇 (0) | 2026.03.04 |
| ESP32 BLE 비콘 스캐너 (0) | 2026.03.03 |
| ESP32 BLE 서버 만들기 가이드와 코드 첨부 (0) | 2026.03.03 |
| ESP32-C3 기반 스마트 시계 (0) | 2026.02.27 |
| zclaw - ESP32에서 888KB로 구동되는 개인용 AI 비서 (1) | 2026.02.25 |
| zclaw 888KiB ESP32 기반 AI 에이전트 (0) | 2026.02.25 |
| ESP32 보드에서 구동되는 초경량 오픈소스 'zclaw' 공개 (1) | 2026.02.25 |
취업, 창업의 막막함, 외주 관리, 제품 부재!
당신의 고민은 무엇입니까? 현실과 동떨어진 교육, 실패만 반복하는 외주 계약,
아이디어는 있지만 구현할 기술이 없는 막막함.
우리는 알고 있습니다. 문제의 원인은 '명확한 학습, 실전 경험과 신뢰할 수 있는 기술력의 부재'에서 시작됩니다.
이제 고민을 멈추고, 캐어랩을 만나세요!
코딩(펌웨어), 전자부품과 디지털 회로설계, PCB 설계 제작, 고객(시장/수출) 발굴과 마케팅 전략으로 당신을 지원합니다.
제품 설계의 고수는 성공이 만든 게 아니라 실패가 만듭니다. 아이디어를 양산 가능한 제품으로!
귀사의 제품을 만드세요. 교육과 개발 실적으로 신뢰할 수 있는 파트너를 확보하세요.
캐어랩


