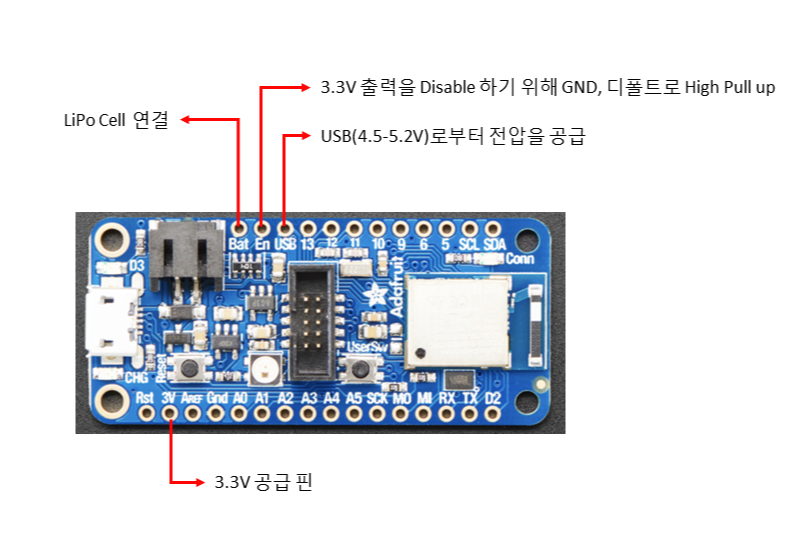
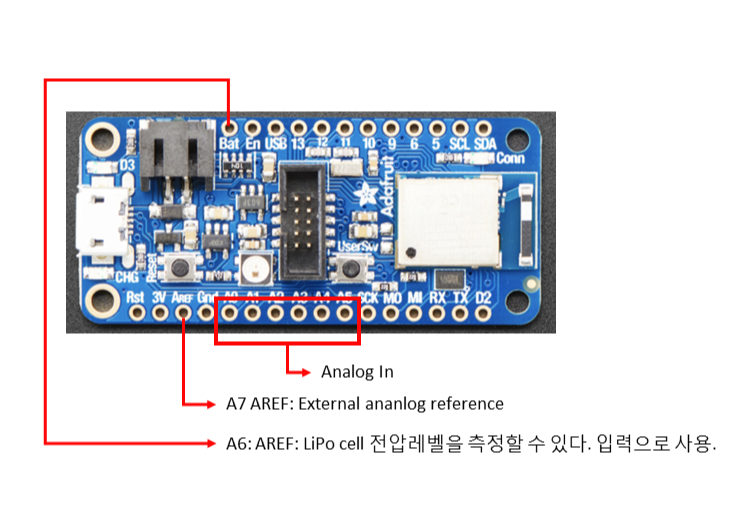
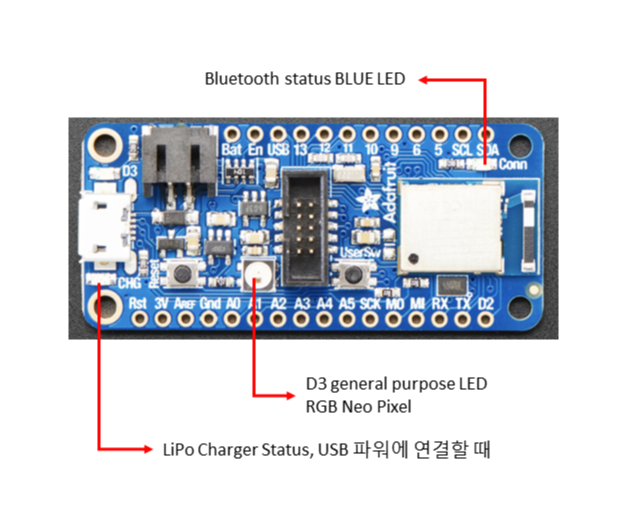
Adafruit Feather nRF52840 Express 보드를 스마트 팜 데이터 수집 플랫폼으로 사용하기 위해 하드웨어 설계를 한다. 우선 nRF52840 보드를 기반으로 하드웨어 설계를 하기 위해 보드 위의 Pin을 중심으로 어떻게 사용해야 하는지에 대해 설명한다.
현재까지 nrf52840 보드 강의 포스트입니다. 참고하세요.
Adafruit Feather nRF52840 Express 01. 소개
Adafruit Feather nRF52840 Express 02. Hardware 설계와 참고자료
Adafruit Feather nRF52840 Express 03. Arduino IDE 환경 설정
Adafruit Feather nRF52840 Express 04. Bootloader Update

Adafruit Feather nRF52840 Express 보드 특징을 간단히 알아보자.
- Bluetooth Low Energy and native USB support
- 'All-in-one' Arduino-compatible + Bluetooth Low Energy with built in USB plus battery charging
- Arduino IDE support
- Cortex-M4 processor nRF52832 projects downward compatible
- Pre-programed the chip with our UF2 bootloader
우선 보드의 전원 핀에 대해 알아보자.

- 3V: used to supply 3.3V power to external sensors, breakouts or Feather Wings
- LIPO Input (Bat): Voltage supply from the optional rechargeable cell. Can be connected via JST PH connector.
- VREG Enable (En): Can be set to GND to disable the 3.3V output. By default set to HIGH.
- USB Power (USB): Supplies voltage from USB (4.5-5.2V)
Analog 입력

- 6 analog pins (A0–A5)
- 2 ADC pins (AREF, VIVD)
AREF (A7): optional external analog reference.
VIDV (A6): allows measurement of battery charge. Can be used as an output.
PWM
Output Any GPIO pin can be configured as PWM.
I2C Pins
- Require external pullup resistors to function. Not present by default
- All Adafruit breakouts normally have pullups, hence this likely won't be an issue
User Switches
- A general purpose switch is accessible via D7
- On board reset, press this button to force USB bootloader mode
SWD Connector
- Long header at center board
- For advanced debugging or to reprogram the board using a 1.27mm SWD cable
LEDs

3개의 기본 LED 가 있다.
1. D3: general red LED. Can be used for any desired purpose. Used as a status indicator.
2. CONN: blue LED. Indicates connection status for bluetooth
3. CHG: indicates a charging battery if connected to a USB power supply
보드에는 RGB Neo Pixel 이라는 통합 RGB 조명이 있습니다. PIN_NEOPIXEL과 같은 코드를 통해 색상을 구성할 수 있습니다. 보드가 올바르게 설정되었는지 테스트하는 좋은 방법입니다. 예제 코드는 아래와 같습니다.
void setup() {
  pinMode(LED_BUILTIN, OUTPUT);
}
void loop() {
  digitalWrite(LED_BUILTIN, HIGH);   // turn the LED on (HIGH is the voltage level)
  delay(1000);                       // wait for a second
  digitalWrite(LED_BUILTIN, LOW);    // turn the LED off by making the voltage LOW
  delay(1000);                       // wait for a second
}
이하 참고
SDK
Drivers
To install the drivers, you know where to go by now.
API
Arduino Bluefruit nRF52 API reference The API is class-based, with the following classes being most commonly used (from Adafruit's documentation):
- AdafruitBluefruit - the essential most-used class
- BLEService - wrapper class for BLE GATT custom services.
- BLECharacteristic - wrapper class for BLE GATT custom characteristics.
- BLEDis - helper for Device Information Services.
- BLEUart - helper for Nordic UART Service
- BLEBeacon - helper class to use the device as a Bluetooth beacon using the BT advertising packet.
- BLEMidi - helper class to use MIDI data (audio, etc) over Bluetooth.
- BLEHidAdafruit - is a helper class to emulate an HID mouse or keyboard over BLE. Related project
Languages
- C++ (the default)
- CircuitPython
IDEs
The Feather supports the usage of the Arduino IDE, but the IDE doesn't include the support out of the box. To install:
- Download and install the Arduino IDE (At least v1.6.12)
- Start the Arduino IDE
- Go into Preferences
- Add https://www.adafruit.com/package_adafruit_index.json as an 'Additional Board Manager URL'
- Restart the Arduino IDE
- Open the Boards Manager from the Tools -> Board menu and install 'Adafruit nRF52 by Adafruit'
- Once the BSP is installed, select 'Adafruit Bluefruit nRF52 Feather' from the Tools -> Board menu, which will update your system config to use the right compiler and settings for the nRF52.
- Write, compile, upload over USB.
Set up CircuitPython Quick Start
https://learn.adafruit.com/introducing-the-adafruit-nrf52840-feather/circuitpython
Board Testing
- Select the Board Target
- Select the USB CDC Serial Port
- Update the bootloader (nRF52832 Feather Only)
- Run a Test Sketch https://learn.adafruit.com/introducing-the-adafruit-nrf52840-feather/arduino-board-setup
CircuitPython for nRF53840 Download
https://circuitpython.org/board/feather_nrf52840_express/
BootLoader & Source Code
https://github.com/adafruit/Adafruit_nRF52_Bootloader/releases/tag/0.2.13
Libraries
Adafruit nRF52 Library
- dafruit-nrfutil is based on Nordic Semiconductor ASA's pc-nrfutil
- freeRTOS as operating system
- tinyusb as usb stack
- nrfx for peripherals driver
- littlefs for internal file system
https://github.com/adafruit/Adafruit_nRF52_Arduino/tree/master/libraries
Adafruit Sponsored Libraries and Drivers from CircuitPython
https://github.com/adafruit/Adafruit_CircuitPython_Bundle/blob/master/docs/drivers.rst
Bluefruit App
Using your iOS or Android phone/tablet as a controller
A USB bootloader lets you quickly use it with the Arduino IDE or to install CircuitPython.
Sent data Format
Each Controller data packet sent is prefixed with single byte char “!” (0x21) followed by a single byte char initial for identification. Sensor data values are encoded as floats of 4 byte length.
Each packet ends with a single byte checksum for validation.
Controller Test
- Sensors Quaternion, Accelerometer, Gyro, Magnetometer and Location (GPS)
- 8-button Control Pad
- Colour Picker
흠... 일모도원!
'개발자 > Arduino' 카테고리의 다른 글
| Adafruit Feather nRF52840 05. 씨리얼 포트 인식 해결 (0) | 2022.02.11 |
|---|---|
| Adafruit Feather nRF52840 Express 04. Bootloader Update (0) | 2022.02.08 |
| Adafruit Feather nRF52840 Express 03. Arduino IDE 환경 설정 (0) | 2022.02.07 |
| Arduino를 사용하는 RS-485 구현 (0) | 2021.12.13 |
| Adafruit Feather nRF52840 Express 01. 소개 (0) | 2021.12.06 |
| Arduino 와 Processing 나침반 만들기 (0) | 2021.11.11 |
| Adafruit TCS34725 컬러 센서로 빛과 색상 측정 (0) | 2021.11.01 |
| 방수 초음파 센서 사용 거리 측정 Waterproof Ultrasonic Sensors (0) | 2021.10.12 |
취업, 창업의 막막함, 외주 관리, 제품 부재!
당신의 고민은 무엇입니까? 현실과 동떨어진 교육, 실패만 반복하는 외주 계약,
아이디어는 있지만 구현할 기술이 없는 막막함.
우리는 알고 있습니다. 문제의 원인은 '명확한 학습, 실전 경험과 신뢰할 수 있는 기술력의 부재'에서 시작됩니다.
이제 고민을 멈추고, 캐어랩을 만나세요!
코딩(펌웨어), 전자부품과 디지털 회로설계, PCB 설계 제작, 고객(시장/수출) 발굴과 마케팅 전략으로 당신을 지원합니다.
제품 설계의 고수는 성공이 만든 게 아니라 실패가 만듭니다. 아이디어를 양산 가능한 제품으로!
귀사의 제품을 만드세요. 교육과 개발 실적으로 신뢰할 수 있는 파트너를 확보하세요.
캐어랩


