ESP32 Bluetooth Classic과 Arduino IDE – 시작하기
ESP32에는 Wi-Fi, Bluetooth Low Energy 및 Bluetooth Classic이 함께 제공됩니다. 이 튜토리얼에서는 ESP32 Bluetooth Classic과 Arduino IDE를 사용하여 ESP32와 Android 스마트폰 간에 데이터를 교환하는 방법을 알아봅니다.

ESP32 Bluetooth Classic과 Android 스마트폰 BT
ESP32 출력을 제어하고 Bluetooth Classic을 사용하여 센서 판독값을 Android 스마트폰으로 전송합니다.
참고: 이 프로젝트는 Android 스마트폰과만 호환됩니다.
비디오 튜토리얼을 보거나 이 페이지에서 서면 지침을 계속 읽어보세요.
Bluetooth Classic과 ESP32
현재 Bluetooth Classic을 사용하는 것은 Bluetooth Low Energy보다 훨씬 간단합니다. HC-06과 같은 Bluetooth 모듈로 Arduino를 이미 프로그래밍한 적이 있다면 매우 유사합니다. 표준 직렬 프로토콜과 기능을 사용합니다.

hc-05 bluetooth 모듈 arduino ESP32
이 튜토리얼에서는 Arduino IDE와 함께 제공되는 예제를 사용하여 시작합니다. 그런 다음 ESP32와 Android 스마트폰 간에 데이터를 교환하는 간단한 프로젝트를 빌드합니다.
필요한 부품: 이 튜토리얼을 따르려면 다음 부품이 필요합니다.
- ESP32 DOIT DEVKIT V1 보드(최고의 ESP32 개발 보드 읽기)
- 블루투스가 있는 Android 스마트폰
- 5mm LED
- 330옴 저항
- DS18B20 온도 센서
- 4.7k옴 저항
- 점퍼 와이어
- 브레드보드
이전 링크를 사용하거나 MakerAdvisor.com/tools로 직접 이동하여 프로젝트에 필요한 모든 부품을 최고의 가격으로 찾을 수 있습니다!
블루투스 터미널 애플리케이션
이 튜토리얼을 진행하려면 스마트폰에 블루투스 터미널 애플리케이션이 설치되어 있어야 합니다.
Play 스토어에서 제공되는 Android 앱 "Serial Bluetooth Terminal"을 사용하는 것이 좋습니다.

bluetooth serial application esp32
Serial to Serial Bluetooth
Arduino IDE를 사용하여 ESP32를 프로그래밍하므로 진행하기 전에 ESP32 애드온이 설치되어 있는지 확인하세요.
- Windows: 지침 – Arduino IDE의 ESP32 보드
- Mac 및 Linux: 지침 – Arduino IDE의 ESP32 보드
Arduino IDE를 열고 파일 > 예제 > BluetoothSerial > SerialtoSerialBT로 이동합니다.
다음 코드가 로드되어야 합니다.
//This example code is in the Public Domain (or CC0 licensed, at your option.)
//By Evandro Copercini - 2018
//
//This example creates a bridge between Serial and Classical Bluetooth (SPP)
//and also demonstrate that SerialBT have the same functionalities of a normal Serial

#include "BluetoothSerial.h"

#if !defined(CONFIG_BT_ENABLED) || !defined(CONFIG_BLUEDROID_ENABLED)
#error Bluetooth is not enabled! Please run `make menuconfig` to and enable it
#endif

BluetoothSerial SerialBT;

void setup() {
  Serial.begin(115200);
  SerialBT.begin("ESP32test"); //Bluetooth device name
  Serial.println("The device started, now you can pair it with bluetooth!");
}

void loop() {
  if (Serial.available()) {
    SerialBT.write(Serial.read());
  }
  if (SerialBT.available()) {
    Serial.write(SerialBT.read());
  }
  delay(20);
}
코드 작동 방식
이 코드는 두 장치 간의 양방향 직렬 Bluetooth 통신을 설정합니다.
코드는 BluetoothSerial 라이브러리를 포함하는 것으로 시작합니다.
#include "BluetoothSerial.h"
다음 세 줄은 Bluetooth가 제대로 활성화되었는지 확인합니다.
#if !defined(CONFIG_BT_ENABLED) || !defined(CONFIG_BLUEDROID_ENABLED)
#error Bluetooth is not enabled! Please run `make menuconfig` to and enable it
#endif
그런 다음 SerialBT라는 BluetoothSerial 인스턴스를 만듭니다.
BluetoothSerial SerialBT;
setup()
setup()에서 115200의 전송 속도로 직렬 통신을 초기화합니다.
Serial.begin(115200);
Bluetooth 직렬 장치를 초기화하고 Bluetooth 장치 이름을 인수로 전달합니다. 기본적으로 ESP32test라고 하지만 이름을 바꾸고 고유한 이름을 지정할 수 있습니다.
SerialBT.begin("ESP32test"); //Bluetooth 장치 이름
loop()
loop()에서 Bluetooth 직렬을 통해 데이터를 보내고 받습니다.
첫 번째 if 문에서 직렬 포트에서 수신되는 바이트가 있는지 확인합니다. 있으면 해당 정보를 Bluetooth를 통해 연결된 장치로 보냅니다.
if (Serial.available()) {
  SerialBT.write(Serial.read());
}
SerialBT.write()는 Bluetooth 직렬을 사용하여 데이터를 보냅니다.
Serial.read()는 직렬 포트에서 수신된 데이터를 반환합니다.
다음 if 문은 Bluetooth 직렬 포트에서 읽을 수 있는 바이트가 있는지 확인합니다. 있으면 해당 바이트를 직렬 모니터에 씁니다.
if (SerialBT.available()) {
  Serial.write(SerialBT.read());
}
데모에서 이 스케치가 정확히 어떻게 작동하는지 더 쉽게 이해할 수 있습니다.
코드 테스트
이전 코드를 ESP32에 업로드합니다. 올바른 보드와 COM 포트를 선택했는지 확인합니다.
코드를 업로드한 후 115200의 전송 속도로 직렬 모니터를 엽니다. ESP32 활성화 버튼을 누릅니다.
몇 초 후에 "장치가 시작되었습니다. 이제 블루투스와 페어링할 수 있습니다!"라는 메시지가 표시됩니다.

ESP32 Bluetooth Classic 및 Android 스마트폰 데모
스마트폰으로 이동하여 "Serial Bluetooth Terminal" 앱을 엽니다. 스마트폰의 Bluetooth를 활성화했는지 확인합니다.
ESP32에 처음 연결하려면 새 기기를 페어링해야 합니다.
기기로 이동합니다.

ESP32 Bluetooth Classic 및 Android 애플리케이션 Serial Bluetooth Terminal
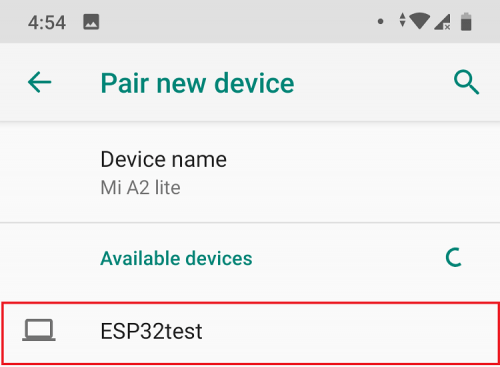
설정 아이콘을 클릭하고 새 기기 페어링을 선택합니다. ESP32test를 포함하여 사용 가능한 Bluetooth 기기 목록이 표시됩니다. ESP32test와 페어링합니다.

ESP32 Bluetooth Classic 및 Android 애플리케이션 Serial Bluetooth Terminal 새 기기 페어링
그런 다음 Serial Bluetooth Terminal로 돌아갑니다. 위쪽의 아이콘을 클릭하여 ESP32에 연결합니다. "Connected" 메시지가 표시되어야 합니다.

ESP32 Bluetooth Classic 및 Android 애플리케이션 Serial Bluetooth Terminal 연결됨
그런 다음 Serial Bluetooth Terminal 앱에 무언가를 입력합니다. 예를 들어 "Hello"를 입력합니다.

ESP32 Bluetooth Classic 및 Android 애플리케이션 Serial Bluetooth Terminal 데모
Arduino IDE Serial Monitor에서 해당 메시지를 즉시 수신해야 합니다.

ESP32 Bluetooth Classic 데모 serial monitor Arduino IDE
Serial Monitor와 스마트폰 간에 데이터를 교환할 수도 있습니다. Serial Monitor 상단 막대에 무언가를 입력하고 "Send" 버튼을 누릅니다.

ESP32 Bluetooth Classic 데모 serial monitor Arduino IDE
Serial Bluetooth Terminal 앱에서 해당 메시지를 즉시 수신해야 합니다.

ESP32 Bluetooth Classic 및 Android 애플리케이션 Serial Bluetooth Terminal 데모
Bluetooth Serial을 사용하여 데이터 교환
이제 Bluetooth Serial을 사용하여 데이터를 교환하는 방법을 알았으므로 이전 스케치를 수정하여 유용한 것을 만들 수 있습니다. 예를 들어, 특정 메시지를 받으면 ESP32 출력을 제어하거나 센서 판독값과 같은 데이터를 스마트폰으로 보냅니다.
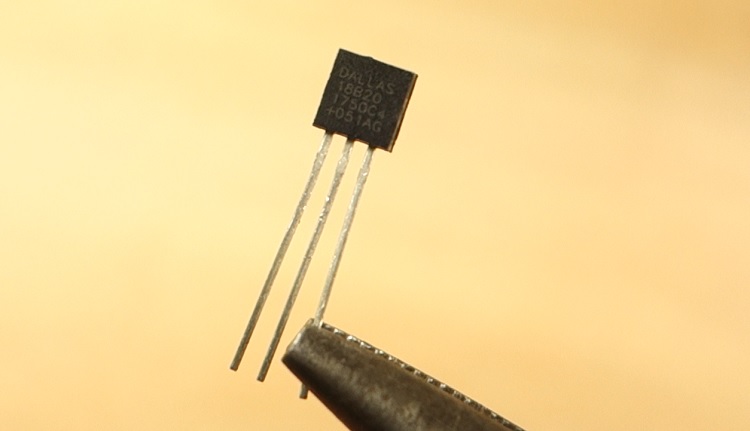
빌드할 프로젝트는 10초마다 스마트폰으로 온도 판독값을 보냅니다. DS18B20 온도 센서를 사용합니다.

ds18b20 온도 센서
Android 앱을 통해 ESP32 출력을 제어하는 메시지를 보냅니다. ESP32가 led_on 메시지를 받으면 GPIO를 켜고, led_off 메시지를 받으면 GPIO를 끕니다.
회로도
이 프로젝트를 진행하기 전에 다음 회로도에 따라 회로를 조립합니다.
LED를 GPIO25에 연결하고 DS18B20 데이터 핀을 GPIO32에 연결합니다.

Bluetooth Classic ESP32 통신
추천 자료: ESP32 핀아웃 참조: 어떤 GPIO 핀을 사용해야 합니까?
코드
DS18B20 온도 센서를 사용하려면 Paul Stoffregen의 One Wire 라이브러리와 Dallas Temperature 라이브러리를 설치해야 합니다. 아직 설치하지 않았다면 다음 지침에 따라 라이브러리를 설치하세요.
One Wire 라이브러리
- 여기를 클릭하여 One Wire 라이브러리를 다운로드하세요. 다운로드에 .zip 폴더가 있어야 합니다.
- .zip 폴더의 압축을 풀면 OneWire-master 폴더가 나옵니다.
- 폴더 이름을 OneWire-master에서 OneWire로 바꿉니다.
- OneWire 폴더를 Arduino IDE 설치 라이브러리 폴더로 옮깁니다.
- 마지막으로 Arduino IDE를 다시 엽니다.
Dallas Temperature 라이브러리
- 여기를 클릭하여 Dallas Temperature 라이브러리를 다운로드합니다. 다운로드에 .zip 폴더가 있어야 합니다.
- .zip 폴더의 압축을 풀면 Arduino-Temperature-Control-Library-master 폴더가 나옵니다.
- 폴더 이름을 Arduino-Temperature-Control-Library-master에서 DallasTemperature로 바꿉니다.
- DallasTemperature폴더를 Arduino IDE 설치 라이브러리 폴더로 옮깁니다.
- 마지막으로 Arduino IDE를 다시 엽니다.
회로를 조립하고 필요한 라이브러리를 설치한 후 다음 스케치를 Arduino IDE에 복사합니다.
/*********
  Rui Santos
  Complete project details at https://randomnerdtutorials.com
*********/

// Load libraries
#include "BluetoothSerial.h"
#include <OneWire.h>
#include <DallasTemperature.h>

// Check if Bluetooth configs are enabled
#if !defined(CONFIG_BT_ENABLED) || !defined(CONFIG_BLUEDROID_ENABLED)
#error Bluetooth is not enabled! Please run `make menuconfig` to and enable it
#endif

// Bluetooth Serial object
BluetoothSerial SerialBT;

// GPIO where LED is connected to
const int ledPin =  25;

// GPIO where the DS18B20 is connected to
const int oneWireBus = 32;
// Setup a oneWire instance to communicate with any OneWire devices
OneWire oneWire(oneWireBus);
// Pass our oneWire reference to Dallas Temperature sensor
DallasTemperature sensors(&oneWire);

// Handle received and sent messages
String message = "";
char incomingChar;
String temperatureString = "";

// Timer: auxiliar variables
unsigned long previousMillis = 0;    // Stores last time temperature was published
const long interval = 10000;         // interval at which to publish sensor readings

void setup() {
  pinMode(ledPin, OUTPUT);
  Serial.begin(115200);
  // Bluetooth device name
  SerialBT.begin("ESP32");
  Serial.println("The device started, now you can pair it with bluetooth!");
}

void loop() {
  unsigned long currentMillis = millis();
  // Send temperature readings
  if (currentMillis - previousMillis >= interval){
    previousMillis = currentMillis;
    sensors.requestTemperatures();
    temperatureString = String(sensors.getTempCByIndex(0)) + "C  " +  String(sensors.getTempFByIndex(0)) + "F";
    SerialBT.println(temperatureString);
  }
  // Read received messages (LED control command)
  if (SerialBT.available()){
    char incomingChar = SerialBT.read();
    if (incomingChar != '\n'){
      message += String(incomingChar);
    }
    else{
      message = "";
    }
    Serial.write(incomingChar);
  }
  // Check received message and control output accordingly
  if (message =="led_on"){
    digitalWrite(ledPin, HIGH);
  }
  else if (message =="led_off"){
    digitalWrite(ledPin, LOW);
  }
  delay(20);
}
코드 작동 방식
코드를 잠깐 살펴보고 작동 방식을 살펴보겠습니다.
필요한 라이브러리를 포함하는 것으로 시작합니다. Bluetooth용 BluetoothSerial 라이브러리와 DS18B20 온도 센서용 OneWire 및 DallasTemperature입니다.
#include "BluetoothSerial.h"
#include <OneWire.h>
#include <DallasTemperature.h>
SerialBT라는 BluetoothSerial 인스턴스를 만듭니다.
BluetoothSerial SerialBT;
제어하려는 GPIO를 보관하기 위해 ledPin이라는 변수를 만듭니다. 이 경우 GPIO25에 LED가 연결되어 있습니다.
const int ledPin = 25;
DS18B20 센서 핀을 정의하고 작동하도록 객체를 만듭니다. 온도 센서는 GPIO32에 연결됩니다.
// DS18B20이 연결된
GPIO const int oneWireBus = 32;
// OneWire 장치와 통신하기 위한 oneWire 인스턴스 설정
OneWire oneWire(oneWireBus);
// oneWire 참조를 Dallas Temperature 센서에 전달
DallasTemperature sensor(&oneWire);
수신된 메시지를 저장하기 위해 message라는 빈 문자열을 만듭니다.
String message = "";
Bluetooth Serial을 통해 들어오는 문자를 저장하기 위해 incomingChar라는 char 변수를 만듭니다.
char incomingChar;
temperatureString 변수는 Bluetooth를 통해 보낼 온도 판독값을 보관합니다.
String temperatureString = "";
10초마다 판독값을 보내는 보조 타이머 변수를 만듭니다.
unsigned long previousMillis = 0; // 마지막으로 온도가 게시된 시간을 저장합니다.
const long interval = 10000; // 센서 판독값을 게시하는 간격
setup()
setup()에서 ledPin을 출력으로 설정합니다.
pinMode(ledPin, OUTPUT);
ESP32를 "ESP32"라는 이름으로 블루투스 장치로 초기화합니다.
SerialBT.begin("ESP32"); // 블루투스 장치 이름
loop()
loop()에서 온도 판독값을 보내고, 수신된 메시지를 읽고, 그에 따라 동작을 실행합니다.
다음 코드 조각은 마지막 판독 이후 10초가 지났는지 확인합니다. 새로운 판독을 보낼 때가 되면 최신 온도를 가져와 temperatureString 변수에 섭씨와 화씨로 저장합니다.
unsigned long currentMillis = millis();
if (currentMillis - previousMillis >= interval) {
    previousMillis = currentMillis;
    sensors.requestTemperatures();
    temperatureString = " " + String(sensors.getTempCByIndex(0)) + "C  " +  String(sensors.getTempFByIndex(0)) + "F";
그런 다음 Bluetooth를 통해 temperatureString을 보내려면 SerialBT.println()을 사용합니다.
SerialBT.println(temperatureString);
다음 if 문은 들어오는 메시지를 읽습니다. 직렬을 통해 메시지를 받으면 한 번에 한 문자씩 받습니다. \n을 받으면 메시지가 끝났다는 것을 알 수 있습니다.
따라서 Bluetooth 직렬 포트에 사용 가능한 데이터가 있는지 확인합니다.
if (SerialBT.available()) {
데이터가 있으면 incomingChar 변수에 문자를 저장합니다.
char incomingChar = SerialBT.read();
incomingChar가 \n과 다르면 해당 char 문자를 메시지에 연결합니다.
if (incomingChar!= '\n'){
  message += String(incomingChar);
}
문자 읽기가 끝나면 message 변수를 지웁니다. 그렇지 않으면 수신된 모든 메시지가 서로 추가됩니다.
message = "";
그 후에 메시지의 내용을 확인하는 두 개의 if 문이 있습니다. 메시지가 led_on이면 LED가 켜집니다.
if (message =="led_on"){
   digitalWrite(ledPin, HIGH);
}
메시지가 led_off이면 LED가 꺼집니다.
else if (message =="led_off"){
  digitalWrite(ledPin, LOW);
}
프로젝트 테스트
이전 스케치를 ESP32 보드에 업로드합니다. 그런 다음 직렬 모니터를 열고 ESP32 활성화 버튼을 누릅니다. 다음 메시지가 나타나면 스마트폰으로 이동하여 ESP32에 연결할 수 있습니다.

ESP32 Bluetooth Classic 프로젝트 코드 예제 테스트
그런 다음 "led_on" 및 "led_off" 메시지를 작성하여 LED를 제어할 수 있습니다.

ESP32 Bluetooth Classic 프로젝트 코드 예제 테스트
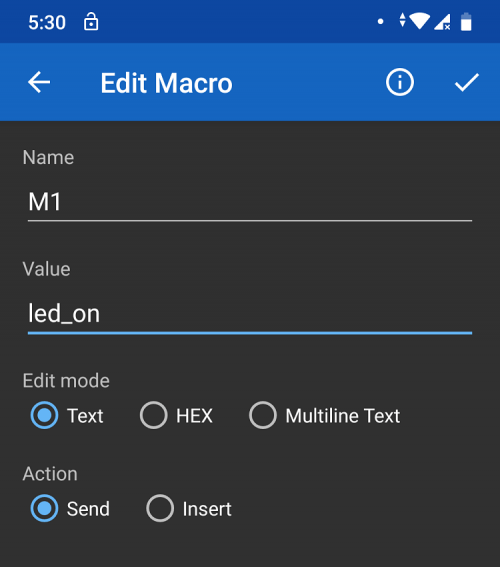
애플리케이션에는 기본 메시지를 저장할 수 있는 여러 버튼이 있습니다. 예를 들어 M1을 "led_on" 메시지와 연결하고 M2를 "led_off" 메시지와 연결할 수 있습니다.

이제 ESP32 GPIO를 제어할 수 있습니다.
동시에 10초마다 온도 판독값을 수신해야 합니다.
마무리
요약하면 ESP32는 BLE와 Bluetooth Classic을 지원합니다. Bluetooth Classic을 사용하는 것은 직렬 통신과 그 기능을 사용하는 것만큼 간단합니다.
ESP32에서 BLE를 사용하는 방법을 알아보려면 가이드를 읽어보세요.
Arduino IDE에서 ESP32 Bluetooth Low Energy(BLE) 시작하기
이 튜토리얼이 도움이 되었기를 바랍니다. ESP32를 사용한 다른 프로젝트를 보려면 프로젝트 컴파일을 확인하세요. 20+ ESP32 프로젝트 및 튜토리얼.
이 튜토리얼은 "Arduino IDE로 ESP32 배우기" 과정의 미리보기입니다. 이 프로젝트가 마음에 든다면 ESP32 과정 페이지를 꼭 살펴보세요. 여기서는 이 주제와 ESP32에 대한 더 많은 주제를 다룹니다.
읽어주셔서 감사합니다. 배움을 멈추지 마세요.
'ESP32' 카테고리의 다른 글
| ESP32 웹 서버(WebSocket): Multiple Slider LED 밝기 제어(PWM) (2) | 2025.01.15 |
|---|---|
| ESP32 슬라이더가 있는 웹 서버: LED 밝기 제어(PWM) (0) | 2025.01.15 |
| ESP32 이벤트 사용 Web Server(센서값 자동 업데이트) (0) | 2025.01.14 |
| HTTP POST Web APIs, ThingSpeak 및 IFTTT.com (0) | 2025.01.14 |
| ESP32 HTTP GET Web APIs, OpenWeatherMap.org 및 ThingSpeak (1) | 2025.01.13 |
| ESP32 HTTP GET 및 HTTP POST와 JSON, URL 인코딩, 텍스트 (0) | 2025.01.13 |
| ESP32 SIM800L 모듈 문자 메시지(SMS 알림) 보내기 (0) | 2025.01.10 |
| ESP32 SMTP 서버를 사용하여 이메일 보내기 (1) | 2025.01.10 |
취업, 창업의 막막함, 외주 관리, 제품 부재!
당신의 고민은 무엇입니까? 현실과 동떨어진 교육, 실패만 반복하는 외주 계약,
아이디어는 있지만 구현할 기술이 없는 막막함.
우리는 알고 있습니다. 문제의 원인은 '명확한 학습, 실전 경험과 신뢰할 수 있는 기술력의 부재'에서 시작됩니다.
이제 고민을 멈추고, 캐어랩을 만나세요!
코딩(펌웨어), 전자부품과 디지털 회로설계, PCB 설계 제작, 고객(시장/수출) 발굴과 마케팅 전략으로 당신을 지원합니다.
제품 설계의 고수는 성공이 만든 게 아니라 실패가 만듭니다. 아이디어를 양산 가능한 제품으로!
귀사의 제품을 만드세요. 교육과 개발 실적으로 신뢰할 수 있는 파트너를 확보하세요.
캐어랩


