ESP32와 ADXL345 가속도계 인터페이싱

가속도계는 중력에 의한 가속도를 g 단위로 측정하는 전기기계 장치입니다.
지구에서 1g는 9.8m/s²의 가속도를 의미합니다. 달에서는 지구의 1/6이고, 화성에서는 지구의 1/3입니다.
가속도계는 기울기 감지 애플리케이션뿐만 아니라 움직임, 충격 또는 진동으로 인한 동적 가속도에도 사용할 수 있습니다.
ADXL345 모듈 사양
ADXL345는 다음 범위에서 완전한 3축 가속도 측정을 제공합니다.
X: -235 ~ +270
Y: -240 ~ +260
Z: -240 ~ +270
이 모듈의 출력 신호는 I2C 및 SPI 디지털 형태입니다.
이 모듈은 x, y, z축에서 최대 ±16g의 고해상도(13비트)를 측정합니다.
측정 모드에서는 40uA 전류를 소모하고 대기 모드에서는 2.5V에서 0.1uA를 소모합니다.
온보드 Low Drop Out(LDO) 전압 레귤레이터
온보드 MOSFET 기반 레벨 시프터(전압 레벨 변환기)
가속도에 따른 힘에 대한 저항력을 제공하기 위해 실리콘 웨이퍼 위에 폴리실리콘 표면 미세 가공 센서를 내장했습니다.
ADXL345 모듈 핀아웃
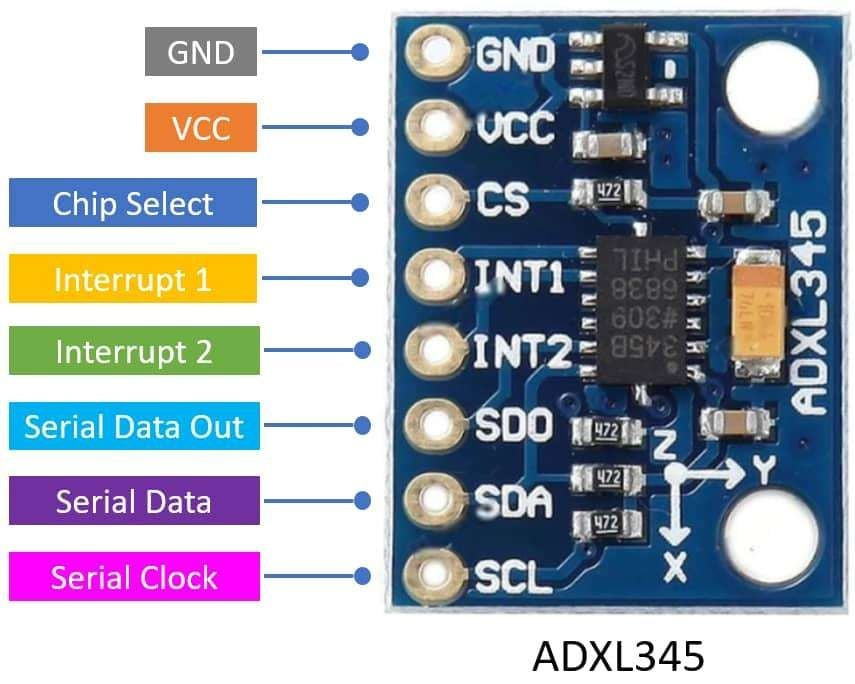
ADXL345 모듈 핀 설명
VCC: 전원 공급 핀은 3~5.5V DC 범위에 연결됩니다.
GND: 전원 접지에 연결합니다.
CS(Chip Select): 칩 선택 핀.
INT1(인터럽트 1): 인터럽트 1 출력 핀
INT2(인터럽트 2): 인터럽트 2 출력 핀
SDO(Serial Data Out): 직렬 데이터 출력(SPI 4-Wire)/대체 I2C 주소 선택(I2C).
SDA(직렬 데이터): 직렬 데이터(I2C)/직렬 데이터 입력(SPI 4-Wire)/직렬 데이터 입력 및 출력(SPI 3-Wire).
SCL(Serial Clock): 직렬 통신용 클럭. SCL은 I2C용 클럭이고, SCLK는 SPI용 클럭입니다.
ESP32와 ADXL345 하드웨어 연결

ADXL345 가속도계와 ESP32 인터페이싱 다이어그램
연결이 되었다면 아래 코드를 사용하여 I2C 주소를 확인합니다. 이 과정은 제가 할 때는 항상 필요했어요. 연결이 안된다거나 i2c 연결이 제대로 되었는지 확인하기 위해서요. 보통 i2c scanner 라고 부르는데 참고하세요.
특히 wire.begin 라인의 sda, scl 주소 적는것 잊지 마세요.
#include <Wire.h>

void setup() {
  Serial.begin(115200);
  Wire.begin(6, 7); // Default SDA=21, SCL=22

  Serial.println("Scanning for I2C devices...");
}

void loop() {
  byte error, address;
  int nDevices = 0;

  for (address = 1; address < 127; address++) {
    Wire.beginTransmission(address);
    error = Wire.endTransmission();

    if (error == 0) {
      Serial.print("I2C device found at address 0x");
      Serial.println(address, HEX);
      nDevices++;
    }
  }

  if (nDevices == 0) Serial.println("No I2C devices found. Check wiring!");
  delay(2000);
}
ADXL345 및 ESP32를 사용하여 읽기 가속
가속도계 모듈의 I2C 인터페이스를 사용하여 장치의 롤과 피치를 찾아 Arduino와 웹 서버의 직렬 모니터에 표시합니다.
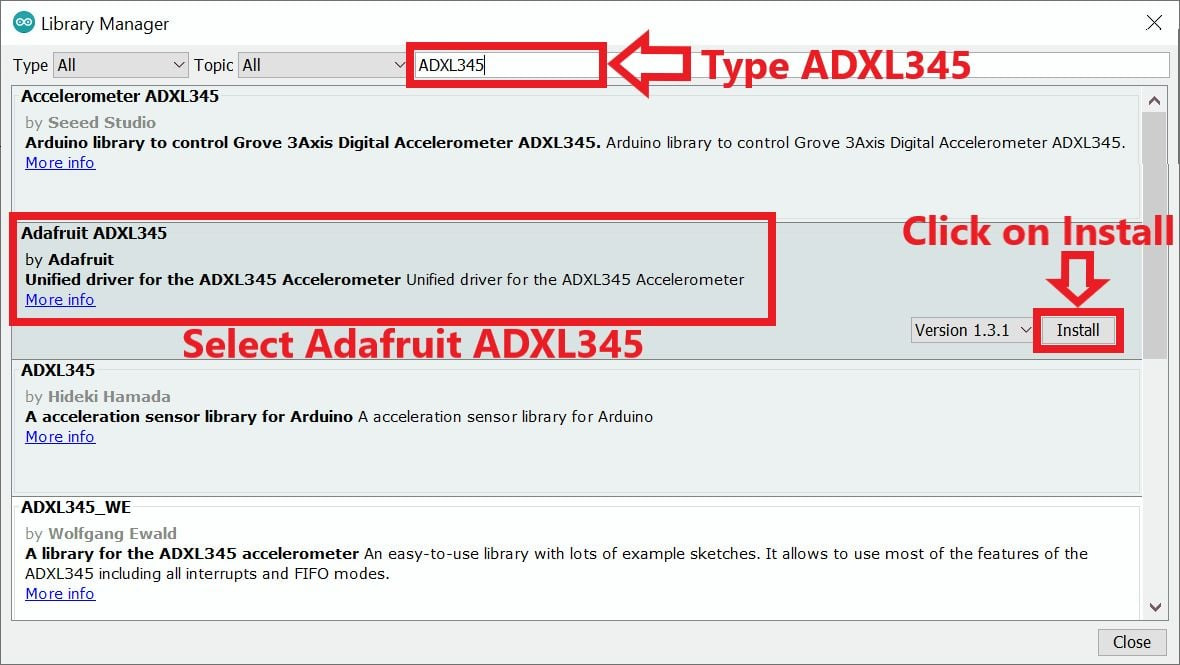
위 예제에서는 Adafruit 라이브러리를 사용합니다. Arduino 라이브러리 관리자를 사용하여 Adafruit ADXL345 라이브러리를 설치해야 합니다 .
Arduino IDE를 열고 Sketch ► 라이브러리 포함 ► 라이브러리 관리… 로 이동합니다.

라이브러리 관리자 창이 나타납니다. 검색창에 ADXL345를 입력하고 Adafruit ADXL345 옵션에서 "설치"를 클릭하여 1.3.1 이상 버전을 설치하세요.
이제 Adafruit ADXL345 io 대시보드 예제를 엽니다. "파일" ► "예제" ► "Adafruit ADXM345" ► "센서 테스트" 로 이동하여 대시보드를 엽니다.

여기서는 아래와 같은 예제를 사용했습니다.
#include <Wire.h>
#include <Adafruit_Sensor.h>
#include <Adafruit_ADXL345_U.h>

/* Assign a unique ID to this sensor at the same time */
Adafruit_ADXL345_Unified accel = Adafruit_ADXL345_Unified(12345);

void displaySensorDetails(void)
{
  sensor_t sensor;
  accel.getSensor(&sensor);
  Serial.println("------------------------------------");
  Serial.print  ("Sensor:       "); Serial.println(sensor.name);
  Serial.print  ("Driver Ver:   "); Serial.println(sensor.version);
  Serial.print  ("Unique ID:    "); Serial.println(sensor.sensor_id);
  Serial.print  ("Max Value:    "); Serial.print(sensor.max_value); Serial.println(" m/s^2");
  Serial.print  ("Min Value:    "); Serial.print(sensor.min_value); Serial.println(" m/s^2");
  Serial.print  ("Resolution:   "); Serial.print(sensor.resolution); Serial.println(" m/s^2");
  Serial.println("------------------------------------");
  Serial.println("");
  delay(500);
}

void displayDataRate(void)
{
  Serial.print  ("Data Rate:    ");

  switch(accel.getDataRate())
  {
    case ADXL345_DATARATE_3200_HZ:
      Serial.print  ("3200 ");
      break;
    case ADXL345_DATARATE_1600_HZ:
      Serial.print  ("1600 ");
      break;
    case ADXL345_DATARATE_800_HZ:
      Serial.print  ("800 ");
      break;
    case ADXL345_DATARATE_400_HZ:
      Serial.print  ("400 ");
      break;
    case ADXL345_DATARATE_200_HZ:
      Serial.print  ("200 ");
      break;
    case ADXL345_DATARATE_100_HZ:
      Serial.print  ("100 ");
      break;
    case ADXL345_DATARATE_50_HZ:
      Serial.print  ("50 ");
      break;
    case ADXL345_DATARATE_25_HZ:
      Serial.print  ("25 ");
      break;
    case ADXL345_DATARATE_12_5_HZ:
      Serial.print  ("12.5 ");
      break;
    case ADXL345_DATARATE_6_25HZ:
      Serial.print  ("6.25 ");
      break;
    case ADXL345_DATARATE_3_13_HZ:
      Serial.print  ("3.13 ");
      break;
    case ADXL345_DATARATE_1_56_HZ:
      Serial.print  ("1.56 ");
      break;
    case ADXL345_DATARATE_0_78_HZ:
      Serial.print  ("0.78 ");
      break;
    case ADXL345_DATARATE_0_39_HZ:
      Serial.print  ("0.39 ");
      break;
    case ADXL345_DATARATE_0_20_HZ:
      Serial.print  ("0.20 ");
      break;
    case ADXL345_DATARATE_0_10_HZ:
      Serial.print  ("0.10 ");
      break;
    default:
      Serial.print  ("???? ");
      break;
  }
  Serial.println(" Hz");
}

void displayRange(void)
{
  Serial.print ("Range:         +/- ");

  switch(accel.getRange())
  {
    case ADXL345_RANGE_16_G:
      Serial.print  ("16 ");
      break;
    case ADXL345_RANGE_8_G:
      Serial.print  ("8 ");
      break;
    case ADXL345_RANGE_4_G:
      Serial.print  ("4 ");
      break;
    case ADXL345_RANGE_2_G:
      Serial.print  ("2 ");
      break;
    default:
      Serial.print  ("?? ");
      break;
  }
  Serial.println(" g");
}

void setup(void)
{
//#ifndef ESP8266
//  while (!Serial); // for Leonardo/Micro/Zero
//#endif
  Serial.begin(9600);
  Serial.println("Accelerometer Test"); Serial.println("");

  /* Initialise the sensor */
  if(!accel.begin())
  {
    /* There was a problem detecting the ADXL345 ... check your connections */
    Serial.println("Ooops, no ADXL345 detected ... Check your wiring!");
    while(1);
  }

  /* Set the range to whatever is appropriate for your project */
  accel.setRange(ADXL345_RANGE_16_G);
  // accel.setRange(ADXL345_RANGE_8_G);
  // accel.setRange(ADXL345_RANGE_4_G);
  // accel.setRange(ADXL345_RANGE_2_G);

  /* Display some basic information on this sensor */
  displaySensorDetails();

  /* Display additional settings (outside the scope of sensor_t) */
  displayDataRate();
  displayRange();
  Serial.println("");
}

void loop(void)
{
  /* Get a new sensor event */
  sensors_event_t event;
  accel.getEvent(&event);

  /* Display the results (acceleration is measured in m/s^2) */
  Serial.print("X: "); Serial.print(event.acceleration.x); Serial.print("  ");
  Serial.print("Y: "); Serial.print(event.acceleration.y); Serial.print("  ");
  Serial.print("Z: "); Serial.print(event.acceleration.z); Serial.print("  ");Serial.println("m/s^2 ");
  delay(500);
}
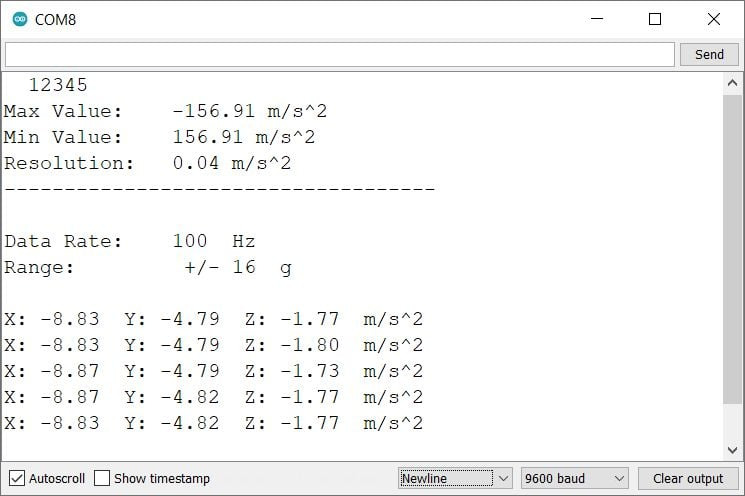
ADXL345 가속도계를 읽고 직렬 모니터에 표시하는 코드
- 이제 코드를 업로드하세요. (코드를 업로드하는 동안 ESP32 보드가 부팅 모드인지 확인하세요.)
- 코드를 업로드한 후 직렬 모니터를 열고 통신 속도를 9600 으로 설정하여 출력을 확인하세요.
직렬 모니터에 출력
코드 설명
먼저 필요한 라이브러리를 초기화합니다.
#include <Wire.h>
#include <Adafruit_Sensor.h>
#include <Adafruit_ADXL345_U.h>
ADXL345 센서에 동시에 고유 ID를 할당합니다.
Adafruit_ADXL345_Unified accel = Adafruit_ADXL345_Unified(12345);
displaySensorDetails(void) 함수는 센서 이름, 드라이버 버전, 고유 ID, 최대값, 최소값, 해상도를 제공합니다 .
displaySensorDetails(void)
이 함수는 ADXL345의 현재 데이터 전송 속도를 반환하는 데 사용됩니다. 또한, 가장 느린 속도(10Hz)부터 가장 빠른 속도(3200Hz)까지 데이터 전송 속도를 선택할 수 있습니다. 데이터시트에 따라 데이터 전송 속도를 선택할 수 있습니다.
displayDataRate(void)
setDataRate(datarate) 함수를 사용하여 데이터 속도를 변경할 수 있습니다.
setRange(ADXL345_RANGE_16_G);
다음 데이터 전송률을 설정할 수 있습니다.
		ADXL345_DATARATE_3200_HZ
            ADXL345_DATARATE_1600_HZ
            ADXL345_DATARATE_800_HZ
            ADXL345_DATARATE_400_HZ
            ADXL345_DATARATE_200_HZ
            ADXL345_DATARATE_100_HZ
            ADXL345_DATARATE_50_HZ
            ADXL345_DATARATE_25_HZ
            ADXL345_DATARATE_12_5_HZ
            ADXL345_DATARATE_6_25HZ
            ADXL345_DATARATE_3_13_HZ
            ADXL345_DATARATE_1_56_HZ
            ADXL345_DATARATE_0_78_HZ
            ADXL345_DATARATE_0_39_HZ
            ADXL345_DATARATE_0_20_HZ
            ADXL345_DATARATE_0_10_HZ
이 함수는 ADXL345의 현재 측정 범위를 직렬 모니터에 출력하는 데 사용됩니다. 를 선택하면 ±8g가속도계는 최대 ±78.4m/s²(8 * 9.8)의 가속도를 감지할 수 있습니다. 기본 측정 범위는 ±16g 입니다 .
displayRange(void)
setup 기능에서
우리는 9600 보드 속도로 직렬 통신을 시작했습니다.
Serial.begin(9600);
I2C 통신을 시작하고, 함수를 사용하여 센서를 감지하고 초기화합니다.accel.begin()
if(!accel.begin())
{
    /* There was a problem detecting the ADXL345 ... check your connections */
Serial.println("Ooops, no ADXL345 detected ... Check your wiring!");
while(1);
}
accel.setRange(range);함수를 사용하여 적절한 범위를 설정합니다.
accel.setRange(ADXL345_RANGE_16_G);
// accel.setRange(ADXL345_RANGE_8_G);
// accel.setRange(ADXL345_RANGE_4_G);
// accel.setRange(ADXL345_RANGE_2_G);
직렬 모니터에 ADXL345 센서의 기본 정보를 인쇄합니다.
displaySensorDetails();
ADXL345 센서의 데이터 속도를 직렬 모니터에 출력합니다.
displayDataRate();
직렬 모니터에 ADXL345의 현재 범위를 인쇄합니다.
displayRange();
loop 함수
루프 함수에서 가속도를 읽어 직렬 모니터에 표시합니다.
먼저 sensors_event_t 이벤트 객체를 생성합니다.
sensors_event_t는 특정 시점의 ADXL345 센서 데이터를 포함하는 사용자 정의 데이터형(C 언어의 구조체)입니다.
그런 다음 측정된 X, Y, Z 가속도 를 m/s^2 단위로 직렬 모니터에 인쇄합니다.
void loop(void)
{
  /* Get a new sensor event */
  sensors_event_t event;
  accel.getEvent(&event);

  /* Display the results (acceleration is measured in m/s^2) */
  Serial.print("X: "); Serial.print(event.acceleration.x); Serial.print("  ");
  Serial.print("Y: "); Serial.print(event.acceleration.y); Serial.print("  ");
  Serial.print("Z: "); Serial.print(event.acceleration.z); Serial.print("  ");Serial.println("m/s^2 ");
  delay(500);
}
ESP32를 사용한 가속도계 ADXL345 웹 서버
이제 Arduino IDE를 사용하여 웹 서버에 동일한 판독값을 표시하는 또 다른 예를 살펴보겠습니다.
여기서는 위의 예를 수정하여 웹 서버에 결과를 표시했습니다.
코드를 업로드하기 전에 다음과 같이 SSID 와 비밀번호를 추가했는지 확인하세요 .
const char* ssid = "*Your SSID*";         /*Enter Your SSID*/
const char* password = "*Your Password*"; /*Enter Your Password*/
ADXL345 가속도계 웹 서버 코드
#include <WiFi.h>
#include <WebServer.h>
#include <Adafruit_Sensor.h>
#include <Adafruit_ADXL345_U.h>
#include "html.h"

WebServer server(80);

const char* ssid = "*Your SSID*";         /*Enter Your SSID*/
const char* password = "*Your Password*"; /*Enter Your Password*/

long X, Y, Z;

/* Assign a unique ID to this sensor at the same time */
Adafruit_ADXL345_Unified accel = Adafruit_ADXL345_Unified(12345);

void displaySensorDetails(void)
{
  sensor_t sensor;
  accel.getSensor(&sensor);
  Serial.println("------------------------------------");
  Serial.print  ("Sensor:       "); Serial.println(sensor.name);
  Serial.print  ("Driver Ver:   "); Serial.println(sensor.version);
  Serial.print  ("Unique ID:    "); Serial.println(sensor.sensor_id);
  Serial.print  ("Max Value:    "); Serial.print(sensor.max_value); Serial.println(" m/s^2");
  Serial.print  ("Min Value:    "); Serial.print(sensor.min_value); Serial.println(" m/s^2");
  Serial.print  ("Resolution:   "); Serial.print(sensor.resolution); Serial.println(" m/s^2");
  Serial.println("------------------------------------");
  Serial.println("");
  delay(500);
}

void displayDataRate(void)
{
  Serial.print  ("Data Rate:    ");

  switch(accel.getDataRate())
  {
    case ADXL345_DATARATE_3200_HZ:
      Serial.print  ("3200 ");
      break;
    case ADXL345_DATARATE_1600_HZ:
      Serial.print  ("1600 ");
      break;
    case ADXL345_DATARATE_800_HZ:
      Serial.print  ("800 ");
      break;
    case ADXL345_DATARATE_400_HZ:
      Serial.print  ("400 ");
      break;
    case ADXL345_DATARATE_200_HZ:
      Serial.print  ("200 ");
      break;
    case ADXL345_DATARATE_100_HZ:
      Serial.print  ("100 ");
      break;
    case ADXL345_DATARATE_50_HZ:
      Serial.print  ("50 ");
      break;
    case ADXL345_DATARATE_25_HZ:
      Serial.print  ("25 ");
      break;
    case ADXL345_DATARATE_12_5_HZ:
      Serial.print  ("12.5 ");
      break;
    case ADXL345_DATARATE_6_25HZ:
      Serial.print  ("6.25 ");
      break;
    case ADXL345_DATARATE_3_13_HZ:
      Serial.print  ("3.13 ");
      break;
    case ADXL345_DATARATE_1_56_HZ:
      Serial.print  ("1.56 ");
      break;
    case ADXL345_DATARATE_0_78_HZ:
      Serial.print  ("0.78 ");
      break;
    case ADXL345_DATARATE_0_39_HZ:
      Serial.print  ("0.39 ");
      break;
    case ADXL345_DATARATE_0_20_HZ:
      Serial.print  ("0.20 ");
      break;
    case ADXL345_DATARATE_0_10_HZ:
      Serial.print  ("0.10 ");
      break;
    default:
      Serial.print  ("???? ");
      break;
  }
  Serial.println(" Hz");
}

void displayRange(void)
{
  Serial.print ("Range:         +/- ");

  switch(accel.getRange())
  {
    case ADXL345_RANGE_16_G:
      Serial.print  ("16 ");
      break;
    case ADXL345_RANGE_8_G:
      Serial.print  ("8 ");
      break;
    case ADXL345_RANGE_4_G:
      Serial.print  ("4 ");
      break;
    case ADXL345_RANGE_2_G:
      Serial.print  ("2 ");
      break;
    default:
      Serial.print  ("?? ");
      break;
  }
  Serial.println(" g");
}


void MainPage() {
  String _html_page = html_page;              /*Read The HTML Page*/
  server.send(200, "text/html", _html_page);  /*Send the code to the web server*/
}

void ADXL345html() {
  String data = "[\""+String(X)+"\",\""+String(Y)+"\",\""+String(Z)+"\"]";
  server.send(200, "text/plane", data);
}

void setup(void){
//  #ifndef ESP8266
//  while (!Serial); // for Leonardo/Micro/Zero
//#endif
  Serial.begin(115200);                 /*Set the baudrate to 115200*/
  Serial.println("Accelerometer Test"); Serial.println("");

  /* Initialise the sensor */
  if(!accel.begin())
  {
    /* There was a problem detecting the ADXL345 ... check your connections */
    Serial.println("Ooops, no ADXL345 detected ... Check your wiring!");
    while(1);
  }

  /* Set the range to whatever is appropriate for your project */
  accel.setRange(ADXL345_RANGE_16_G);
  // accel.setRange(ADXL345_RANGE_8_G);
  // accel.setRange(ADXL345_RANGE_4_G);
  // accel.setRange(ADXL345_RANGE_2_G);

  /* Display some basic information on this sensor */
  displaySensorDetails();

  /* Display additional settings (outside the scope of sensor_t) */
  displayDataRate();
  displayRange();
  Serial.println("");


  WiFi.mode(WIFI_STA);                  /*Set the WiFi in STA Mode*/
  WiFi.begin(ssid, password);
  Serial.print("Connecting to ");
  Serial.println(ssid);
  delay(1000);                          /*Wait for 1000mS*/
  while(WiFi.waitForConnectResult() != WL_CONNECTED){Serial.print(".");} /*Wait while connecting to WiFi*/
  Serial.print("Connected to ");
  Serial.println(ssid);
  Serial.print("Your Local IP address is: ");
  Serial.println(WiFi.localIP());       /*Print the Local IP*/

  server.on("/", MainPage);             /*Display the Web/HTML Page*/
  server.on("/readADXL345", ADXL345html); /*Display the updated Distance value(CM and INCH)*/
  server.begin();                       /*Start Server*/
  delay(1000);                          /*Wait for 1000mS*/
}

void loop(void){
  /* Get a new sensor event */
  sensors_event_t event;
  accel.getEvent(&event);

  X = event.acceleration.x;
  Y = event.acceleration.y;
  Z = event.acceleration.z;

  /* Display the results (acceleration is measured in m/s^2) */
  Serial.print("X: "); Serial.print(X); Serial.print("  ");
  Serial.print("Y: "); Serial.print(Y); Serial.print(" ");
  Serial.print("Z: "); Serial.print(Z); Serial.print(" ");Serial.println("m/s^2 ");
  server.handleClient();
  /*wait a second*/
  delay(1000);
}
이제 코드를 업로드하세요. (코드를 업로드하는 동안 ESP32 보드가 부팅 모드인지 확인하세요.)
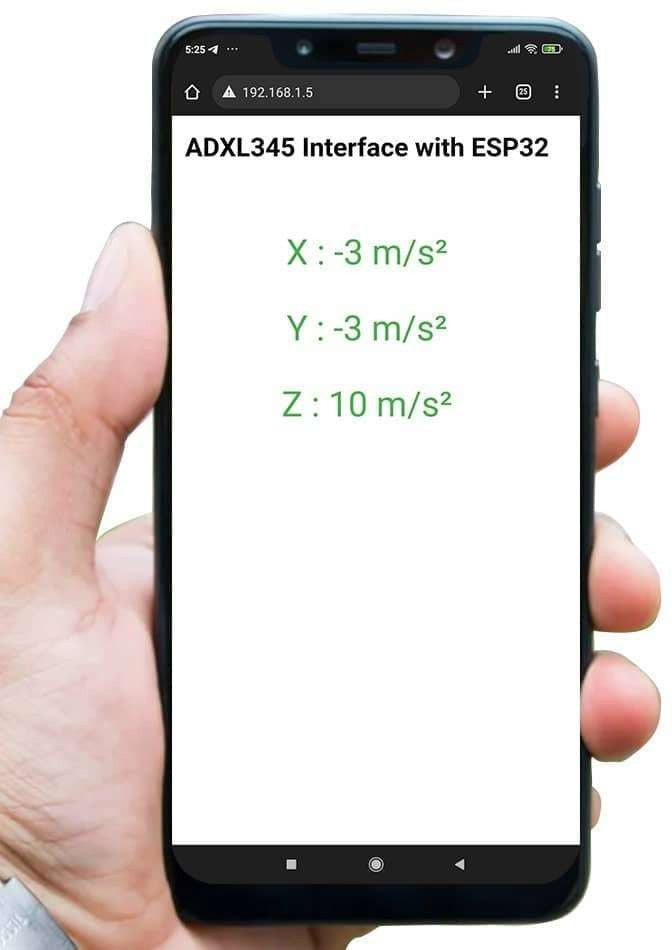
코드를 업로드한 후 직렬 모니터를 열고 통신 속도를 115200 으로 설정한 다음 ESP32 보드를 재설정하고 아래 이미지에 표시된 대로 IP 주소를 확인합니다.

웹서버에 출력
이제 모바일 브라우저를 열고 직렬 모니터에 표시된 IP 주소를 입력하고 Enter 버튼을 누르세요.
모두 괜찮다면, 웹 페이지는 아래 이미지와 같이 웹 서버의 현재 가속도를 보여주기 시작할 것입니다.
참고: ESP32와 모바일이 동일한 라우터/서버에 연결되어 있는지 확인하세요. 동일한 라우터나 서버에 연결되어 있는 경우 웹 페이지는 사용자만 볼 수 있습니다.
코드를 이해해보자
이 코드를 이해하려면 " ESP32 서버 생성 방법 " 기본 가이드를 참조하세요 .
ESP32 서버 생성의 기본을 이해하면 코드를 이해하는 것이 매우 간단할 것입니다.
이 코드는 중요한 헤더 파일과 라이브러리로 시작합니다. 이 WiFi.h파일에는 ESP32 WiFi 관련 정의가 모두 포함되어 있으며, 여기서는 네트워크 연결 목적으로 이를 사용했습니다.
WebServer.h 파일은 HTTP GET 및 POST 요청 처리와 서버 설정을 지원합니다. html.h 파일에는 모든 웹 페이지 코드가 포함되어 있으며, Wire.h를 사용하면 I2C 장치(예: ADXL345)와 통신할 수 있습니다. 이후 Adafruit_Sensor 및 Adafruit_ADXL345_U 라이브러리 파일을 추가합니다.
#include <WiFi.h>
#include <WebServer.h>
#include "html.h"
#include <Adafruit_ADXL345_U.h>
#include <Adafruit_Sensor.h>
#include <Wire.h>
HTTP 포트, 즉 포트 80을 다음과 같이 정의해 보겠습니다.
WebServer server(80);
setup 기능
설정 기능에서는 먼저 WiFi를 STA 모드 로 설정 하고 주어진 SSID 와 비밀번호 에 연결합니다.
WiFi.mode(WIFI_STA);          /*Set the WiFi in STA Mode*/
WiFi.begin(ssid, password);
Serial.print("Connecting to ");
Serial.println(ssid);
delay(1000);                  /*Wait for 1000mS*/
while(WiFi.waitForConnectResult() != WL_CONNECTED){Serial.print(".");}
서버에 성공적으로 연결한 후 직렬 창에 로컬 IP 주소를 인쇄합니다.
Serial.print("Your Local IP address is: ");
Serial.println(WiFi.localIP());     /*Print the Local IP*/
클라이언트 요청 처리 및 페이지 제공:
클라이언트 요청을 처리하려면 server.on() 함수를 사용합니다.
두 개의 매개변수가 필요합니다. 첫 번째는 요청된 URL 경로이고, 두 번째는 실행하려는 함수 이름입니다.
아래 코드에 따르면 클라이언트가 루트 (/)경로를 요청하면 " MainPage()" 함수가 실행됩니다.
또한 클라이언트가 " /readADXL345" 경로를 요청하면 ADXL345html()함수가 호출됩니다.
server.on("/", MainPage);           /*Client request handling: calls the function to serve HTML page */
server.on("/readADXL345", ADXL345html);/*Display the updated Distance value(CM and INCH)*/
이제 server.begin() 함수를 사용하여 서버를 시작하십시오.
server.begin(); /*Start Server*/
HTML 제공을 위한 함수
우리는 "html.h"라는 파일에서 완전한 HTML 페이지를 정의하고 헤더 파일에 추가했습니다. 다음 함수를 통해 server.send() 함수를 통해 클라이언트에게 전체 페이지를 전송하고 있습니다.
전송하는 동안 첫 번째 매개변수인 " 200 " 을 전달하는데, 이는 OK (성공적인 HTTP 요청에 대한 표준 응답) 상태 응답 코드입니다 .
두 번째 매개변수는 콘텐츠 유형을 " text/html"로 나타내고, 세 번째 매개변수는 HTML 페이지 코드입니다.
void MainPage() {
  String _html_page = html_page;              /*Read The HTML Page*/
  server.send(200, "text/html", _html_page);  /*Send HTM page to Client*/
}
이제 아래 함수에서만 업데이트된 가속도 값을 웹 페이지로 전송합니다.
void ADXL345html() {
  String data = "[\""+String(X)+"\",\""+String(Y)+"\",\""+String(Z)+"\"]";
  server.send(200, "text/plane", data);
}
loop 함수
이제 들어오는 클라이언트 요청을 처리하고 관련 HTML 페이지를 제공하기 위해 handleClient() 함수를 사용할 수 있습니다. 이 함수는 void setup()에 정의되어 있음에도 불구하고 콜백 함수로 관련 server.on()을 실행합니다.
그래서 지속적으로 고객의 요청에 부응하고 있습니다.
server.handleClient();
HTML 페이지 코드
/*
ESP32 HTML WebServer Page Code
http:://www.electronicwings.com
*/
const char html_page[] PROGMEM = R"RawString(
<!DOCTYPE html>
<html>
  <style>
    body {font-family: sans-serif;}
    h1 {text-align: center; font-size: 30px;}
    p {text-align: center; color: #4CAF50; font-size: 40px;}
  </style>
<body>
<h1>ADXL345 Interface with ESP32 </h1><br>
<p>X : <span id="_X">0</span> m/s²</p>
<p>Y : <span id="_Y">0</span> m/s²</p>
<p>Z : <span id="_Z">0</span> m/s²</p>
<script>
setInterval(function() {
var xhttp = new XMLHttpRequest();
xhttp.onreadystatechange = function() {
if (this.readyState == 4 && this.status == 200) {
const text = this.responseText;
const myArr = JSON.parse(text);
document.getElementById("_X").innerHTML = myArr[0];
document.getElementById("_Y").innerHTML = myArr[1];
document.getElementById("_Z").innerHTML = myArr[2];
}
};
xhttp.open("GET", "readADXL345", true);
xhttp.send();
},100);
</script>
</body>
</html>
)RawString";
코드를 단계별로 이해해 보겠습니다.
모든 HTML 페이지는 <!DOCTYPE html>선언문으로 시작하는데, 이는 브라우저에게 어떤 유형의 문서가 예상되는지 알려주는 정보일 뿐입니다.
Let’s understand the code step by step
All html pages start with the <!DOCTYPE html> declaration, it is just information to the browser about what type of document is expected.
<!DOCTYPE html>The html tag is the container of the complete html page which represents on the top of the html code.
<html>Now here we are defining the style information for a web page using the <style> tag. Inside the style tag we have defined the font name, size, color, and test alignment.
<style>
body {font-family: sans-serif;}
h1 {text-align: center; font-size: 30px;}
p {text-align: center; color: #4CAF50; font-size: 40px;}
</style>
Inside the body, we are defining the document body, in below we have used headings, and paragraphs if you want you can add images, hyperlinks, tables, lists, etc. also.
On the web page, we are displaying the heading of the page, and inside a paragraph three accelerations i.e., x, y, and z readings.
Now accelerations values updates under the span id which is manipulated with JavaScript using the id attribute.
<body>
<h1>ADXL345 Interface with ESP32 </h1><br>
<p>X : <span id="_X">0</span> m/s²</p>
<p>Y : <span id="_Y">0</span> m/s²</p>
<p>Z : <span id="_Z">0</span> m/s²</p>Now, this is the javascript that comes under the <script> tag, this is also called a client-side script.
<script>In setInterval() method we are calling the function at every 50mS intervals.
setInterval(function() {},50);
Here we are creating the html XMLHttpRequest object
var xhttp = new XMLHttpRequest();The xhttp.onreadystatechange event is triggered every time the readyState changes and the readyState holds the status of the XMLHttpRequest.
Now in the below code, the ready state is 4 means the request finished and response is ready and the status is 200 which means OK.
xhttp.onreadystatechange = function() {
if (this.readyState == 4 && this.status == 200) {
const myArr = JSON.parse(this.responseText);
Now here is the main thing, we are updating the acceleration values in html page using _X, _Y, and _Z id.
document.getElementById("_X").innerHTML = myArr[0];
document.getElementById("_Y").innerHTML = myArr[1];
document.getElementById("_Z").innerHTML = myArr[2];
Here we used the AJAX method to send the updated values to the server without refreshing the page.
In the below function we have used the GET method and sent the readADXL345 function which we defined in the main code asynchronously.
xhttp.open("GET", "readADXL345", true);Send the request to the server using xhttp.send(); function.
xhttp.send();
Close the script
</script>Close the body
</body>Close the html.
</html>
'ESP32' 카테고리의 다른 글
| zclaw 888KiB ESP32 기반 AI 에이전트 (0) | 2026.02.25 |
|---|---|
| ESP32 보드에서 구동되는 초경량 오픈소스 'zclaw' 공개 (1) | 2026.02.25 |
| 연결이 끊긴 ESP32를 Wi-Fi 네트워크에 다시 연결하는 방법 (0) | 2026.02.24 |
| ESP32 MPU-6050 가속도계 및 자이로스코프 웹 서버 (0) | 2026.02.17 |
| GY-291 ADXL345 i2c SPI 가속도 센서 (인터럽트 기능) - ESP32, ESP8266, STM32 및 아두이노 호환 (1) | 2026.02.17 |
| ESP32 MPU-6050 웹 서버 3D 객체 표현 (0) | 2026.02.14 |
| ESP32-P4 vs. C3: 어떤 Elecrow HMI 디스플레이가 당신에게 더 적합할까요? (0) | 2026.02.09 |
| ESP32 웹 업데이터: 브라우저를 통해 코드 업데이트(OTA) (0) | 2026.02.03 |
취업, 창업의 막막함, 외주 관리, 제품 부재!
당신의 고민은 무엇입니까? 현실과 동떨어진 교육, 실패만 반복하는 외주 계약,
아이디어는 있지만 구현할 기술이 없는 막막함.
우리는 알고 있습니다. 문제의 원인은 '명확한 학습, 실전 경험과 신뢰할 수 있는 기술력의 부재'에서 시작됩니다.
이제 고민을 멈추고, 캐어랩을 만나세요!
코딩(펌웨어), 전자부품과 디지털 회로설계, PCB 설계 제작, 고객(시장/수출) 발굴과 마케팅 전략으로 당신을 지원합니다.
제품 설계의 고수는 성공이 만든 게 아니라 실패가 만듭니다. 아이디어를 양산 가능한 제품으로!
귀사의 제품을 만드세요. 교육과 개발 실적으로 신뢰할 수 있는 파트너를 확보하세요.
캐어랩


