직원들 다 퇴근하고, 이것만 간단하게 해야지 하고 했는데 4시간을 날렸다. 최종 단계에서는 Nano 33 IoT 보드에 연결해야 하는데 Oled 잘 되나 시험해 본다고 했는데 화면이 안 나온다. 결국 간단한 문제 하나 해결하니 잘 나온다. 단순한 화면 하나 보자고 내가 이런 ㅠ.ㅠ
아두이노 우노 보드의 개발환경이나 i2c연결이나 라이브러리 설치, 업로딩 등과 같은 기본적인 내용은 다른 사이트를 참고하시기 바라며 여기서는 생략한다. ^^
보드: 아두이노 우노
Oled: ssd1306 i2c
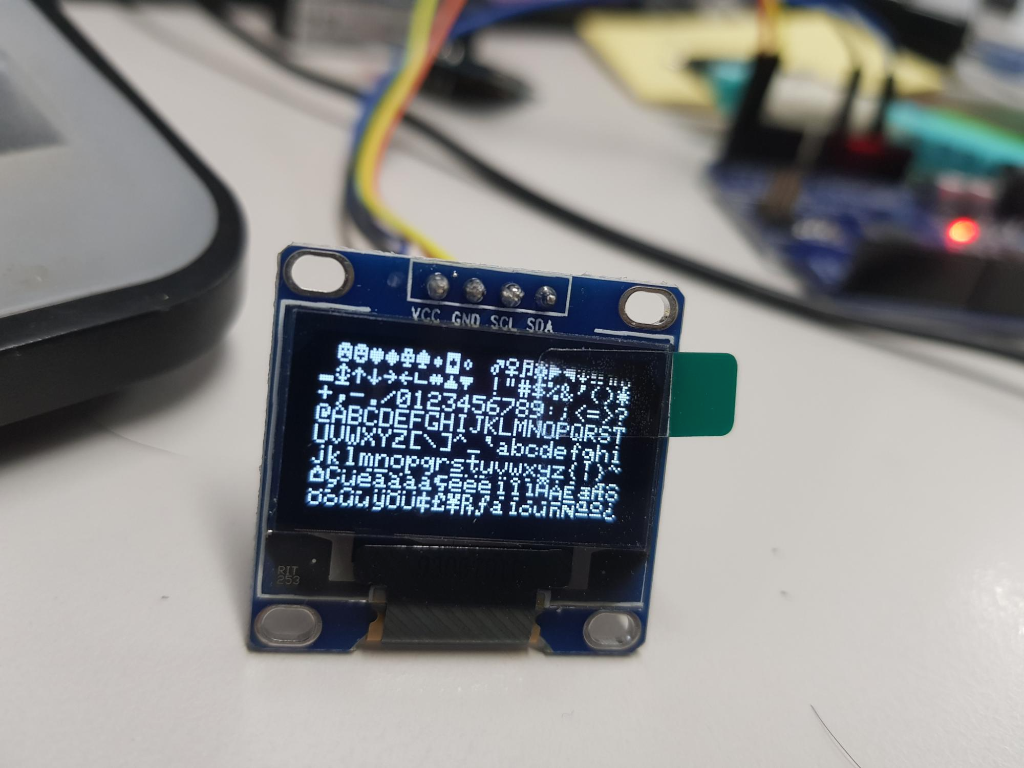
요약 1줄: 불러온 예제를 아래 그림처럼 이렇게 불러왔을 것이다. 파일 -> Examples -> Adafruit SSD1306 -> ssd1306_128864_i2c 처럼 말이다. 잘했다. 파일을 열어서 정확히 59라인 소스를 보면 I2C Oled 주소를 3C로 바꿔준다. 참고로 공급 전원 3.3v에서도 매우 동작을 잘한다. ^^

즉 아래와 같은 라인의 3D를 3C로 바꿔주면 잘 나온다. 0x3D -> 0x3C 로 변경한다. 아래는 수정한 부분 코드다.
// SSD1306_SWITCHCAPVCC = generate display voltage from 3.3V internally
  if(!display.begin(SSD1306_SWITCHCAPVCC, 0x3C)) { // Address 0x3D for 128x64
    Serial.println(F("SSD1306 allocation failed"));
라이브러리 설치 문제
라이브러리를 아래 화면처럼 설치할 때 only ssd1306 라이브러리만 설치하지 마시고 All을 선택해서 두 가지 라이브러리가 모두 설치하도록 한다.

만약에 하나만 설치했다면 다시 라이브러리 선택을 해서 버전을 달리하면 모두 설치할 수 있는 방법이 있다. 최신 버전은 선택 설치하도록 메시지가 나오는데 구 버전의 IDE에서는 Adafruit_SSD1306 (SSD1306 library), Adafruit-GFX-Library (GFX library) 두 가지 라이브러리를 설치하였다.
요약 3줄:
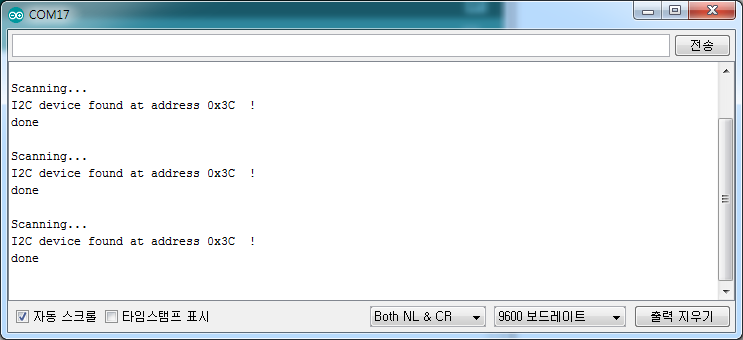
정확히 다른 예제와 마찬가지로 Oled를 I2C 로 잘 연결했다면 우선 아래와 같은 i2c 스캐너 프로그램을 실행시켜 연결한 i2c 주소를 알아낸다. 다른 라이브러리가 필요 없는 아래 코드를 i2c_scanner.ino로 저장하고 컴파일하고 업로드를 수행한다. 아래 코드와 문서 출처는 여기를 참고하기 바란다.
 // --------------------------------------
// i2c_scanner
//
// Version 1
//    This program (or code that looks like it)
//    can be found in many places.
//    For example on the Arduino.cc forum.
//    The original author is not know.
// Version 2, Juni 2012, Using Arduino 1.0.1
//     Adapted to be as simple as possible by Arduino.cc user Krodal
// Version 3, Feb 26  2013
//    V3 by louarnold
// Version 4, March 3, 2013, Using Arduino 1.0.3
//    by Arduino.cc user Krodal.
//    Changes by louarnold removed.
//    Scanning addresses changed from 0...127 to 1...119,
//    according to the i2c scanner by Nick Gammon
//    https://www.gammon.com.au/forum/?id=10896
// Version 5, March 28, 2013
//    As version 4, but address scans now to 127.
//    A sensor seems to use address 120.
// Version 6, November 27, 2015.
//    Added waiting for the Leonardo serial communication.
//
//
// This sketch tests the standard 7-bit addresses
// Devices with higher bit address might not be seen properly.
//

#include <Wire.h>


void setup()
{
  Wire.begin();

  Serial.begin(9600);
  while (!Serial);             // Leonardo: wait for serial monitor
  Serial.println("\nI2C Scanner");
}


void loop()
{
  byte error, address;
  int nDevices;

  Serial.println("Scanning...");

  nDevices = 0;
  for(address = 1; address < 127; address++ )
  {
    // The i2c_scanner uses the return value of
    // the Write.endTransmisstion to see if
    // a device did acknowledge to the address.
    Wire.beginTransmission(address);
    error = Wire.endTransmission();

    if (error == 0)
    {
      Serial.print("I2C device found at address 0x");
      if (address<16)
        Serial.print("0");
      Serial.print(address,HEX);
      Serial.println("  !");

      nDevices++;
    }
    else if (error==4)
    {
      Serial.print("Unknown error at address 0x");
      if (address<16)
        Serial.print("0");
      Serial.println(address,HEX);
    }
  }
  if (nDevices == 0)
    Serial.println("No I2C devices found\n");
  else
    Serial.println("done\n");

  delay(5000);           // wait 5 seconds for next scan
}
위 코드를 수행하면 연결한 i2c 디바이스 주소를 출력하는데 여기서는 oled 하나만 연결했으므로 주소는 아래와 같이 나온다. 즉, ssd1306 oled의 i2c 주소는 0x3C다.
이 주소를 위에 설명한 곳에 넣으면 정상적으로 출력한다. 아두이노 우노 보드의 i2c연결이나 라이브러리 설치, 업로딩 등과 같은 기본적인 내용은 생략한다. 이제 Nnao 33 IoT 보드에서 테스트해야 한다. 잘 될지 해보고 포스팅을 하기로 한다. 끝나고 어서 놀러 나가야 한다. 놀 데는 없어도 혼자서 시간을 보내는 곳으로 출동이다. ^^
참고 자료
014. Arduino 아두이노 - 0.96" OLED 모듈 사용하기
'개발자 > Arduino' 카테고리의 다른 글
| Nano 33 IoT 보드 온도 습도 센서 dht11 테스트 (0) | 2020.10.06 |
|---|---|
| Nano 33 IoT 보드 간단한 서버 만들고 AP로 동작 (0) | 2020.10.03 |
| Nano 33 IoT 보드 WiFi 스캔 코드 (0) | 2020.10.03 |
| nano 33 IoT 보드에 0.96 ssd1306 i2c OLED 연결하기 (0) | 2020.09.29 |
| Arduino nano 33 IoT 특별한 LSM6DS3 Library (0) | 2020.09.25 |
| 고정밀 온도 습도 센서 DHT21 AM2301 Digital Temperature Humidity Sensor (0) | 2020.09.22 |
| nano 33 IoT 보드로 구현한 스마트 가든 예제 (0) | 2020.09.21 |
| Arduino Nano 33 IoT 개발 가이드 1-1 Blink Test (0) | 2020.09.18 |
취업, 창업의 막막함, 외주 관리, 제품 부재!
당신의 고민은 무엇입니까? 현실과 동떨어진 교육, 실패만 반복하는 외주 계약,
아이디어는 있지만 구현할 기술이 없는 막막함.
우리는 알고 있습니다. 문제의 원인은 '명확한 학습, 실전 경험과 신뢰할 수 있는 기술력의 부재'에서 시작됩니다.
이제 고민을 멈추고, 캐어랩을 만나세요!
코딩(펌웨어), 전자부품과 디지털 회로설계, PCB 설계 제작, 고객(시장/수출) 발굴과 마케팅 전략으로 당신을 지원합니다.
제품 설계의 고수는 성공이 만든 게 아니라 실패가 만듭니다. 아이디어를 양산 가능한 제품으로!
귀사의 제품을 만드세요. 교육과 개발 실적으로 신뢰할 수 있는 파트너를 확보하세요.
캐어랩


