Nano33 IoT 보드는 저전력 아키텍처와 결합된 WiFi 및 Bluetooth 연결을 지원하는 소형 보드로 네트워크 연결 프로젝트를위한 실용적이고 비용 효율적인 해결책이다. Wifi 와 bluetooth chip 에 대한 설명자료는 링크를 참고합니다.
반복해서 나오는 이미지는 중요한 이유겠죠. Nano 33 IoT 보드의 Pinmap 이미지를 참고하세요.

특징적인 굵은 글씨를 참고하세요.
This table highlights some of the features
Product variants
| Antenna | |
| Antenna pin | ✓ |
| Internal antenna | – |
| Short range features | |
| Bluetooth qualification | v4.2 (Bluetooth low energy and BR/EDR) |
| Bluetooth output power EIRP [dBm] | 8 |
| Bluetooth low energy output power EIRP [dBm] | 8 |
| Wi-Fi output power EIRP [dBm] | 19 |
| Throughput [Mbit/s] | 150.0 |
| Wi-Fi micro access point [max stations] | 4 |
| Maximum Wi-Fi range [m] | 500 |
| Bluetooth profiles and services | |
| Bluetooth SPP | ✓ |
| Bluetooth DUN | ✓ |
| Bluetooth PAN | ✓ |
| Bluetooth GATT | ✓ |
| Wi-Fi standard | |
| IEEE 802.11b | ✓ |
| IEEE 802.11g | ✓ |
| IEEE 802.11n | ✓ |
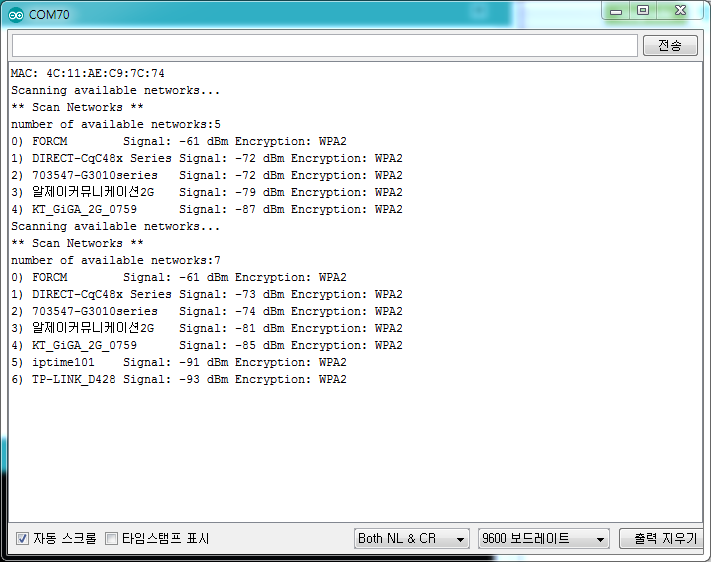
Arduino Nnao 33 IoT 보드에서 주변의 WiFi를 스캔하는 코드입니다. 보드에 대한 자세한 설명은 아래 링크를 참고하세요. 순서대로 포스팅 자료를 검토하고 문의사항은 댓글 남겨주시길 바랍니다.
소스코드 wifi-scan.ino 로 파일 이름을 저장한다.
#include <SPI.h>
#include <WiFiNINA.h>

void setup() {
  //Initialize serial and wait for port to open:
  Serial.begin(9600);
  while (!Serial) {
    ; // wait for serial port to connect. Needed for native USB port only
  }

  // check for the WiFi module:
  if (WiFi.status() == WL_NO_MODULE) {
    Serial.println("Communication with WiFi module failed!");
    // don't continue
    while (true);
  }

  String fv = WiFi.firmwareVersion();
  if (fv < "1.0.0") {
    Serial.println("Please upgrade the firmware");
  }

  // print your MAC address:
  byte mac[6];
  WiFi.macAddress(mac);
  Serial.print("MAC: ");
  printMacAddress(mac);
}

void loop() {
  // scan for existing networks:
  Serial.println("Scanning available networks...");
  listNetworks();
  delay(10000);
}

void listNetworks() {
  // scan for nearby networks:
  Serial.println("** Scan Networks **");
  int numSsid = WiFi.scanNetworks();
  if (numSsid == -1) {
    Serial.println("Couldn't get a wifi connection");
    while (true);
  }

  // print the list of networks seen:
  Serial.print("number of available networks:");
  Serial.println(numSsid);

  // print the network number and name for each network found:
  for (int thisNet = 0; thisNet < numSsid; thisNet++) {
    Serial.print(thisNet);
    Serial.print(") ");
    Serial.print(WiFi.SSID(thisNet));
    Serial.print("\tSignal: ");
    Serial.print(WiFi.RSSI(thisNet));
    Serial.print(" dBm");
    Serial.print("\tEncryption: ");
    printEncryptionType(WiFi.encryptionType(thisNet));
  }
}

void printEncryptionType(int thisType) {
  // read the encryption type and print out the name:
  switch (thisType) {
    case ENC_TYPE_WEP:
      Serial.println("WEP");
      break;
    case ENC_TYPE_TKIP:
      Serial.println("WPA");
      break;
    case ENC_TYPE_CCMP:
      Serial.println("WPA2");
      break;
    case ENC_TYPE_NONE:
      Serial.println("None");
      break;
    case ENC_TYPE_AUTO:
      Serial.println("Auto");
      break;
    case ENC_TYPE_UNKNOWN:
    default:
      Serial.println("Unknown");
      break;
  }
}


void printMacAddress(byte mac[]) {
  for (int i = 5; i >= 0; i--) {
    if (mac[i] < 16) {
      Serial.print("0");
    }
    Serial.print(mac[i], HEX);
    if (i > 0) {
      Serial.print(":");
    }
  }
  Serial.println();
}
코드를 업로드 하고 씨리얼 모니터 창을 열면 아래와 같은 결과를 볼 수 있습니다.
'개발자 > Arduino' 카테고리의 다른 글
| SSD1306 OLED 로 LM35 온도센서 값을 디스플레이 (0) | 2020.10.07 |
|---|---|
| 달리기와 술자리도 마다하고, 여기까지 돌아가는 코드 (0) | 2020.10.06 |
| Nano 33 IoT 보드 온도 습도 센서 dht11 테스트 (0) | 2020.10.06 |
| Nano 33 IoT 보드 간단한 서버 만들고 AP로 동작 (0) | 2020.10.03 |
| nano 33 IoT 보드에 0.96 ssd1306 i2c OLED 연결하기 (0) | 2020.09.29 |
| ssd1306 Oled 화면 안 나올 때 점검 사항 (0) | 2020.09.29 |
| Arduino nano 33 IoT 특별한 LSM6DS3 Library (0) | 2020.09.25 |
| 고정밀 온도 습도 센서 DHT21 AM2301 Digital Temperature Humidity Sensor (0) | 2020.09.22 |
취업, 창업의 막막함, 외주 관리, 제품 부재!
당신의 고민은 무엇입니까? 현실과 동떨어진 교육, 실패만 반복하는 외주 계약,
아이디어는 있지만 구현할 기술이 없는 막막함.
우리는 알고 있습니다. 문제의 원인은 '명확한 학습, 실전 경험과 신뢰할 수 있는 기술력의 부재'에서 시작됩니다.
이제 고민을 멈추고, 캐어랩을 만나세요!
코딩(펌웨어), 전자부품과 디지털 회로설계, PCB 설계 제작, 고객(시장/수출) 발굴과 마케팅 전략으로 당신을 지원합니다.
제품 설계의 고수는 성공이 만든 게 아니라 실패가 만듭니다. 아이디어를 양산 가능한 제품으로!
귀사의 제품을 만드세요. 교육과 개발 실적으로 신뢰할 수 있는 파트너를 확보하세요.
캐어랩


