HTTP를 통해 Arduino Nano 33 IoT와 Ubidots 연결
Arduino Nano 33 IoT를 HTTP를 통해 Ubidots 애플리케이션 개발 플랫폼에 연결하는 방법을 설명합니다. 본 문서는 Ubidots에서 제공하는 참고 문서를 번역하였습니다. 영문 문서는 Connect the Arduino Nano 33 IoT with Ubidots over HTTP 를 참고하십시오.
관련 포스팅을 참고하세요.
HTTP를 통해 Arduino Nano 33 IoT와 Ubidots 연결 1
HTTP를 통해 Arduino Nano 33 IoT와 Ubidots 데이터 보내기 2
HTTP를 통해 Arduino Nano 33 IoT와 Ubidots 데이터 보내기 3 Oled에 데이터 표시하기
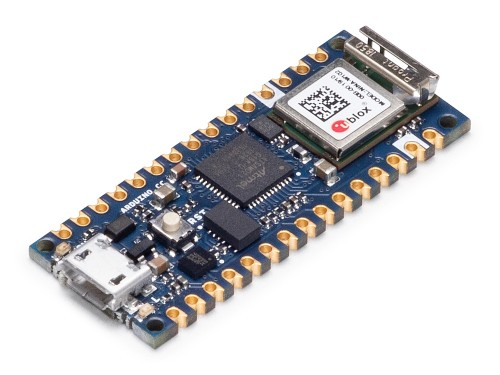
Nano 33 IoT는 Nano Every의 획기적인 개선으로 IoT 플랫폼과의 통신을 설정하기 위해 추가 WiFi 모듈 없이도 센서 및 액추에이터를 원격으로 모니터링 및 제어하는 등 일상적인 기능을 확장할 수 있습니다. Arduino의 공식 문서를 참조하고 보드의 모든 사양을 확인하십시오.
Ubidots API 문서를 참고한다.
Ubidots Docs
ubidots.com
이 가이드를 따르면 Ubidots에 POST 및 GET HTTP 요청을 할 수 있습니다. 단 몇 분만에!
요구 사항
- Nano 33 IoT
- WIFININA 라이브러리
- Ubidots 계정
단계별
- Arduino IDE 설정
- Ubidots에 (POST) 데이터 보내기
- Ubidots에서 데이터 검색 (GET)
- 요약
1. Arduino IDE 설정
1. Arduino IDE가 아직 없는 경우 최신 버전을 다운로드합니다.
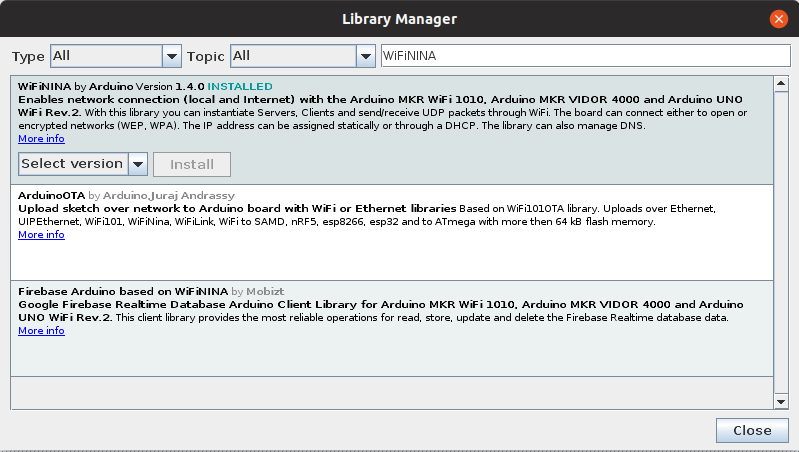
2. Arduino IDE에서 Sketch-> Include Library-> Manage Libraries를 클릭합니다.
3. WiFiNINA 라이브러리를 검색하고 컴퓨터에서 사용 가능한 최신 버전을 설치합니다. 보드의 펌웨어 버전이 라이브러리와 일치하는지 확인하십시오. 펌웨어 업데이트가 필요한 경우 다음 유틸리티를 사용하십시오.
- CheckWiFiNINAFirmwareVersion : 라이브러리에서 필요한 필수 펌웨어 번호를 읽고 이를 보드 또는 실드에 설치된 것과 일치시킵니다.
- WiFiNINAFirmwareUpdater : Arduino Software (IDE) rel의 통합 플러그인을 통해 펌웨어를 허용하고 업데이트를 인증하기 위해 로드해야 하는 스케치입니다. 1.8.5 이상.
4. 도구> 보드> 보드 관리자에서 보드 관리자로 이동하여 "Arduino SAMD"를 검색합니다. “Arduino Nano 33 IoT”가 나열된 것을 설치하십시오.
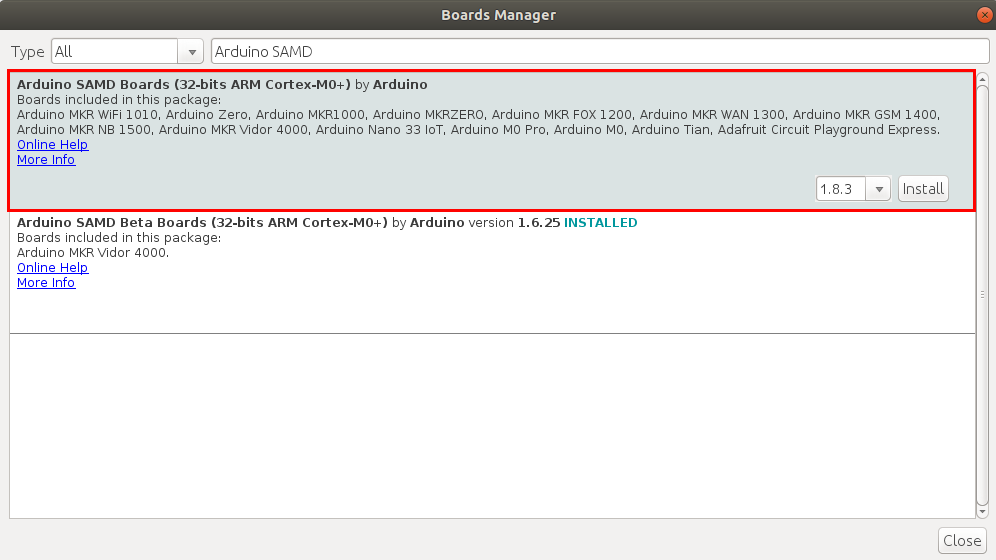
중요 참고 : 최신 버전의 보드를 설치해야 합니다. 보드가 설치되면 보드 관리자에서 "Arduino NANO 33 IoT"로 시각화할 수 있어야 합니다. 보드가 목록에 없으면 보드 관리자로 돌아가 "업데이트"를 클릭합니다.
2. (POST) 데이터를 Ubidots로 보내기
1. Ubidots에 데이터를 POST 하려면 먼저 Arduino IDE 바의 도구 옵션에서 보드와 포트를 선택해야 합니다.

2. 보드가 컴퓨터에 성공적으로 연결되었는지 확인한 후 아래 샘플 코드를 붙여 넣습니다. 코드를 붙여 넣으면 표시된 곳에 사용 가능한 네트워크의 Ubidots TOKEN, SSID (WiFi 이름) 및 암호를 할당해야 합니다.
/********************************
 * Libraries included
 *******************************/

#include <SPI.h>
#include <WiFiNINA.h>
#include <avr/dtostrf.h>

/********************************
 * Constants and objects
 *******************************/

#define DEVICE_LABEL "arduino-nano-33"
#define TOKEN "PUT_YOUR_TOKEN_HERE"

char const * VARIABLE_LABEL_1 = "sensor";
char const *SERVER="industrial.api.ubidots.com";
//Replace the above line if you are an Educational user char const *SERVER="things.ubidots.com";

const int HTTPPORT= 443;
char const *AGENT="Arduino Nano 33 IoT";
char const *HTTP_VERSION = " HTTP/1.1\r\n";
char const *VERSION ="1.0";
char const *PATH= "/api/v1.6/devices/";

char const * SSID_NAME = "xxxxxxx"; // Put here your SSID name
char const * SSID_PASS = "xxxxxxx"; // Put here your password

int status = WL_IDLE_STATUS;

WiFiSSLClient client;

/********************************
 * Auxiliar Functions
 *******************************/

void printWiFiStatus() {
  // print the SSID of the network you're attached to:
  Serial.print("SSID: ");
  Serial.println(WiFi.SSID());
  // print your board's IP address:
  IPAddress ip = WiFi.localIP();
  Serial.print("IP Address: ");
  Serial.println(ip);
  // print the received signal strength:
  long rssi = WiFi.RSSI();
  Serial.print("signal strength (RSSI):");
  Serial.print(rssi);
  Serial.println(" dBm");
}

void getResponseServer() {
  Serial.println(F("\nUbidots' Server response:\n"));
  while (client.available()) {
    char c = client.read();
    Serial.print(c); // Uncomment this line to visualize the response on the Serial Monitor
  }
}

void waitServer() {
  int timeout = 0;
  while (!client.available() && timeout < 5000) {
    timeout++;
    delay(1);
    if (timeout >= 5000) {
      Serial.println(F("Error, max timeout reached"));
      break;
    }
  }
}

void sendData(char* payload) {
  int contentLength = strlen(payload);

  /* Connecting the client */
  if (client.connect(SERVER, HTTPPORT)) {
    Serial.println("connected to server");

    client.print(F("POST "));
    client.print(PATH);
    client.print(DEVICE_LABEL);
    client.print(F("/"));
    client.print(HTTP_VERSION);
    client.print(F("Host: "));
    client.print(SERVER);
    client.print(F("\r\n"));
    client.print(F("User-Agent: "));
    client.print(AGENT);
    client.print(F("\r\n"));
    client.print(F("X-Auth-Token: "));
    client.print(TOKEN);
    client.print(F("\r\n"));
    client.print(F("Connection: close\r\n"));
    client.print(F("Content-Type: application/json\r\n"));
    client.print(F("Content-Length: "));
    client.print(contentLength);
    client.print(F("\r\n\r\n"));
    client.print(payload);
    client.print(F("\r\n"));

    Serial.print(F("POST "));
    Serial.print(PATH);
    Serial.print(DEVICE_LABEL);
    Serial.print(F("/"));
    Serial.print(HTTP_VERSION);
    Serial.print(F("Host: "));
    Serial.print(SERVER);
    Serial.print(F("\r\n"));
    Serial.print(F("User-Agent: "));
    Serial.print(AGENT);
    Serial.print(F("\r\n"));
    Serial.print(F("X-Auth-Token: "));
    Serial.print(TOKEN);
    Serial.print(F("\r\n"));
    Serial.print(F("Connection: close\r\n"));
    Serial.print(F("Content-Type: application/json\r\n"));
    Serial.print(F("Content-Length: "));
    Serial.print(contentLength);
    Serial.print(F("\r\n\r\n"));
    Serial.print(payload);
    Serial.print(F("\r\n"));

    waitServer();
    getResponseServer();
  }

    /* Disconnecting the client */
  client.stop();
}

/********************************
 * Main Functions
 *******************************/

void setup() {
  //Initialize serial and wait for port to open:
  Serial.begin(9600);

  while (!Serial) {
    ; // wait for serial port to connect. Needed for native USB port only
  }

  // check for the WiFi module:
  if (WiFi.status() == WL_NO_MODULE) {
    Serial.println("Communication with WiFi module failed!");
    // don't continue
    while (true);
  }

  // attempt to connect to WiFi network:
  while (status != WL_CONNECTED) {
    Serial.print("Attempting to connect to SSID: ");
    Serial.println(SSID_NAME);
    // Connect to WPA/WPA2 network. Change this line if using open or WEP network:
    status = WiFi.begin(SSID_NAME, SSID_PASS);
    // wait 10 seconds for connection:
    delay(10000);
  }
  Serial.println("Connected to wifi");
  printWiFiStatus();
}

void loop(){

  char payload[200];
  char str_val_1[30];

  /*4 is the total lenght of number,maximun number accepted is 99.99*/
  float value = analogRead(A0);
  dtostrf(value, 4, 2, str_val_1);
  sprintf(payload, "%s","");
  sprintf(payload, "{\"");
  sprintf(payload, "%s%s\":%s", payload, VARIABLE_LABEL_1, str_val_1);
  sprintf(payload, "%s}", payload);

  //Send the payload to Ubidots
  sendData(payload);
  delay(5000);
}
3. Arduino IDE 내에서 코드를 확인합니다. 이를 위해 Arduino IDE의 왼쪽 상단에 "확인 표시"아이콘이 있습니다. 코드를 확인하려면 선택하십시오.
4. "Arduino Nano 33 IoT"에 코드를 업로드합니다. 이렇게 하려면 "확인 표시"아이콘 옆에 있는 "오른쪽 화살표"아이콘을 선택합니다.
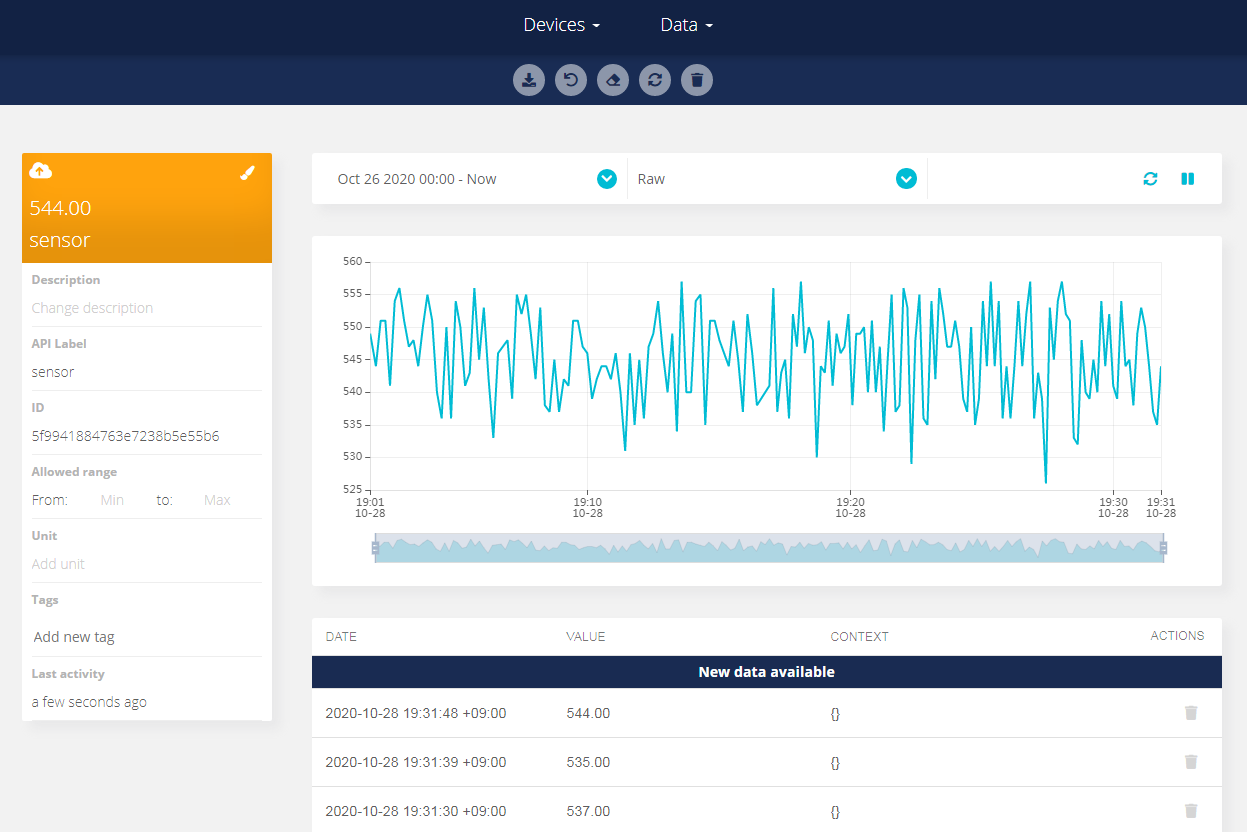
5. 장치의 연결 및 서버 응답을 확인하려면 Arduino IDE의 오른쪽 상단 모서리에 있는 "돋보기"아이콘을 선택하여 직렬 모니터를 열어 데이터가 올바르게 전송되고 있는지 확인합니다.
6. Ubidots 계정의 장치 섹션을 참조하여 새 장치가 자동으로 생성된 방법을 확인하십시오. "sensor"라는 변수는 Arduino 보드의 아날로그 입력에서 가져온 판독 값을 게시합니다.
여기까지 1차 Test 완료. 놀러가자. 아래는 전송 완료 후 다른 포스팀으로 게시할 예정.
3. Ubidots에서 데이터 검색 (GET)
1. 다음 샘플 코드를 사용하여 변수의 마지막 값을 가져올 수 있습니다. 표시된 위치를 얻으려면 원하는 Ubidots TOKEN, SSID (WiFi 이름), 암호, 장치 레이블 및 변수 레이블을 지정해야 합니다.
/********************************
 * Libraries included
 *******************************/

#include <SPI.h>
#include <WiFiNINA.h>
#include <avr/dtostrf.h>

/********************************
 * Constants and objects
 *******************************/
#include <SPI.h>
#include <WiFiNINA.h>
#include <avr/dtostrf.h>

#define DEVICE_LABEL "DEVICE_LABEL"
#define TOKEN "PUT_YOUR_TOKEN_HERE"
char const * VARIABLE_LABEL = "PUT_YOUR_WIFI_SSID_HERE";

char const *SERVER="industrial.api.ubidots.com";
//Replace the line above this if you are an Educational user char const *SERVER="things.ubidots.com";
const int HTTPPORT= 443;
char const *AGENT="Arduino Nano 33 IoT";
char const *HTTP_VERSION = " HTTP/1.1\r\n";
char const *VERSION ="1.0";
char const *PATH= "/api/v1.6/devices/";
char ssid[] = "PUT_YOUR_WIFI_SSID_HERE";
char pass[] = "PUT_YOUR_WIFI_PASSWORD_HERE";

int status = WL_IDLE_STATUS;

WiFiSSLClient client;

/********************************
 * Auxiliar Functions
 *******************************/

void printWiFiStatus() {

  // print the SSID of the network you're attached to:
  Serial.print("SSID: ");
  Serial.println(WiFi.SSID());

  // print your board's IP address:
  IPAddress ip = WiFi.localIP();
  Serial.print("IP Address: ");
  Serial.println(ip);

  // print the received signal strength:
  long rssi = WiFi.RSSI();
  Serial.print("signal strength (RSSI):");
  Serial.print(rssi);
  Serial.println(" dBm");
}

void getFromUbidots(char* response) {

  /* Connecting the client */
  client.connect(SERVER, HTTPPORT);

  if (client.connected()) {
    /* Builds the request GET - Please reference this link to know all the request's structures https://ubidots.com/docs/api/ */

    client.print(F("GET "));
    client.print(PATH);
    client.print(DEVICE_LABEL);
    client.print(F("/"));
    client.print(VARIABLE_LABEL);
    client.print(F("/lv"));
    client.print(HTTP_VERSION);
    client.print(F("Host: "));
    client.print(SERVER);
    client.print(F("\r\n"));
    client.print(F("User-Agent: "));
    client.print(AGENT);
    client.print(F("/"));
    client.print(VERSION);
    client.print(F("\r\n"));
    client.print(F("X-Auth-Token: "));
    client.print(TOKEN);
    client.print(F("\r\n"));
    client.print(F("Connection: close\r\n"));
    client.print(F("Content-Type: application/json\r\n\r\n"));

    Serial.println(F("Making request to Ubidots:\n"));
    Serial.print(F("GET "));
    Serial.print(PATH);
    Serial.print(DEVICE_LABEL);
    Serial.print(F("/"));
    Serial.print(VARIABLE_LABEL);
    Serial.print(F("/lv"));
    Serial.print(HTTP_VERSION);
    Serial.print(F("Host: "));
    Serial.print(SERVER);
    Serial.print(F("\r\n"));
    Serial.print(F("User-Agent: "));
    Serial.print(AGENT);
    Serial.print(F("\r\n"));
    Serial.print(F("X-Auth-Token: "));
    Serial.print(TOKEN);
    Serial.print(F("\r\n"));
    Serial.print("Content-Type: application/json\r\n\r\n");

    waitServer();
    getResponseServer(response);
  }

  else {
    Serial.println("Connection Failed ubidots - Try Again");
    }
}

void waitServer() {

  int timeout = 0;
  while (!client.available() && timeout < 5000) {
    timeout++;
    delay(1);
    if (timeout >= 5000) {
      Serial.println(F("Error, max timeout reached"));
      break;
    }
  }
}

void getResponseServer(char* response) {

    /* Reads the response from the server */
    int i = 0;
    sprintf(response, "");
    if (client.available() > 0) {
      while (client.available()) {
        char c = client.read();
        //Serial.print(c); // Uncomment this line to visualize the response on the Serial Monitor
        response[i++] = c;
        if (i >= 699){
          break;
        }
      }
    }
    for (int j = i; j < strlen(response) - 1; j++) {
      response[j++] = '\0';
    }
    /* Disconnecting the client */
    client.stop();
}

float parseUbiResponse(char* data, int dstSize=700){
  float error_value = -3.4028235E+8;
  char parsed[20];
  char dst[20];
  int len = strlen(data);  // Length of the answer char array from the server

  for (int i = 0; i < len - 2; i++) {
    if ((data[i] == '\r') && (data[i + 1] == '\n') && (data[i + 2] == '\r') && (data[i + 3] == '\n')) {
      strncpy(parsed, data + i + 4, 20);  // Copies the result to the parsed
      parsed[20] = '\0';
      break;
    }
  }

  /* Extracts the the value */
  uint8_t index = 0;

  // Creates pointers to split the value
  char* pch = strchr(parsed, '\n');
  if (pch == NULL) {
    return error_value;
  }

  char* pch2 = strchr(pch + 1, '\n');

  if (pch2 == NULL) {
    return error_value;
  }

  index = (int)(pch2 - pch - 1);

  sprintf(dst, "%s", pch);
  dst[strlen(dst) - 1] = '\0';

  float result = atof(dst);
  return result;
}

/********************************
 * Main Functions
 *******************************/

void setup() {

  //Initialize serial and wait for port to open:
  Serial.begin(9600);
  while (!Serial) {
    ; // wait for serial port to connect. Needed for native USB port only
  }

  // check for the WiFi module:
  if (WiFi.status() == WL_NO_MODULE) {
    Serial.println("Communication with WiFi module failed!");
    // don't continue
    while (true);
  }

  // attempt to connect to WiFi network:
  while (status != WL_CONNECTED) {
    Serial.print("Attempting to connect to SSID: ");
    Serial.println(ssid);
    // Connect to WPA/WPA2 network. Change this line if using open or WEP network:
    status = WiFi.begin(ssid, pass);
    // wait 10 seconds for connection:
    delay(10000);
  }

  Serial.println("Connected to wifi");
  printWiFiStatus();
}

void loop(){

  if (client.connect(SERVER, HTTPPORT)) {
    /* Calls the Ubidots Function */
    char* response = (char *) malloc(sizeof(char) * 700);
    sprintf(response, "");

    getFromUbidots(response);

    // Memory space to store the request result
    float results = parseUbiResponse(response);
    Serial.print("results:");
    Serial.println(results);
    Serial.println();
    free(response);
  }

  else {

    Serial.println("Could not connect to cloud");
    Serial.println("Attemping again in 5 seconds ....");

  }

  delay(5000);
 }
2. 코드를 붙여 넣은 후 오류가 없는지 확인하고 코드를 장치에 업로드합니다. 코드가 성공적으로 업로드되면 직렬 모니터를 열어 서버의 응답을 확인하고 변수의 마지막 값을 가져옵니다.
4. 요약 이 간단한 튜토리얼을 통해 Ubidots에서 데이터를 게시하고 가져올 수 있습니다. 이제 Ubidots 대시 보드를 만들어 데이터를 시각화하고 IoT 솔루션을 배포할 때입니다.
다른 독자들도 아래 자료를 유용하다고 생각했습니다.
- Arduino Wi-Fi Shield를 사용하여 Arduino UNO를 Ubidots와 연결
- TCP / UDP를 통해 Arduino UNO + GPRS Shield를 Ubidots에 연결
- Adafruit CC3000을 사용하여 Arduino UNO를 Ubidots와 연결
'개발자 > Arduino' 카테고리의 다른 글
| 아두이노 퀴즈 40문제 파일 무료 제공 (0) | 2020.11.11 |
|---|---|
| Arduino LCD KeyPad Shield SKU DFR0009 캐릭터 LCD (0) | 2020.11.08 |
| HTTP를 통해 Arduino Nano 33 IoT와 Ubidots 데이터 보내기 3 Oled에 데이터 표시하기 (0) | 2020.10.30 |
| HTTP를 통해 Arduino Nano 33 IoT와 Ubidots 데이터 보내기 2 (0) | 2020.10.30 |
| Arduino IDE – 설정 및 시작 가이드 (0) | 2020.10.28 |
| nano 33 IoT에서 타이머 인터럽트 구현 참고 2 (0) | 2020.10.25 |
| nano 33 IoT에서 타이머 인터럽트 구현 참고 1 (0) | 2020.10.25 |
| OpenWeatherMap 날씨 정보를 OLED 에 디스플레이, Nano 33 IoT (2) | 2020.10.24 |
더욱 좋은 정보를 제공하겠습니다.~ ^^


