Nano ESP32의 SPIFFS 파티션
Nano ESP32에서 SPIFFS 파티션 구성표로 시작하세요.
이 포스팅을 포함하여 작성한 전체 링크는 아래 리스트를 참고하세요. 배움을 절대로 멈추지 마세요.
아두이노 Nano ESP32 빠른 가이드 1 - 시작 & FAQ
아두이노 Nano ESP32 빠른 가이드 2 - 스펙과 튜토리얼
아두이노 Nano ESP32 빠른 가이드 3 - 치트시트
아두이노 Nano ESP32 빠른 가이드 4 - 클라우드
아두이노 Nano ESP32 빠른 가이드 5 - 디버깅
아두이노 Nano ESP32 빠른 가이드 6 - ESP-NOW
아두이노 Nano ESP32 빠른 가이드 7 - 시작하기
아두이노 Nano ESP32 빠른 가이드 8 - 핀 설정
아두이노 Nano ESP32 빠른 가이드 9 - SPIFFS 파티션
SPIFFS(직렬 주변 장치 인터페이스 플래시 파일 시스템)는 Nano ESP32에 탑재된 ESP32와 같이 직렬 주변 장치 인터페이스(SPI) 프로토콜을 지원하는 마이크로 컨트롤러 및 NOR 플래시 메모리 장치와 함께 사용하도록 설계된 파일 시스템입니다.
참고: Nano ESP에서 SPIFFS 파일 시스템 설정을 진행하기 전에 패키지 기본 제공 예제의 코드 주석에 언급된 마운팅 지침은 IDE 1.8과 같은 특정 이전 IDE 버전에 맞게 조정되어 있다는 점에 유의하시기 바랍니다. IDE 2.0은 사용자 지정 도구 사용을 지원하지 않으므로 이러한 지침은 이 경우 불필요할 수 있습니다.
필요한 하드웨어 및 소프트웨어
- 아두이노 나노 ESP32
- 아두이노 IDE 아두이노
- ESP32 보드 패키지 설치(아두이노 IDE에서 완료).
SPIFFS 파일 시스템 설정
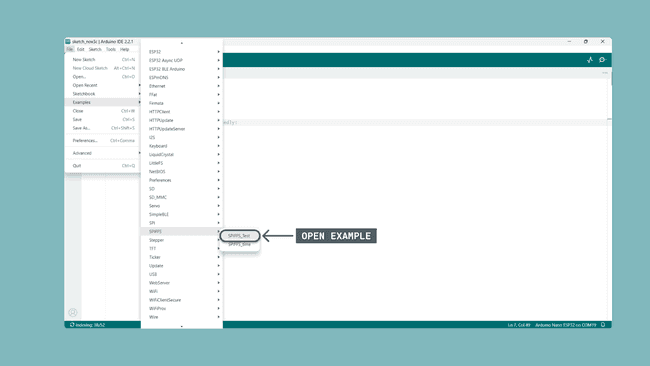
다음으로 이동하여 SPIFFS_Test 예제를 열어 시작합니다:
- 파일 > 예제 > SPIFFS > SPIFFS_Test로 이동합니다.
예제는 코드 작동 방식에 대한 설명과 함께 하단에 포함되어 있습니다(예제 참조).
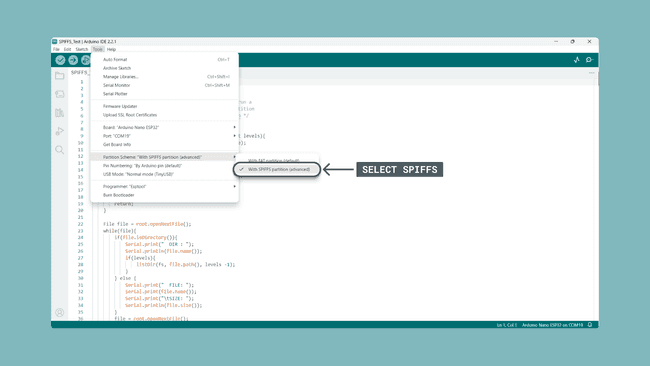
클릭하여 올바른 파티션 구성표를 선택합니다:
도구 > 파티션 구성표 > SPIFFS 파티션 사용(고급)
다음 단계를 준비합니다:
- 플러그를 뽑은 보드를 가져다가 GND와 B1 핀 사이에 점퍼 케이블을 연결합니다.
- 플러그를 꽂으면 RGB LED가 녹색 또는 파란색으로 켜집니다.
- GND와 B1 핀이 단락된 상태에서 보드 상단의 흰색 RST 버튼을 눌러 보드를 리셋합니다.
- 점퍼 케이블을 분리합니다. RGB LED가 보라색 또는 노란색으로 계속 켜져 있어야 합니다.
올바른 포트를 선택합니다:
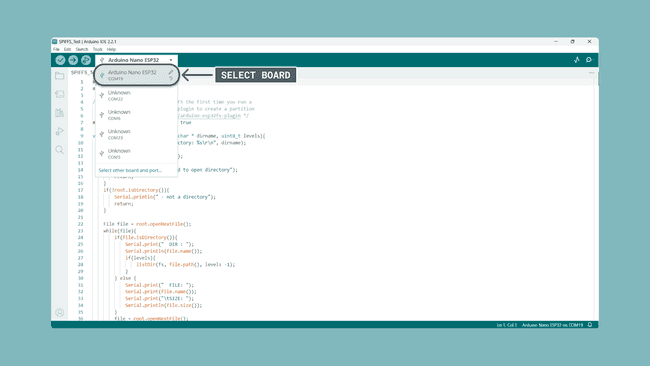
포트 선택 보드가 일반 ESP32 장치로 표시되는 경우 도구 > 보드로 이동하여 도구 > 포트에서 올바른 포트와 함께 "Arduino Nano ESP32"를 선택합니다.
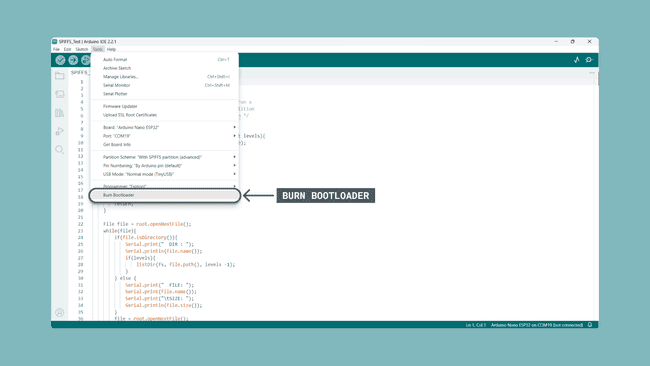
Esptool을 프로그래머로 선택합니다: 도구 > 프로그래머 > Esptool

프로그래머 선택 클릭하여 부트로더를 굽습니다:
도구 > 부트로더 굽기 부트로더 굽기
이제 파티션 구성표를 성공적으로 변경했으며 마지막 단계는 프로그래머를 사용하여 스케치를 업로드하고 보드를 재설정하는 것입니다.
프로그래머 사용으로 이동하여 스케치를 업로드합니다:
스케치 > 프로그래머를 사용하여 업로드 프로그래머를 사용하여 업로드 업로드가 성공적으로 완료되면

보드 상단의 흰색 RST 버튼을 누릅니다. 드롭다운 메뉴에 두 개의 포트가 표시되는데, 하나는 USB 기호이고 다른 하나는 정육면체입니다. USB 기호 옆에 있는 포트를 선택합니다.

직렬 모니터를 열면 다음과 같은 출력이 표시됩니다:

참고: 메시지가 인쇄되는 데 잠시 시간이 걸릴 수 있습니다. 1분 후에도 메시지가 표시되지 않으면 이 과정을 반복하세요.
예제
위에서 언급했듯이 이 코드는 파일 > 예제 > SPIFFS > SPIFFS_Test에서 가져온 것이며 IDE의 예제 섹션에서도 찾을 수 있습니다. 이 코드는 SPIFSF 파일 시스템을 사용할 때 사용할 수 있는 다양한 기능을 보여줍니다.
#include "FS.h"
#include "SPIFFS.h"

/* You only need to format SPIFFS the first time you run a
   test or else use the SPIFFS plugin to create a partition
   https://github.com/me-no-dev/arduino-esp32fs-plugin */
#define FORMAT_SPIFFS_IF_FAILED true

void listDir(fs::FS &fs, const char * dirname, uint8_t levels){
    Serial.printf("Listing directory: %s\r\n", dirname);

    File root = fs.open(dirname);
    if(!root){
        Serial.println("- failed to open directory");
        return;
    }
    if(!root.isDirectory()){
        Serial.println(" - not a directory");
        return;
    }

    File file = root.openNextFile();
    while(file){
        if(file.isDirectory()){
            Serial.print("  DIR : ");
            Serial.println(file.name());
            if(levels){
                listDir(fs, file.path(), levels -1);
            }
        } else {
            Serial.print("  FILE: ");
            Serial.print(file.name());
            Serial.print("\tSIZE: ");
            Serial.println(file.size());
        }
        file = root.openNextFile();
    }
}

void readFile(fs::FS &fs, const char * path){
    Serial.printf("Reading file: %s\r\n", path);

    File file = fs.open(path);
    if(!file || file.isDirectory()){
        Serial.println("- failed to open file for reading");
        return;
    }

    Serial.println("- read from file:");
    while(file.available()){
        Serial.write(file.read());
    }
    file.close();
}

void writeFile(fs::FS &fs, const char * path, const char * message){
    Serial.printf("Writing file: %s\r\n", path);

    File file = fs.open(path, FILE_WRITE);
    if(!file){
        Serial.println("- failed to open file for writing");
        return;
    }
    if(file.print(message)){
        Serial.println("- file written");
    } else {
        Serial.println("- write failed");
    }
    file.close();
}

void appendFile(fs::FS &fs, const char * path, const char * message){
    Serial.printf("Appending to file: %s\r\n", path);

    File file = fs.open(path, FILE_APPEND);
    if(!file){
        Serial.println("- failed to open file for appending");
        return;
    }
    if(file.print(message)){
        Serial.println("- message appended");
    } else {
        Serial.println("- append failed");
    }
    file.close();
}

void renameFile(fs::FS &fs, const char * path1, const char * path2){
    Serial.printf("Renaming file %s to %s\r\n", path1, path2);
    if (fs.rename(path1, path2)) {
        Serial.println("- file renamed");
    } else {
        Serial.println("- rename failed");
    }
}

void deleteFile(fs::FS &fs, const char * path){
    Serial.printf("Deleting file: %s\r\n", path);
    if(fs.remove(path)){
        Serial.println("- file deleted");
    } else {
        Serial.println("- delete failed");
    }
}

void testFileIO(fs::FS &fs, const char * path){
    Serial.printf("Testing file I/O with %s\r\n", path);

    static uint8_t buf[512];
    size_t len = 0;
    File file = fs.open(path, FILE_WRITE);
    if(!file){
        Serial.println("- failed to open file for writing");
        return;
    }

    size_t i;
    Serial.print("- writing" );
    uint32_t start = millis();
    for(i=0; i<2048; i++){
        if ((i & 0x001F) == 0x001F){
          Serial.print(".");
        }
        file.write(buf, 512);
    }
    Serial.println("");
    uint32_t end = millis() - start;
    Serial.printf(" - %u bytes written in %u ms\r\n", 2048 * 512, end);
    file.close();

    file = fs.open(path);
    start = millis();
    end = start;
    i = 0;
    if(file && !file.isDirectory()){
        len = file.size();
        size_t flen = len;
        start = millis();
        Serial.print("- reading" );
        while(len){
            size_t toRead = len;
            if(toRead > 512){
                toRead = 512;
            }
            file.read(buf, toRead);
            if ((i++ & 0x001F) == 0x001F){
              Serial.print(".");
            }
            len -= toRead;
        }
        Serial.println("");
        end = millis() - start;
        Serial.printf("- %u bytes read in %u ms\r\n", flen, end);
        file.close();
    } else {
        Serial.println("- failed to open file for reading");
    }
}

void setup(){
    Serial.begin(115200);
    if(!SPIFFS.begin(FORMAT_SPIFFS_IF_FAILED)){
        Serial.println("SPIFFS Mount Failed");
        return;
    }

    listDir(SPIFFS, "/", 0);
    writeFile(SPIFFS, "/hello.txt", "Hello ");
    appendFile(SPIFFS, "/hello.txt", "World!\r\n");
    readFile(SPIFFS, "/hello.txt");
    renameFile(SPIFFS, "/hello.txt", "/foo.txt");
    readFile(SPIFFS, "/foo.txt");
    deleteFile(SPIFFS, "/foo.txt");
    testFileIO(SPIFFS, "/test.txt");
    deleteFile(SPIFFS, "/test.txt");
    Serial.println( "Test complete" );
}

void loop(){

}
어떻게 작동하나요?
먼저 필요한 라이브러리가 포함되어 있습니다:
#include "FS.h"
#include "SPIFFS.h"
- 상수 FORMAT_SPIFFS_IF_FAILED는 SPIFFS 파일 시스템이 마운트되지 않을 경우 포맷할지 여부를 지정하는 데 사용됩니다. 참이면 파일 시스템이 포맷됩니다:
#define FORMAT_SPIFFS_IF_FAILED true
- 이 코드는 다음과 같은 다양한 기능을 보여주는 여러 함수로 정의되어 있습니다:
void listDir() = 파일 목록
void readFile() = 파일 읽기
void writeFile() = 파일 쓰기
void appendFile() = 기존 파일에 메시지 추가하기
void renameFile() = 파일 이름 바꾸기
void deleteFile() = 파일 삭제
void testFileIO() = 대량의 데이터를 쓴 다음 읽어서 파일의 입력과 출력을 테스트합니다.
위에서 언급한 모든 함수를 호출하기 전에 setup() 내부에서 두 가지 작업이 수행됩니다:
- 직렬 통신이 115200의 전송 속도로 초기화됩니다.
- SPIFFS 파일 시스템이 마운트되고 FORMAT_SPIFFS_IF_FAILED가 참이면 포맷됩니다.
void setup(){
    Serial.begin(115200);
    if(!SPIFFS.begin(FORMAT_SPIFFS_IF_FAILED)){
        Serial.println("SPIFFS Mount Failed");
        return;
    }
    ...
}
마지막으로 모든 함수는 매개변수를 사용하여 호출됩니다:
void setup(){
    Serial.begin(115200);
    if(!SPIFFS.begin(FORMAT_SPIFFS_IF_FAILED)){
        Serial.println("SPIFFS Mount Failed");
        return;
    }

    listDir(SPIFFS, "/", 0);
    writeFile(SPIFFS, "/hello.txt", "Hello ");
    appendFile(SPIFFS, "/hello.txt", "World!\r\n");
    readFile(SPIFFS, "/hello.txt");
    renameFile(SPIFFS, "/hello.txt", "/foo.txt");
    readFile(SPIFFS, "/foo.txt");
    deleteFile(SPIFFS, "/foo.txt");
    testFileIO(SPIFFS, "/test.txt");
    deleteFile(SPIFFS, "/test.txt");
    Serial.println( "Test complete" );
}
- 직렬 모니터에 출력되는 모든 메시지는 각 함수에 정의되어 있으며, 모든 작업이 완료되면 setup()에 의해 출력되는 "테스트 완료"를 제외한 모든 메시지는 해당 함수에 정의되어 있습니다.
'ESP32' 카테고리의 다른 글
| ESP32-WROOM-32E 개발보드 소개 (0) | 2024.08.20 |
|---|---|
| ESP32의 개발 관련 자료 (0) | 2024.08.08 |
| 인터넷을 통해 원격으로 환경의 상태를 모니터링 (0) | 2024.07.04 |
| 원격으로 모니터링 할 수 있는 도구 (0) | 2024.07.03 |
| 아두이노 Nano ESP32 빠른 가이드 8 - 핀 설정 (0) | 2024.06.11 |
| 아두이노 Nano ESP32 빠른 가이드 7 - 시작하기 (0) | 2024.06.10 |
| 아두이노 Nano ESP32 빠른 가이드 6 - ESP-NOW (2) | 2024.06.07 |
| 아두이노 Nano ESP32 빠른 가이드 5 - 디버깅 (1) | 2024.06.06 |
취업, 창업의 막막함, 외주 관리, 제품 부재!
당신의 고민은 무엇입니까? 현실과 동떨어진 교육, 실패만 반복하는 외주 계약,
아이디어는 있지만 구현할 기술이 없는 막막함.
우리는 알고 있습니다. 문제의 원인은 '명확한 학습, 실전 경험과 신뢰할 수 있는 기술력의 부재'에서 시작됩니다.
이제 고민을 멈추고, 캐어랩을 만나세요!
코딩(펌웨어), 전자부품과 디지털 회로설계, PCB 설계 제작, 고객(시장/수출) 발굴과 마케팅 전략으로 당신을 지원합니다.
제품 설계의 고수는 성공이 만든 게 아니라 실패가 만듭니다. 아이디어를 양산 가능한 제품으로!
귀사의 제품을 만드세요. 교육과 개발 실적으로 신뢰할 수 있는 파트너를 확보하세요.
캐어랩


