ESP32-CAM 원격 제어 자동차 로봇 웹 서버
ESP32-CAM을 사용하여 Wi-Fi 원격 제어 자동차 로봇을 만들어 보세요. 로봇이 "보는" 화면을 비디오 스트리밍으로 보여주는 웹 서버를 통해 로봇을 제어할 수 있습니다. 로봇이 시야에서 벗어나 있어도 원격으로 제어할 수 있습니다. ESP32-CAM은 Arduino IDE를 사용하여 프로그래밍됩니다.
ESP32-CAM 원격 제어 자동차 로봇 웹 서버 - 아두이노 IDE 환경
보드 호환성 : 이 프로젝트는 DC 모터를 제어하기 위해 4개의 GPIO 핀이 필요합니다. 따라서 ESP32-CAM Ai-Thinker 보드 또는 TTGO T-Journal 과 같이 4개의 GPIO 핀을 사용할 수 있는 모든 ESP32 카메라 보드를 사용할 수 있습니다 .
프로젝트 개요
프로젝트를 시작하기 전에 로봇 제작에 사용되는 가장 중요한 특징과 구성 요소를 살펴보겠습니다.
와이파이
이 로봇은 ESP32-CAM을 사용하여 Wi-Fi를 통해 제어됩니다. 로컬 네트워크 내의 모든 기기에서 접속할 수 있는 웹 기반 인터페이스를 구축하여 로봇을 제어할 것입니다.
웹 페이지에는 로봇이 "보는" 장면을 비디오 스트리밍으로 보여주는 기능도 있습니다. 비디오 스트리밍에서 좋은 결과를 얻으려면 외부 안테나가 있는 ESP32-CAM을 사용하는 것이 좋습니다.

ESP32-CAM 보드 외부 안테나
중요: 외부 안테나가 없으면 비디오 스트림에 지연이 발생하고 웹 서버의 로봇 제어 속도가 매우 느려집니다.
로봇 제어
웹 서버에는 앞으로 , 뒤로 , 왼쪽 , 오른쪽 , 정지 이렇게 5개의 제어 버튼이 있습니다 .
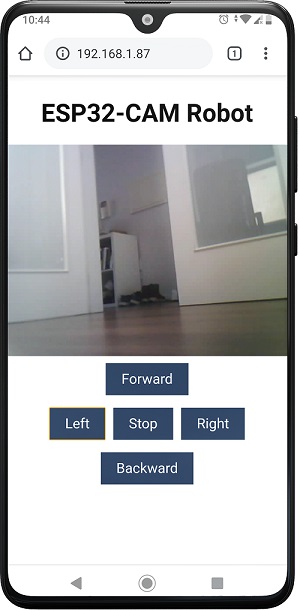
ESP32-CAM 원격 제어 로봇 웹 서버 영상을 폰에서 확인
버튼을 누르고 있는 동안 로봇이 움직입니다. 버튼에서 손을 떼면 로봇이 멈춥니다. 하지만 ESP32가 버튼에서 손을 떼도 정지 명령을 받지 못하는 경우를 대비하여 정지 버튼을 추가했습니다.
스마트 로봇 섀시 키트
스마트 로봇 섀시 키트를 사용할 거예요 . 대부분의 온라인 쇼핑몰에서 구입할 수 있고, 가격은 약 10달러 정도입니다. 조립도 아주 간단해요. DC 모터 두 개가 포함된 다른 섀시 키트라면 어떤 것이든 사용 가능합니다.

스마트 로봇 섀시 키트, 아두이노 키트, ESP32-CAM
L298N 모터 드라이버
DC 모터를 제어하는 방법은 여러 가지가 있습니다. 여기서는 두 개의 DC 모터의 속도와 방향을 간편하게 제어할 수 있는 L298N 모터 드라이버를 사용하겠습니다.

L298N DC 모터 드라이버 ESP32-CAM
L298N 모터 드라이버의 작동 원리는 설명하지 않겠습니다. L298N 모터 드라이버에 대한 자세한 내용은 다음 글을 참조하십시오.
ESP32와 DC 모터 및 L298N 모터 드라이버를 사용하여 속도와 방향을 제어하세요.
전원
회로를 단순하게 유지하기 위해 로봇(모터)과 ESP32에 동일한 전원을 공급하겠습니다. 스마트폰 충전에 사용하는 것과 같은 보조 배터리를 사용했는데 잘 작동했습니다.
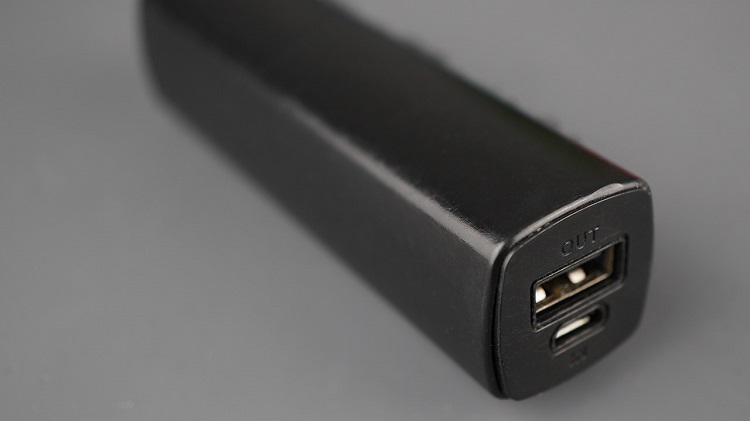
ESP32-CAM 로봇에 전원을 공급하는 휴대용 보조 배터리
참고: 모터는 전류를 많이 소모하므로 로봇이 제대로 움직이지 않는다고 생각되면 모터에 외부 전원을 공급해야 할 수도 있습니다. 즉, DC 모터용 전원과 ESP32용 전원, 이렇게 두 가지 전원이 필요합니다.
필요한 부품
본 프로젝트에서는 다음과 같은 부품들을 사용하겠습니다.
- 외부 안테나가 장착된 ESP32-CAM AI-Thinker
- L298N 모터 드라이버
- 로봇 자동차 섀시 키트
- 보조 배터리 또는 기타 5V 전원 공급 장치
- 회로 기판 시제품 제작 (선택 사항)
CODE
다음 코드를 아두이노 IDE에 복사하세요.
/*********
  Rui Santos & Sara Santos - Random Nerd Tutorials
  Complete instructions at https://RandomNerdTutorials.com/esp32-cam-projects-ebook/
  Permission is hereby granted, free of charge, to any person obtaining a copy of this software and associated documentation files.
  The above copyright notice and this permission notice shall be included in all copies or substantial portions of the Software.
*********/

#include "esp_camera.h"
#include <WiFi.h>
#include "esp_timer.h"
#include "img_converters.h"
#include "Arduino.h"
#include "fb_gfx.h"
#include "soc/soc.h"             // disable brownout problems
#include "soc/rtc_cntl_reg.h"    // disable brownout problems
#include "esp_http_server.h"

// Replace with your network credentials
const char* ssid = "REPLACE_WITH_YOUR_SSID";
const char* password = "REPLACE_WITH_YOUR_PASSWORD";

#define PART_BOUNDARY "123456789000000000000987654321"

#define CAMERA_MODEL_AI_THINKER
//#define CAMERA_MODEL_M5STACK_PSRAM
//#define CAMERA_MODEL_M5STACK_WITHOUT_PSRAM
//#define CAMERA_MODEL_M5STACK_PSRAM_B
//#define CAMERA_MODEL_WROVER_KIT

#if defined(CAMERA_MODEL_WROVER_KIT)
  #define PWDN_GPIO_NUM    -1
  #define RESET_GPIO_NUM   -1
  #define XCLK_GPIO_NUM    21
  #define SIOD_GPIO_NUM    26
  #define SIOC_GPIO_NUM    27

  #define Y9_GPIO_NUM      35
  #define Y8_GPIO_NUM      34
  #define Y7_GPIO_NUM      39
  #define Y6_GPIO_NUM      36
  #define Y5_GPIO_NUM      19
  #define Y4_GPIO_NUM      18
  #define Y3_GPIO_NUM       5
  #define Y2_GPIO_NUM       4
  #define VSYNC_GPIO_NUM   25
  #define HREF_GPIO_NUM    23
  #define PCLK_GPIO_NUM    22

#elif defined(CAMERA_MODEL_M5STACK_PSRAM)
  #define PWDN_GPIO_NUM     -1
  #define RESET_GPIO_NUM    15
  #define XCLK_GPIO_NUM     27
  #define SIOD_GPIO_NUM     25
  #define SIOC_GPIO_NUM     23

  #define Y9_GPIO_NUM       19
  #define Y8_GPIO_NUM       36
  #define Y7_GPIO_NUM       18
  #define Y6_GPIO_NUM       39
  #define Y5_GPIO_NUM        5
  #define Y4_GPIO_NUM       34
  #define Y3_GPIO_NUM       35
  #define Y2_GPIO_NUM       32
  #define VSYNC_GPIO_NUM    22
  #define HREF_GPIO_NUM     26
  #define PCLK_GPIO_NUM     21

#elif defined(CAMERA_MODEL_M5STACK_WITHOUT_PSRAM)
  #define PWDN_GPIO_NUM     -1
  #define RESET_GPIO_NUM    15
  #define XCLK_GPIO_NUM     27
  #define SIOD_GPIO_NUM     25
  #define SIOC_GPIO_NUM     23

  #define Y9_GPIO_NUM       19
  #define Y8_GPIO_NUM       36
  #define Y7_GPIO_NUM       18
  #define Y6_GPIO_NUM       39
  #define Y5_GPIO_NUM        5
  #define Y4_GPIO_NUM       34
  #define Y3_GPIO_NUM       35
  #define Y2_GPIO_NUM       17
  #define VSYNC_GPIO_NUM    22
  #define HREF_GPIO_NUM     26
  #define PCLK_GPIO_NUM     21

#elif defined(CAMERA_MODEL_AI_THINKER)
  #define PWDN_GPIO_NUM     32
  #define RESET_GPIO_NUM    -1
  #define XCLK_GPIO_NUM      0
  #define SIOD_GPIO_NUM     26
  #define SIOC_GPIO_NUM     27

  #define Y9_GPIO_NUM       35
  #define Y8_GPIO_NUM       34
  #define Y7_GPIO_NUM       39
  #define Y6_GPIO_NUM       36
  #define Y5_GPIO_NUM       21
  #define Y4_GPIO_NUM       19
  #define Y3_GPIO_NUM       18
  #define Y2_GPIO_NUM        5
  #define VSYNC_GPIO_NUM    25
  #define HREF_GPIO_NUM     23
  #define PCLK_GPIO_NUM     22

#elif defined(CAMERA_MODEL_M5STACK_PSRAM_B)
  #define PWDN_GPIO_NUM     -1
  #define RESET_GPIO_NUM    15
  #define XCLK_GPIO_NUM     27
  #define SIOD_GPIO_NUM     22
  #define SIOC_GPIO_NUM     23

  #define Y9_GPIO_NUM       19
  #define Y8_GPIO_NUM       36
  #define Y7_GPIO_NUM       18
  #define Y6_GPIO_NUM       39
  #define Y5_GPIO_NUM        5
  #define Y4_GPIO_NUM       34
  #define Y3_GPIO_NUM       35
  #define Y2_GPIO_NUM       32
  #define VSYNC_GPIO_NUM    25
  #define HREF_GPIO_NUM     26
  #define PCLK_GPIO_NUM     21

#else
  #error "Camera model not selected"
#endif

#define MOTOR_1_PIN_1    14
#define MOTOR_1_PIN_2    15
#define MOTOR_2_PIN_1    13
#define MOTOR_2_PIN_2    12

static const char* _STREAM_CONTENT_TYPE = "multipart/x-mixed-replace;boundary=" PART_BOUNDARY;
static const char* _STREAM_BOUNDARY = "\r\n--" PART_BOUNDARY "\r\n";
static const char* _STREAM_PART = "Content-Type: image/jpeg\r\nContent-Length: %u\r\n\r\n";

httpd_handle_t camera_httpd = NULL;
httpd_handle_t stream_httpd = NULL;

static const char PROGMEM INDEX_HTML[] = R"rawliteral(
<html>
  <head>
    <title>ESP32-CAM Robot</title>
    <meta name="viewport" content="width=device-width, initial-scale=1">
    <style>
      body { font-family: Arial; text-align: center; margin:0px auto; padding-top: 30px;}
      table { margin-left: auto; margin-right: auto; }
      td { padding: 8 px; }
      .button {
        background-color: #2f4468;
        border: none;
        color: white;
        padding: 10px 20px;
        text-align: center;
        text-decoration: none;
        display: inline-block;
        font-size: 18px;
        margin: 6px 3px;
        cursor: pointer;
        -webkit-touch-callout: none;
        -webkit-user-select: none;
        -khtml-user-select: none;
        -moz-user-select: none;
        -ms-user-select: none;
        user-select: none;
        -webkit-tap-highlight-color: rgba(0,0,0,0);
      }
      img {  width: auto ;
        max-width: 100% ;
        height: auto ;
      }
    </style>
  </head>
  <body>
    <h1>ESP32-CAM Robot</h1>
    <img src="" id="photo" >
    <table>
      <tr><td colspan="3" align="center"><button class="button" onmousedown="toggleCheckbox('forward');" ontouchstart="toggleCheckbox('forward');" onmouseup="toggleCheckbox('stop');" ontouchend="toggleCheckbox('stop');">Forward</button></td></tr>
      <tr><td align="center"><button class="button" onmousedown="toggleCheckbox('left');" ontouchstart="toggleCheckbox('left');" onmouseup="toggleCheckbox('stop');" ontouchend="toggleCheckbox('stop');">Left</button></td><td align="center"><button class="button" onmousedown="toggleCheckbox('stop');" ontouchstart="toggleCheckbox('stop');">Stop</button></td><td align="center"><button class="button" onmousedown="toggleCheckbox('right');" ontouchstart="toggleCheckbox('right');" onmouseup="toggleCheckbox('stop');" ontouchend="toggleCheckbox('stop');">Right</button></td></tr>
      <tr><td colspan="3" align="center"><button class="button" onmousedown="toggleCheckbox('backward');" ontouchstart="toggleCheckbox('backward');" onmouseup="toggleCheckbox('stop');" ontouchend="toggleCheckbox('stop');">Backward</button></td></tr>
    </table>
   <script>
   function toggleCheckbox(x) {
     var xhr = new XMLHttpRequest();
     xhr.open("GET", "/action?go=" + x, true);
     xhr.send();
   }
   window.onload = document.getElementById("photo").src = window.location.href.slice(0, -1) + ":81/stream";
  </script>
  </body>
</html>
)rawliteral";

static esp_err_t index_handler(httpd_req_t *req){
  httpd_resp_set_type(req, "text/html");
  return httpd_resp_send(req, (const char *)INDEX_HTML, strlen(INDEX_HTML));
}

static esp_err_t stream_handler(httpd_req_t *req){
  camera_fb_t * fb = NULL;
  esp_err_t res = ESP_OK;
  size_t _jpg_buf_len = 0;
  uint8_t * _jpg_buf = NULL;
  char * part_buf[64];

  res = httpd_resp_set_type(req, _STREAM_CONTENT_TYPE);
  if(res != ESP_OK){
    return res;
  }

  while(true){
    fb = esp_camera_fb_get();
    if (!fb) {
      Serial.println("Camera capture failed");
      res = ESP_FAIL;
    } else {
      if(fb->width > 400){
        if(fb->format != PIXFORMAT_JPEG){
          bool jpeg_converted = frame2jpg(fb, 80, &_jpg_buf, &_jpg_buf_len);
          esp_camera_fb_return(fb);
          fb = NULL;
          if(!jpeg_converted){
            Serial.println("JPEG compression failed");
            res = ESP_FAIL;
          }
        } else {
          _jpg_buf_len = fb->len;
          _jpg_buf = fb->buf;
        }
      }
    }
    if(res == ESP_OK){
      size_t hlen = snprintf((char *)part_buf, 64, _STREAM_PART, _jpg_buf_len);
      res = httpd_resp_send_chunk(req, (const char *)part_buf, hlen);
    }
    if(res == ESP_OK){
      res = httpd_resp_send_chunk(req, (const char *)_jpg_buf, _jpg_buf_len);
    }
    if(res == ESP_OK){
      res = httpd_resp_send_chunk(req, _STREAM_BOUNDARY, strlen(_STREAM_BOUNDARY));
    }
    if(fb){
      esp_camera_fb_return(fb);
      fb = NULL;
      _jpg_buf = NULL;
    } else if(_jpg_buf){
      free(_jpg_buf);
      _jpg_buf = NULL;
    }
    if(res != ESP_OK){
      break;
    }
    //Serial.printf("MJPG: %uB\n",(uint32_t)(_jpg_buf_len));
  }
  return res;
}

static esp_err_t cmd_handler(httpd_req_t *req){
  char*  buf;
  size_t buf_len;
  char variable[32] = {0,};

  buf_len = httpd_req_get_url_query_len(req) + 1;
  if (buf_len > 1) {
    buf = (char*)malloc(buf_len);
    if(!buf){
      httpd_resp_send_500(req);
      return ESP_FAIL;
    }
    if (httpd_req_get_url_query_str(req, buf, buf_len) == ESP_OK) {
      if (httpd_query_key_value(buf, "go", variable, sizeof(variable)) == ESP_OK) {
      } else {
        free(buf);
        httpd_resp_send_404(req);
        return ESP_FAIL;
      }
    } else {
      free(buf);
      httpd_resp_send_404(req);
      return ESP_FAIL;
    }
    free(buf);
  } else {
    httpd_resp_send_404(req);
    return ESP_FAIL;
  }

  sensor_t * s = esp_camera_sensor_get();
  int res = 0;

  if(!strcmp(variable, "forward")) {
    Serial.println("Forward");
    digitalWrite(MOTOR_1_PIN_1, 1);
    digitalWrite(MOTOR_1_PIN_2, 0);
    digitalWrite(MOTOR_2_PIN_1, 1);
    digitalWrite(MOTOR_2_PIN_2, 0);
  }
  else if(!strcmp(variable, "left")) {
    Serial.println("Left");
    digitalWrite(MOTOR_1_PIN_1, 0);
    digitalWrite(MOTOR_1_PIN_2, 1);
    digitalWrite(MOTOR_2_PIN_1, 1);
    digitalWrite(MOTOR_2_PIN_2, 0);
  }
  else if(!strcmp(variable, "right")) {
    Serial.println("Right");
    digitalWrite(MOTOR_1_PIN_1, 1);
    digitalWrite(MOTOR_1_PIN_2, 0);
    digitalWrite(MOTOR_2_PIN_1, 0);
    digitalWrite(MOTOR_2_PIN_2, 1);
  }
  else if(!strcmp(variable, "backward")) {
    Serial.println("Backward");
    digitalWrite(MOTOR_1_PIN_1, 0);
    digitalWrite(MOTOR_1_PIN_2, 1);
    digitalWrite(MOTOR_2_PIN_1, 0);
    digitalWrite(MOTOR_2_PIN_2, 1);
  }
  else if(!strcmp(variable, "stop")) {
    Serial.println("Stop");
    digitalWrite(MOTOR_1_PIN_1, 0);
    digitalWrite(MOTOR_1_PIN_2, 0);
    digitalWrite(MOTOR_2_PIN_1, 0);
    digitalWrite(MOTOR_2_PIN_2, 0);
  }
  else {
    res = -1;
  }

  if(res){
    return httpd_resp_send_500(req);
  }

  httpd_resp_set_hdr(req, "Access-Control-Allow-Origin", "*");
  return httpd_resp_send(req, NULL, 0);
}

void startCameraServer(){
  httpd_config_t config = HTTPD_DEFAULT_CONFIG();
  config.server_port = 80;
  httpd_uri_t index_uri = {
    .uri       = "/",
    .method    = HTTP_GET,
    .handler   = index_handler,
    .user_ctx  = NULL
  };

  httpd_uri_t cmd_uri = {
    .uri       = "/action",
    .method    = HTTP_GET,
    .handler   = cmd_handler,
    .user_ctx  = NULL
  };
  httpd_uri_t stream_uri = {
    .uri       = "/stream",
    .method    = HTTP_GET,
    .handler   = stream_handler,
    .user_ctx  = NULL
  };
  if (httpd_start(&camera_httpd, &config) == ESP_OK) {
    httpd_register_uri_handler(camera_httpd, &index_uri);
    httpd_register_uri_handler(camera_httpd, &cmd_uri);
  }
  config.server_port += 1;
  config.ctrl_port += 1;
  if (httpd_start(&stream_httpd, &config) == ESP_OK) {
    httpd_register_uri_handler(stream_httpd, &stream_uri);
  }
}

void setup() {
  WRITE_PERI_REG(RTC_CNTL_BROWN_OUT_REG, 0); //disable brownout detector

  pinMode(MOTOR_1_PIN_1, OUTPUT);
  pinMode(MOTOR_1_PIN_2, OUTPUT);
  pinMode(MOTOR_2_PIN_1, OUTPUT);
  pinMode(MOTOR_2_PIN_2, OUTPUT);

  Serial.begin(115200);
  Serial.setDebugOutput(false);

  camera_config_t config;
  config.ledc_channel = LEDC_CHANNEL_0;
  config.ledc_timer = LEDC_TIMER_0;
  config.pin_d0 = Y2_GPIO_NUM;
  config.pin_d1 = Y3_GPIO_NUM;
  config.pin_d2 = Y4_GPIO_NUM;
  config.pin_d3 = Y5_GPIO_NUM;
  config.pin_d4 = Y6_GPIO_NUM;
  config.pin_d5 = Y7_GPIO_NUM;
  config.pin_d6 = Y8_GPIO_NUM;
  config.pin_d7 = Y9_GPIO_NUM;
  config.pin_xclk = XCLK_GPIO_NUM;
  config.pin_pclk = PCLK_GPIO_NUM;
  config.pin_vsync = VSYNC_GPIO_NUM;
  config.pin_href = HREF_GPIO_NUM;
  config.pin_sccb_sda = SIOD_GPIO_NUM;
  config.pin_sccb_scl = SIOC_GPIO_NUM;
  config.pin_pwdn = PWDN_GPIO_NUM;
  config.pin_reset = RESET_GPIO_NUM;
  config.xclk_freq_hz = 20000000;
  config.pixel_format = PIXFORMAT_JPEG;

  if(psramFound()){
    config.frame_size = FRAMESIZE_VGA;
    config.jpeg_quality = 10;
    config.fb_count = 2;
  } else {
    config.frame_size = FRAMESIZE_SVGA;
    config.jpeg_quality = 12;
    config.fb_count = 1;
  }

  // Camera init
  esp_err_t err = esp_camera_init(&config);
  if (err != ESP_OK) {
    Serial.printf("Camera init failed with error 0x%x", err);
    return;
  }
  // Wi-Fi connection
  WiFi.begin(ssid, password);
  while (WiFi.status() != WL_CONNECTED) {
    delay(500);
    Serial.print(".");
  }
  Serial.println("");
  Serial.println("WiFi connected");

  Serial.print("Camera Stream Ready! Go to: http://");
  Serial.println(WiFi.localIP());

  // Start streaming web server
  startCameraServer();
}

void loop() {

}
네트워크 자격 증명을 입력하면 코드가 바로 작동할 것입니다.
const char* ssid = "REPLACE_WITH_YOUR_SSID";
const char* password = "REPLACE_WITH_YOUR_PASSWORD";
코드 작동 방식
로봇 제어에 필요한 부분을 살펴보겠습니다. 모터를 제어할 GPIO 핀을 정의합니다. 각 모터는 두 개의 핀으로 제어됩니다.
#define MOTOR_1_PIN_1 14
#define MOTOR_1_PIN_2 15
#define MOTOR_2_PIN_1 13
#define MOTOR_2_PIN_2 12
버튼을 클릭하면 다른 URL로 요청이 전송됩니다.
<table>
    <tr><td colspan="3" align="center"><button class="button" onmousedown="toggleCheckbox('forward');" ontouchstart="toggleCheckbox('forward');" onmouseup="toggleCheckbox('stop');" ontouchend="toggleCheckbox('stop');">Forward</button></td></tr>
    <tr><td align="center"><button class="button" onmousedown="toggleCheckbox('left');" ontouchstart="toggleCheckbox('left');" onmouseup="toggleCheckbox('stop');" ontouchend="toggleCheckbox('stop');">Left</button></td><td align="center"><button class="button" onmousedown="toggleCheckbox('stop');" ontouchstart="toggleCheckbox('stop');">Stop</button></td><td align="center"><button class="button" onmousedown="toggleCheckbox('right');" ontouchstart="toggleCheckbox('right');" onmouseup="toggleCheckbox('stop');" ontouchend="toggleCheckbox('stop');">Right</button></td></tr>
    <tr><td colspan="3" align="center"><button class="button" onmousedown="toggleCheckbox('backward');" ontouchstart="toggleCheckbox('backward');" onmouseup="toggleCheckbox('stop');" ontouchend="toggleCheckbox('stop');">Backward</button></td></tr>
</table>
<script>
    function toggleCheckbox(x) {
      var xhr = new XMLHttpRequest();
      xhr.open("GET", "/action?go=" + x, true);
      xhr.send();
    }
   window.onload = document.getElementById("photo").src =     window.location.href.slice(0, -1) + ":81/stream";
</script>
누르는 버튼에 따라 다음과 같은 요청이 이루어집니다.
앞으로:
<ESP_IP_ADDRESS>/action?go=forward
뒤로:
/action?go=backward
왼쪽:
/action?go=left
오른쪽:
/action?go=right멈추다:
/action?go=stop버튼을 놓으면 /action?go=stop URL로 요청이 전송됩니다. 로봇은 버튼을 누르고 있는 동안에만 움직입니다.
요청 처리
해당 URL로 요청이 들어올 때 발생하는 상황을 처리하기 위해 다음과 같은 if… else 문을 사용합니다.
if(!strcmp(variable, "forward")) {
    Serial.println("Forward");
    digitalWrite(MOTOR_1_PIN_1, 1);
    digitalWrite(MOTOR_1_PIN_2, 0);
    digitalWrite(MOTOR_2_PIN_1, 1);
    digitalWrite(MOTOR_2_PIN_2, 0);
 }
 else if(!strcmp(variable, "left")) {
   Serial.println("Left");
   digitalWrite(MOTOR_1_PIN_1, 0);
   digitalWrite(MOTOR_1_PIN_2, 1);
   digitalWrite(MOTOR_2_PIN_1, 1);
   digitalWrite(MOTOR_2_PIN_2, 0);
}
else if(!strcmp(variable, "right")) {
   Serial.println("Right");
   digitalWrite(MOTOR_1_PIN_1, 1);
   digitalWrite(MOTOR_1_PIN_2, 0);
   digitalWrite(MOTOR_2_PIN_1, 0);
   digitalWrite(MOTOR_2_PIN_2, 1);
}
else if(!strcmp(variable, "backward")) {
   Serial.println("Backward");
   digitalWrite(MOTOR_1_PIN_1, 0);
   digitalWrite(MOTOR_1_PIN_2, 1);
   digitalWrite(MOTOR_2_PIN_1, 0);
   digitalWrite(MOTOR_2_PIN_2, 1);
}
else if(!strcmp(variable, "stop")) {
   Serial.println("Stop");
   digitalWrite(MOTOR_1_PIN_1, 0);
   digitalWrite(MOTOR_1_PIN_2, 0);
   digitalWrite(MOTOR_2_PIN_1, 0);
   digitalWrite(MOTOR_2_PIN_2, 0);
}
코드 테스트
네트워크 자격 증명을 입력한 후 ESP32-CAM 보드에 코드를 업로드할 수 있습니다. 보드에 코드를 업로드하는 방법을 모르는 경우 다음 튜토리얼을 참조하세요.
ESP32-CAM AI-Thinker에 코드를 프로그래밍/업로드하는 방법 (아두이노 IDE)
업로드가 완료되면 시리얼 모니터를 열어 IP 주소를 확인하세요.

ESP32-CAM IP 주소 수신 시리얼 모니터
브라우저를 열고 ESP32-CAM의 IP 주소를 입력하세요. 다음과 유사한 웹 페이지가 로드될 것입니다.

ESP32-CAM 웹 서버 원격 제어 로봇 시연
버튼을 누르고 시리얼 모니터를 확인하여 지연 없이 스트리밍되는지, 그리고 충돌 없이 명령을 수신하는지 확인하십시오.

ESP32-CAM 원격 제어 로봇 시리얼 모니터 명령
모든 것이 제대로 작동한다면 이제 회로를 조립할 차례입니다.
회로
로봇 섀시를 조립한 후에는 다음 회로도를 참고하여 회로를 배선하십시오.

ESP32-CAM 원격 제어 로봇 다이어그램 DC 모터 배선 회로도
먼저 회로도에 표시된 대로 ESP32-CAM을 모터 드라이버에 연결하세요. 미니 브레드보드나 스트립보드를 사용하여 ESP32-CAM을 배치하고 회로를 구성할 수 있습니다.
다음 표는 ESP32-CAM과 L298N 모터 드라이버 간의 연결을 보여줍니다.
| L298N Motor Driver | ESP32-CAM |
| IN1 | GPIO 14 |
| IN2 | GPIO 15 |
| IN3 | GPIO 13 |
| IN4 | GPIO 12 |
아래 그림과 같이 모든 연결부를 소형 스트립보드에 조립했습니다.

ESP32-CAM 원격 제어 로봇 회로 기판
그 후, 각 모터를 단자대에 연결하십시오.
참고: 전압 스파이크를 완화하기 위해 그림과 같이 각 모터의 양극 및 음극 단자에 0.1uF 세라믹 콘덴서를 납땜하는 것이 좋습니다. 또한, 파워 뱅크에서 나오는 빨간색 선에 슬라이더 스위치를 납땜하여 전원을 켜고 끌 수 있습니다.
마지막으로 회로도에 표시된 대로 보조 배터리를 사용하여 전원을 공급하십시오. USB 케이블의 피복을 벗겨야 합니다. 이 예시에서는 ESP32-CAM과 모터에 동일한 전원을 공급하고 있으며 정상적으로 작동합니다.
참고: 모터는 전류를 많이 소모하므로 로봇의 속도가 충분히 빠르지 않다고 느껴지면 모터에 외부 전원을 공급해야 할 수도 있습니다. 즉, 두 가지 전원이 필요합니다. 하나는 DC 모터에 전원을 공급하고, 다른 하나는 ESP32에 전원을 공급하는 것입니다. 모터에는 AA 배터리 4개로 구성된 배터리 팩을 사용할 수 있습니다. 로봇 섀시 키트를 구입하면 일반적으로 AA 배터리 4개를 넣을 수 있는 배터리 홀더가 포함되어 있습니다.
여러분이 만든 로봇은 다음 그림과 비슷하게 생겼어야 합니다.

ESP32-CAM 원격 제어 카드 로봇 조립 완료
ESP32-CAM을 사용할 때는 외부 안테나를 연결해야 한다는 점을 잊지 마세요. 그렇지 않으면 웹 서버 속도가 매우 느려질 수 있습니다.
데모
ESP32-CAM의 IP 주소로 브라우저를 열면 로봇을 제어할 수 있습니다. 웹 서버는 노트북이나 스마트폰에서 잘 작동합니다.

ESP32-CAM 원격 제어 로봇 웹 서버 시연
웹 서버는 한 번에 하나의 기기/탭에서만 열 수 있습니다.
마무리
이 튜토리얼에서는 ESP32-CAM을 사용하여 원격 제어 로봇을 제작하고 웹 서버를 사용하여 제어하는 방법을 배웠습니다.
ESP32-CAM을 사용하여 DC 모터를 제어하는 방법은 일반 ESP32를 사용하여 제어하는 방법과 동일합니다. 자세한 내용은 다음 튜토리얼을 참조하세요. ESP32와 DC 모터 및 L298N 모터 드라이버를 사용한 속도 및 방향 제어 .
로컬 네트워크 범위를 벗어난 곳에서 로봇을 제어하려면 ESP32-CAM을 액세스 포인트로 설정하는 것을 고려해 볼 수 있습니다 . 이렇게 하면 ESP32-CAM이 라우터에 연결할 필요 없이 자체 Wi-Fi 네트워크를 생성하고, 스마트폰과 같은 주변의 Wi-Fi 기기들이 해당 네트워크에 연결할 수 있습니다.
ESP32-CAM을 활용한 더 많은 프로젝트와 튜토리얼을 보려면 다음을 참조하세요.
'ESP32 CAM' 카테고리의 다른 글
| ESP32-CAM과 YOLO를 이용한 영상 스트리밍 객체 탐지 (0) | 2026.02.19 |
|---|---|
| ESP32-CAM과 Edge Impulse를 이용한 객체 탐지 (1) | 2026.02.19 |
| ESP32-CAM 보드 카메라 연결 방법 (0) | 2026.01.12 |
| ESP32-CAM 업로드 보드 사용법 (웹 스트리밍, AI Thinker, MB) (1) | 2026.01.12 |
| ESP32-CAM 프로그래밍 시작 가이드 (0) | 2026.01.12 |
| ESP32-CAM 더 많은 GPIO 핀 추가 방법 (0) | 2026.01.09 |
취업, 창업의 막막함, 외주 관리, 제품 부재!
당신의 고민은 무엇입니까? 현실과 동떨어진 교육, 실패만 반복하는 외주 계약,
아이디어는 있지만 구현할 기술이 없는 막막함.
우리는 알고 있습니다. 문제의 원인은 '명확한 학습, 실전 경험과 신뢰할 수 있는 기술력의 부재'에서 시작됩니다.
이제 고민을 멈추고, 캐어랩을 만나세요!
코딩(펌웨어), 전자부품과 디지털 회로설계, PCB 설계 제작, 고객(시장/수출) 발굴과 마케팅 전략으로 당신을 지원합니다.
제품 설계의 고수는 성공이 만든 게 아니라 실패가 만듭니다. 아이디어를 양산 가능한 제품으로!
귀사의 제품을 만드세요. 교육과 개발 실적으로 신뢰할 수 있는 파트너를 확보하세요.
캐어랩


