HOW TO SETUP AN LCD ON THE RASPBERRY PI AND PROGRAM IT WITH PYTHON
자료 출처 : http://www.circuitbasics.com/raspberry-pi-lcd-set-up-and-programming-in-python/
WIRING THE LCD IN 8 BIT MODE

WIRING THE LCD IN 4 BIT MODE

PROGRAMMING THE LCD WITH PYTHON
If this is your first time writing and running a Python program, you might want to read How to Write and Run a Python Program on the Raspberry Pi, which will explain everything you need to know to run the examples below.
We’ll be using a Python library that provides a lot of useful functions. Its called the RLPCD library, and was written by Danilo Bargen.
INSTALLING THE RPLCD LIBRARY
The RPLCD library can be installed from the Python Package Index, or PIP. It might already be installed on your Pi, but if not, enter this at the command prompt to install it:
sudo apt-get install python-pip
After you get PIP installed, install the RPLCD library by entering:
sudo pip install RPLCD
The example programs below use the Raspberry Pi’s physical pin numbers, not the BCM or GPIO numbers. I’m assuming you have your LCD connected the way it is in the diagrams above, but I’ll show you how to change the pin connections if you need to.
WRITE TO THE DISPLAY IN 8 BIT MODE
Let’s start with a simple program that will display “Hello world!” on the LCD. If you have a different sized LCD than the 16×2 I’m using (like a 20×4), change the number of columns and rows in line 2 of the code. cols= sets the number of columns, and rows= sets the number of rows. You can also change the pins used for the LCD’s RS, E, and data pins. The data pins are set as pins_data=[D0, D1, D2, D3, D4, D5, D6, D7].
Text strings are written to the display using the lcd.write_string() function:
1 2 3 4 5 | from RPLCD import CharLCD lcd = CharLCD(cols=16, rows=2, pin_rs=37, pin_e=35, pins_data=[40, 38, 36, 32, 33, 31, 29, 23]) lcd.write_string(u'Hello world!') | cs |
WRITE TO THE DISPLAY IN 4 BIT MODE
In 4 bit mode, only LCD pins D4, D5, D6, and D7 are used for data. These are set in pins_data=[D4, D5, D6, D7] on line 2 below:
1 2 3 4 5 | from RPLCD import CharLCD lcd = CharLCD(cols=16, rows=2, pin_rs=37, pin_e=35, pins_data=[33, 31, 29, 23]) lcd.write_string(u'Hello world!') | cs |
POSITION THE TEXT
The text can be positioned anywhere on the screen using lcd.cursor_pos = (ROW, COLUMN). The rows are numbered starting from zero, so the top row is row 0, and the bottom row is row 1. Similarly, the columns are numbered starting at zero, so for a 16×2 LCD the columns are numbered 0 to 15. For example, the code below places “Hello world!” starting at the bottom row, fourth column:
1 2 3 4 5 6 7 | from RPLCD import CharLCD lcd = CharLCD(cols=16, rows=2, pin_rs=37, pin_e=35, pins_data=[33, 31, 29, 23]) lcd.cursor_pos = (1, 3) lcd.write_string(u'Hello world!') | cs |
CLEAR THE SCREEN
The function lcd.clear() will clear the screen. The following code will print “Hello world!” to the screen for two seconds before clearing it:
1 2 3 4 5 6 7 8 9 | import time from RPLCD import CharLCD lcd = CharLCD(cols=16, rows=2, pin_rs=37, pin_e=35, pins_data=[33, 31, 29, 23]) lcd.write_string(u'Hello world!') time.sleep(2) lcd.clear() | cs |
BLINKING TEXT
Combining lcd.clear() and time.sleep() in a while loop will produce a blinking text effect:
1 2 3 4 5 6 7 8 9 10 11 | import time from RPLCD import CharLCD lcd = CharLCD(cols=16, rows=2, pin_rs=37, pin_e=35, pins_data=[33, 31, 29, 23]) while True: lcd.write_string(u"Hello world!") time.sleep(1) lcd.clear() time.sleep(1) | cs |
TURN THE CURSOR ON AND OFF
The RPLCD library provides several functions for controlling the cursor. You can have a block cursor, an underline cursor, or a blinking cursor. Use the following functions to set the cursor:
Blinking block cursor: lcd.cursor_mode = CursorMode.blink
Line cursor: lcd.cursor_mode = CursorMode.line
Cursor off: lcd.cursor_mode = CursorMode.hide
The code below places a blinking cursor after the last character of text:
1 2 3 4 5 6 7 8 9 10 11 | from RPLCD import CharLCD from RPLCD import CursorMode lcd = CharLCD(cols=16, rows=2, pin_rs=37, pin_e=35, pins_data=[33, 31, 29, 23]) lcd.write_string(u'Hello world!') lcd.cursor_mode = CursorMode.blink #lcd.cursor_mode = CursorMode.line #lcd.cursor_mode = CursorMode.hide | cs |
LINE BREAKS
Text will automatically wrap to the next line if the length of the text is greater than the column length of your LCD. You can also control where the text string breaks to the next line by inserting \n\r where you want the break to occur. The code below will print “Hello” to the top row, and “world!” to the bottom row.
1 2 3 4 5 6 | from RPLCD import CharLCD lcd = CharLCD(cols=16, rows=2, pin_rs=37, pin_e=35, pins_data=[33, 31, 29, 23]) lcd.write_string(u'Hello\n\rworld!') | cs |
PRINT THE DATE AND TIME
This program will display the date and time on the LCD:
1 2 3 4 5 6 7 8 9 10 11 12 | from RPLCD import CharLCD import time lcd = CharLCD(cols=16, rows=2, pin_rs=37, pin_e=35, pins_data=[33, 31, 29, 23]) while True: lcd.write_string("Time: %s" %time.strftime("%H:%M:%S")) lcd.cursor_pos = (1, 0) lcd.write_string("Date: %s" %time.strftime("%m/%d/%Y")) | cs |
PRINT YOUR IP ADDRESS
This program will print the IP address of your ethernet connection to the LCD. To print the IP of your WiFi connection, just change eth0 in line 19 to wlan0:
1 2 3 4 5 6 7 8 9 10 11 12 13 14 15 16 17 18 19 20 21 | from RPLCD import CharLCD import socket import fcntl import struct lcd = CharLCD(cols=16, rows=2, pin_rs=37, pin_e=35, pins_data=[33, 31, 29, 23]) def get_ip_address(ifname): s = socket.socket(socket.AF_INET, socket.SOCK_DGRAM) return socket.inet_ntoa(fcntl.ioctl( s.fileno(), 0x8915, struct.pack('256s', ifname[:15]) )[20:24]) lcd.write_string("IP Address:") lcd.cursor_pos = (1, 0) lcd.write_string(get_ip_address('eth0')) | cs |
CUSTOM CHARACTERS
Each character on the LCD is an array of 5×8 of pixels. You can create any pattern or character you can think of, and display it on the screen as a custom character. Check out this website for an interactive tool that creates the bit array used to define custom characters.
First we define the character in lines 4 to 12 of the code below. Then we use the function lcd.create_char(0-7, NAME) to store the character in the LCD’s CGRAM memory. Up to 8 (0-7) characters can be stored at a time. To print the custom character, we use lcd.write_string(unichr(0)), where the number in unichr() is the memory location (0-7) defined in lcd.create_char().
PRINTING A SINGLE CUSTOM CHARACTER
Take a look at this code, which prints a single smiley face character to the display:
1 2 3 4 5 6 7 8 9 10 11 12 13 14 15 16 17 | from RPLCD import CharLCD, cleared, cursor lcd = CharLCD(cols=16, rows=2, pin_rs=37, pin_e=35, pins_data=[33, 31, 29, 23]) smiley = ( 0b00000, 0b01010, 0b01010, 0b00000, 0b10001, 0b10001, 0b01110, 0b00000, ) lcd.create_char(0, smiley) lcd.write_string(unichr(0)) | cs |
PRINTING MULTIPLE CUSTOM CHARACTERS
This program will print the Greek letters omega, pi, and mu, along with symbols for temperature (a thermometer) and humidity (a water drop):
1 2 3 4 5 6 7 8 9 10 11 12 13 14 15 16 17 18 19 20 21 22 23 24 25 26 27 28 29 30 31 32 33 34 35 36 37 38 39 40 41 42 43 44 45 46 47 48 49 50 51 52 53 54 55 56 57 58 59 60 61 62 63 64 65 66 67 68 69 70 71 | from RPLCD import CharLCD, cleared, cursor lcd = CharLCD(cols=16, rows=2, pin_rs=37, pin_e=35, pins_data=[33, 31, 29, 23]) omega = ( 0b00000, 0b01110, 0b10001, 0b10001, 0b10001, 0b01010, 0b11011, 0b00000, ) pi = ( 0b00000, 0b00000, 0b11111, 0b01010, 0b01010, 0b01010, 0b10011, 0b00000, ) mu = ( 0b00000, 0b10010, 0b10010, 0b10010, 0b10010, 0b11101, 0b10000, 0b10000, ) drop = ( 0b00100, 0b00100, 0b01010, 0b01010, 0b10001, 0b10001, 0b10001, 0b01110, ) temp = ( 0b00100, 0b01010, 0b01010, 0b01110, 0b01110, 0b11111, 0b11111, 0b01110, ) lcd.create_char(0, omega) lcd.create_char(1, pi) lcd.create_char(2, mu) lcd.create_char(3, drop) lcd.create_char(4, temp) lcd.write_string(unichr(0)) lcd.write_string(unichr(1)) lcd.write_string(unichr(2)) lcd.write_string(unichr(3)) lcd.write_string(unichr(4)) | cs |
SCROLLING TEXT
This program scrolls text from right to left in an infinite loop:
1 2 3 4 5 6 7 8 9 10 11 12 13 14 15 16 17 18 19 20 21 22 23 24 25 26 27 28 29 | framebuffer = [ '', '', ] def write_to_lcd(lcd, framebuffer, num_cols): lcd.home() for row in framebuffer: lcd.write_string(row.ljust(num_cols)[:num_cols]) lcd.write_string('\r\n') from RPLCD import CharLCD lcd = CharLCD(cols=16, rows=2, pin_rs=37, pin_e=35, pins_data=[33, 31, 29, 23]) write_to_lcd(lcd, framebuffer, 16) import time long_string = 'This string is too long to fit' def loop_string(string, lcd, framebuffer, row, num_cols, delay=0.5): #DELAY= CONTROLS THE SPEED OF SCROLL padding = ' ' * num_cols s = padding + string + padding for i in range(len(s) - num_cols + 1): framebuffer[row] = s[i:i+num_cols] write_to_lcd(lcd, framebuffer, num_cols) time.sleep(delay) while True: loop_string(long_string, lcd, framebuffer, 1, 16) | cs |
You can change the scroll speed in delay=0.5 (line 19).
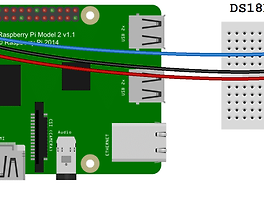
PRINT DATA FROM A SENSOR
To demonstrate how to print data from a sensor, here’s a program that displays the temperature from a DS18B20 Digital Temperature Sensor. There is some set up to do before you can get this to work on the Raspberry Pi, so check out our tutorial on the DS18B20 to see how.
In general, you take the input variable from your sensor and convert it to an integer to perform any calculations. Then convert the result to a string, and output the string to the display using lcd.write_string(sensor_data()):
1 2 3 4 5 6 7 8 9 10 11 12 13 14 15 16 17 18 19 20 21 22 23 24 25 26 27 28 29 30 31 32 33 34 35 36 37 38 39 40 41 42 43 44 45 46 47 48 49 50 51 52 53 54 | import os import glob import time from RPLCD import CharLCD lcd = CharLCD(cols=16, rows=2, pin_rs=37, pin_e=35, pins_data=[33, 31, 29, 23]) os.system('modprobe w1-gpio') os.system('modprobe w1-therm') base_dir = '/sys/bus/w1/devices/' device_folder = glob.glob(base_dir + '28*')[0] device_file = device_folder + '/w1_slave' def read_temp_raw(): f = open(device_file, 'r') lines = f.readlines() f.close() return lines #CELSIUS CALCULATION def read_temp_c(): lines = read_temp_raw() while lines[0].strip()[-3:] != 'YES': time.sleep(0.2) lines = read_temp_raw() equals_pos = lines[1].find('t=') if equals_pos != -1: temp_string = lines[1][equals_pos+2:] temp_c = int(temp_string) / 1000.0 # TEMP_STRING IS THE SENSOR OUTPUT, MAKE SURE IT'S AN INTEGER TO DO THE MATH temp_c = str(round(temp_c, 1)) # ROUND THE RESULT TO 1 PLACE AFTER THE DECIMAL, THEN CONVERT IT TO A STRING return temp_c #FAHRENHEIT CALCULATION def read_temp_f(): lines = read_temp_raw() while lines[0].strip()[-3:] != 'YES': time.sleep(0.2) lines = read_temp_raw() equals_pos = lines[1].find('t=') if equals_pos != -1: temp_string = lines[1][equals_pos+2:] temp_f = (int(temp_string) / 1000.0) * 9.0 / 5.0 + 32.0 # TEMP_STRING IS THE SENSOR OUTPUT, MAKE SURE IT'S AN INTEGER TO DO THE MATH temp_f = str(round(temp_f, 1)) # ROUND THE RESULT TO 1 PLACE AFTER THE DECIMAL, THEN CONVERT IT TO A STRING return temp_f while True: lcd.cursor_pos = (0, 0) lcd.write_string("Temp: " + read_temp_c() + unichr(223) + "C") lcd.cursor_pos = (1, 0) lcd.write_string("Temp: " + read_temp_f() + unichr(223) + "F") | cs |
'개발자 > Raspberry Pi3' 카테고리의 다른 글
| 온도 습도 센서 DHT11 에러. raspberry pi DHT11 센서 data not good skip error 해결 (0) | 2018.05.20 |
|---|---|
| DORJI DRF1276DM LoRa 모듈 timeout error 발생 해결 방법 (0) | 2018.02.02 |
| 868/915MHz LoRa Sx1276 UART interface Module DRF1276DM (0) | 2018.02.01 |
| 라즈베리 파이 캐릭터 LCD 사용하기 C언어 HOW TO SETUP AN LCD ON THE RASPBERRY PI AND PROGRAM IT WITH C (0) | 2017.12.20 |
| Raspberry pi DS18B20 Temperature Sensor 사용 데이터 읽기 Python 소스 (7) | 2017.10.24 |
| 미세먼지 측정 센서 Nova PM sensor SDS011 공기 품질 센서 사용법 (0) | 2017.10.18 |
| Sunfounder Car for Raspberry Pi 라즈베리 카 조립 시험 착수 (0) | 2017.10.17 |
| 라즈베리 파이3 부팅이 끝나면 자동으로 실행하게 하는 방법 bash_completion.sh (19) | 2017.09.19 |
취업, 창업의 막막함, 외주 관리, 제품 부재!
당신의 고민은 무엇입니까? 현실과 동떨어진 교육, 실패만 반복하는 외주 계약,
아이디어는 있지만 구현할 기술이 없는 막막함.
우리는 알고 있습니다. 문제의 원인은 '명확한 학습, 실전 경험과 신뢰할 수 있는 기술력의 부재'에서 시작됩니다.
이제 고민을 멈추고, 캐어랩을 만나세요!
코딩(펌웨어), 전자부품과 디지털 회로설계, PCB 설계 제작, 고객(시장/수출) 발굴과 마케팅 전략으로 당신을 지원합니다.
제품 설계의 고수는 성공이 만든 게 아니라 실패가 만듭니다. 아이디어를 양산 가능한 제품으로!
귀사의 제품을 만드세요. 교육과 개발 실적으로 신뢰할 수 있는 파트너를 확보하세요.
캐어랩