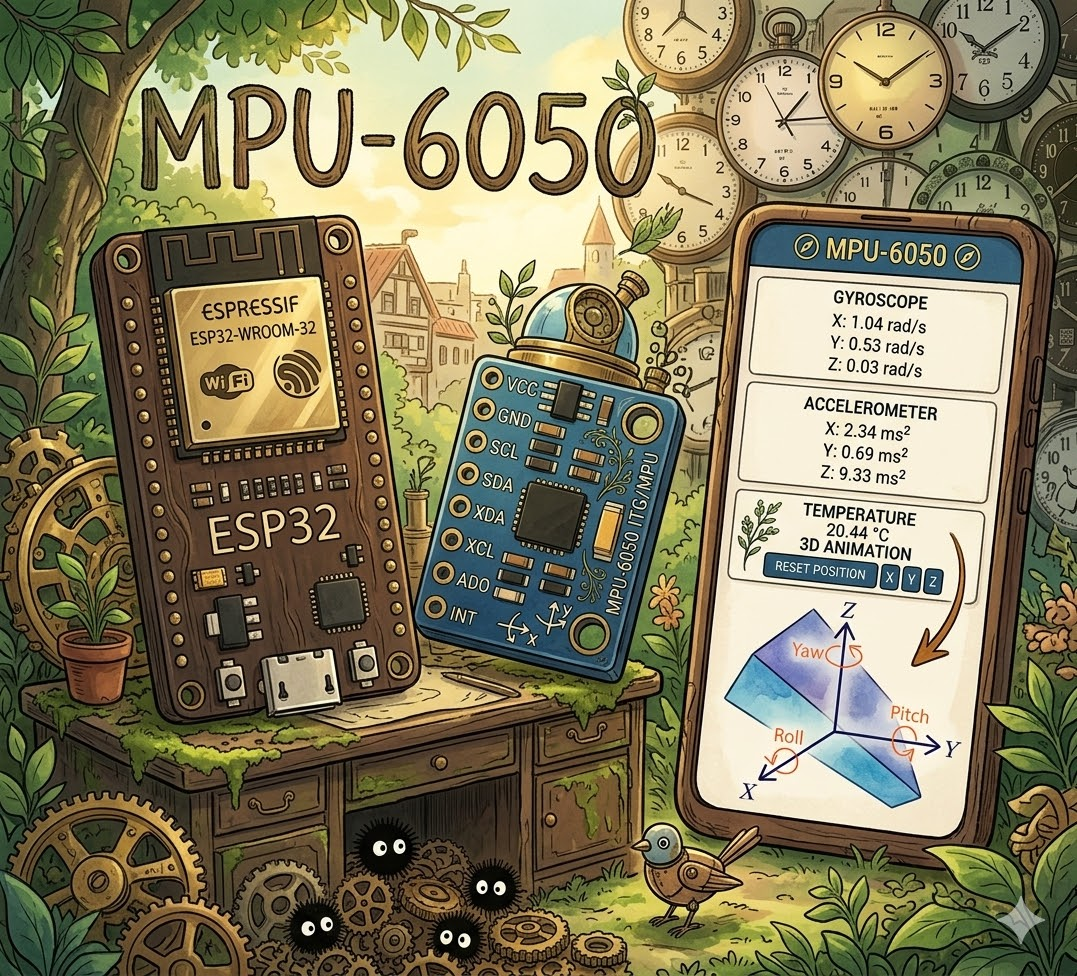
ESP32 웹 서버 (MPU-6050 가속도계 및 자이로스코프 탑재, 3D 객체 표현)
본 프로젝트에서는 ESP32를 사용하여 MPU-6050 가속도계 및 자이로스코프 센서의 측정값을 표시하는 웹 서버를 구축합니다. 또한 웹 브라우저에서 센서 방향을 3D로 시각화합니다. 측정값은 서버 전송 이벤트(SSE)를 사용하여 자동으로 업데이트되며, 3D 시각화는 three.js라는 JavaScript 라이브러리를 사용하여 처리합니다. ESP32 보드는 Arduino 코어를 사용하여 프로그래밍됩니다.
ESP32 웹 서버, MPU-6050 가속도계, 자이로스코프, 3D 객체 표현, 아두이노 IDE
웹 서버를 구축하기 위해 비동기 웹 서버를 쉽게 구축하고 서버 전송 이벤트(SET)를 처리할 수 있는 ESPAsyncWebServer 라이브러리를 사용하겠습니다.
서버 전송 이벤트에 대한 자세한 내용은 "ESP32 웹 서버에서 서버 전송 이벤트를 사용하여 센서 판독값을 자동으로 업데이트하기"를 참조하십시오.
프로젝트 개요
프로젝트를 바로 시작하기 전에, 웹 서버가 어떤 역할을 할지 간략하게 설명하는 것이 이해하기 쉬울 것입니다.

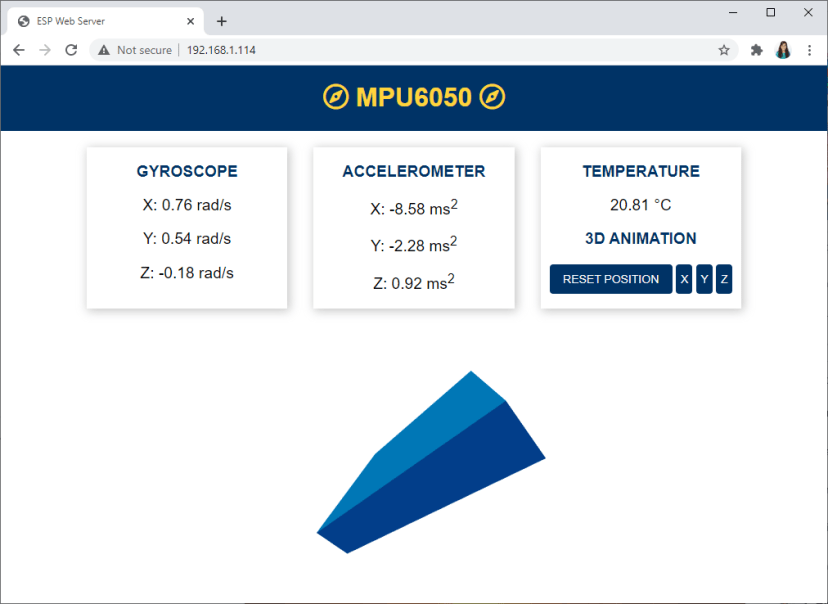
웹 서버는 자이로스코프의 X, Y, Z축 값을 표시합니다.
자이로스코프 값은 10밀리초마다 웹 서버에 업데이트됩니다.
이 화면에는 가속도계 값(X, Y, Z)이 표시됩니다. 이 값은 200밀리초마다 업데이트됩니다.
MPU-6050 센서 모듈은 온도도 측정하므로 온도 값도 표시합니다. 온도는 매초(1000밀리초)마다 업데이트됩니다.
모든 측정값은 서버 전송 이벤트를 사용하여 업데이트됩니다.
센서의 3D 표현이 있습니다. 3D 객체의 방향은 센서의 방향에 따라 변경됩니다. 센서의 현재 위치는 자이로스코프 값을 사용하여 계산됩니다.
이 3D 객체는 three.js 라는 자바스크립트 라이브러리를 사용하여 생성됩니다 .
3D 객체의 위치를 조정하는 버튼이 네 개 있습니다.
위치 재설정: 모든 축의 각도 위치를 0으로 설정합니다.
X: X축 각도 위치를 0으로 설정합니다.
Y: Y축 각도 위치를 0으로 설정합니다.
Z: Z 각도 위치를 0으로 설정합니다.

MPU-6050 가속도계 자이로스코프 웹 서버 ESP32 작동 방식
ESP32 파일 시스템
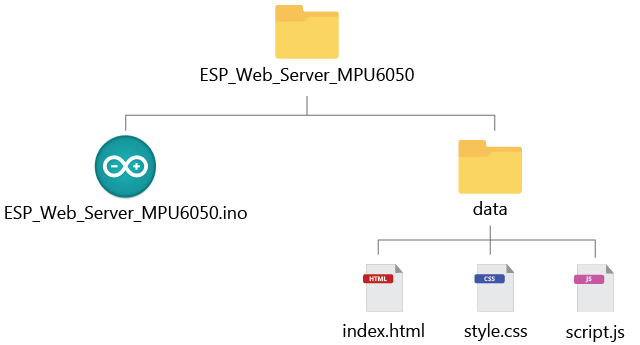
프로젝트를 체계적으로 관리하고 이해하기 쉽게 하기 위해 웹 서버를 구축하는 데 필요한 네 가지 파일을 만들겠습니다.

- 웹 서버를 처리하는 아두이노 코드;
- HTML 파일: 웹 페이지의 내용을 정의하는 파일;
- CSS 파일: 웹 페이지의 스타일을 지정하는 데 사용됩니다.
- 자바스크립트 파일: 웹 페이지의 동작을 프로그래밍합니다 (웹 서버 응답 처리, 이벤트 처리 및 3D 객체 생성).
HTML, CSS 및 JavaScript 파일은 ESP32 LittleFS 파일 시스템에 업로드됩니다. ESP32 파일 시스템에 파일을 업로드하려면 LittleFS Uploader 플러그인을 사용합니다. 아두이노 IDE에 해당 플러그인을 설치했는지 확인하세요.
아두이노 IDE 2: ESP32 LittleFS 업로더 설치 (파일 시스템에 파일 업로드)
PlatformIO와 VS Code를 함께 사용하시는 경우, ESP32 파일 시스템에 파일을 업로드하는 방법을 알아보려면 이 글을 읽어보세요.
VS Code와 PlatformIO를 사용하여 ESP32에 LittleFS 파일 시스템에 파일 업로드하기
MPU-6050 자이로스코프 및 가속도계
MPU-6050은 3축 가속도계와 3축 자이로스코프가 내장된 모듈입니다.
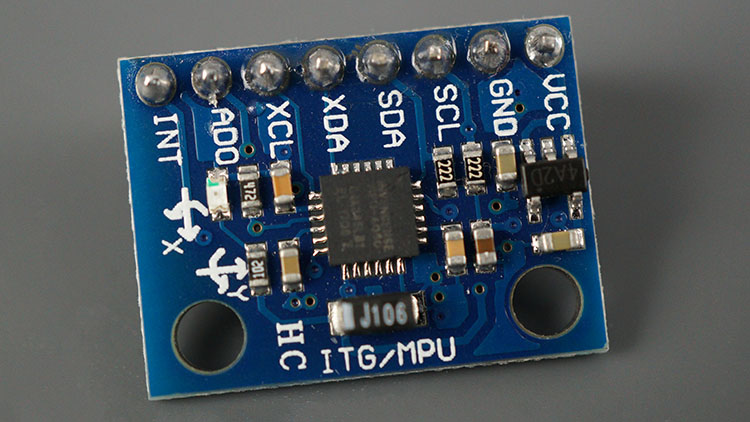
MPU6050 모듈 가속도계 자이로스코프 온도 센서
자이로스코프는 회전 속도(라디안/초)를 측정합니다. 이는 X, Y, Z축을 따라 시간에 따른 각도 변화(롤, 피치, 요)를 나타냅니다. 이를 통해 물체의 방향을 파악할 수 있습니다.

롤, 피치, 요 각도 자이로스코프
가속도계는 가속도(물체의 속도 변화율)를 측정합니다. 중력(9.8m/s²)과 같은 정적 힘이나 진동 또는 움직임과 같은 동적 힘을 감지합니다 . MPU-6050은 X, Y, Z축의 가속도를 측정합니다. 이상적으로 정지된 물체의 경우 Z축 가속도는 중력과 같고, X축과 Y축 가속도는 0이어야 합니다.
가속도계에서 얻은 값을 이용하면 삼각법을 사용하여 롤각과 피치각을 계산할 수 있지만, 요각은 계산할 수 없습니다.
두 센서의 정보를 결합하면 센서의 방향에 대한 정확한 정보를 얻을 수 있습니다.
MPU-6050 센서에 대해 자세히 알아보세요: MPU-6050 가속도계, 자이로스코프 및 온도 센서가 내장된 ESP32
회로도 – ESP32 및 MPU-6050
이 프로젝트에는 다음과 같은 부품이 필요합니다.
MPU-6050 가속도계 자이로스코프 ( ESP32 가이드 )
ESP32 ( 최고의 ESP32 개발 보드 참조 )
브레드보드
점퍼선
다음 회로도에 표시된 대로 ESP32를 MPU-6050 센서에 연결하십시오. SCL 핀을 다음과 같이 연결하십시오.
GPIO 22그리고 SDA 핀은GPIO 21.

MPU6050 가속도계 자이로스코프를 ESP32에 연결하는 회로도
아두이노 IDE 준비 중
아두이노 IDE를 사용하여 ESP32 보드를 프로그래밍하겠습니다. ESP32 애드온이 설치되어 있는지 확인하세요. 다음 튜토리얼을 따라하세요.
Arduino IDE에 ESP32 보드를 설치하세요.
VSCode와 PlatformIO를 함께 사용하는 것을 선호하신다면 다음 튜토리얼을 따라하세요.
VS Code와 PlatformIO IDE를 사용하여 ESP32 및 ESP8266 시작하기
라이브러리 설치
센서에서 값을 읽는 방법은 여러 가지가 있습니다. 이 튜토리얼에서는 Adafruit MPU6050 라이브러리를 사용하겠습니다 . 이 라이브러리를 사용하려면 Adafruit Unified Sensor 라이브러리 와 Adafruit Bus IO 라이브러리 도 설치해야 합니다 .
웹 서버를 구축하기 위해 ESPAsyncWebServer 및 AsyncTCP 라이브러리를 사용합니다 . 이 예제에서는 센서 측정값을 JSON 형식으로 브라우저에 전송합니다. JSON 변수를 쉽게 처리하기 위해 Arduino에서 제공하는 Arduino_JSON 라이브러리를 사용합니다 .
다음은 설치해야 할 라이브러리 목록입니다.
- Adafruit MPU6050 라이브러리
- Adafruit 통합 센서 라이브러리
- Adafruit 버스 IO 라이브러리
- ESP32Async의 ESPAsyncWebServer
- ESP32Async의 AsyncTCP
- Arduino의 Arduino_JSON 라이브러리
아두이노 IDE를 열고 스케치 > 라이브러리 포함 > 라이브러리 관리 로 이동하세요 . 라이브러리 관리자가 열리면 원하는 라이브러리 이름을 검색하여 설치하세요.
파일 시스템 업로더 플러그인
이 튜토리얼을 따라하려면 Arduino IDE에 ESP32 Filesystem Uploader 플러그인이 설치되어 있어야 합니다. 설치되어 있지 않다면 다음 튜토리얼을 참조하여 설치하세요.
Arduino IDE에 ESP32 LittleFS 파일 시스템 업로더를 설치하세요
VS Code와 PlatformIO를 사용 중이라면 다음 튜토리얼을 따라 ESP32 파일 시스템에 파일을 업로드하는 방법을 알아보세요.
VS Code와 PlatformIO를 사용하여 ESP32에 LittleFS 파일 시스템에 파일 업로드하기
파일 정리하기
웹 서버를 구축하려면 네 가지 파일이 필요합니다. 아두이노 스케치, HTML 파일, CSS 파일, 그리고 자바스크립트 파일입니다. HTML, CSS, 자바스크립트 파일은 아래 그림과 같이 아두이노 스케치 폴더 안의 'data' 라는 폴더에 저장해야 합니다 .
ESP 프로젝트 파일 정리하기: HTML, CSS, JavaScript, Arduino 파일
프로젝트의 모든 파일을 다운로드할 수 있습니다.
ESP_Web_Server_MPU6050.ino, index.html, style.css 및 script.js 파일을 다운로드하세요.
HTML 파일 생성
다음 내용을 포함하는 index.html 파일을 생성 하거나 프로젝트 파일 전체를 다운로드하세요 .
<!DOCTYPE HTML><html>
<head>
<title>ESP Web Server</title>
<meta name="viewport" content="width=device-width, initial-scale=1">
<link rel="icon" href="data:,">
<link rel="stylesheet" type="text/css" href="style.css">
<link rel="stylesheet" href="https://use.fontawesome.com/releases/v5.7.2/css/all.css" integrity="sha384-fnmOCqbTlWIlj8LyTjo7mOUStjsKC4pOpQbqyi7RrhN7udi9RwhKkMHpvLbHG9Sr" crossorigin="anonymous">
<script src="https://cdnjs.cloudflare.com/ajax/libs/three.js/107/three.min.js"></script>
</head>
<body>
<div class="topnav">
  <h1><i class="far fa-compass"></i> MPU6050 <i class="far fa-compass"></i></h1>
</div>
<div class="content">
<div class="cards">
<div class="card">
<p class="card-title">GYROSCOPE</p>
<p><span class="reading">X: <span id="gyroX"></span> rad</span></p>
<p><span class="reading">Y: <span id="gyroY"></span> rad</span></p>
<p><span class="reading">Z: <span id="gyroZ"></span> rad</span></p>
</div>
<div class="card">
<p class="card-title">ACCELEROMETER</p>
<p><span class="reading">X: <span id="accX"></span> ms<sup>2</sup></span></p>
<p><span class="reading">Y: <span id="accY"></span> ms<sup>2</sup></span></p>
<p><span class="reading">Z: <span id="accZ"></span> ms<sup>2</sup></span></p>
</div>
<div class="card">
<p class="card-title">TEMPERATURE</p>
<p><span class="reading"><span id="temp"></span> °C</span></p>
<p class="card-title">3D ANIMATION</p>
<button id="reset" onclick="resetPosition(this)">RESET POSITION</button>
<button id="resetX" onclick="resetPosition(this)">X</button>
<button id="resetY" onclick="resetPosition(this)">Y</button>
<button id="resetZ" onclick="resetPosition(this)">Z</button>
</div>
</div>
<div class="cube-content">
<div id="3Dcube"></div>
</div>
</div>
<script src="script.js"></script>
</body>
</html>
Head
<head> 태그와 </head> 태그는 헤드의 시작과 끝을 표시합니다. 헤드는 최종 사용자에게 직접 표시되지 않지만 웹 페이지에 기능을 추가하는 HTML 문서에 대한 데이터를 삽입하는 곳입니다. 이를 메타데이터라고 합니다.
다음 줄은 웹 페이지의 제목을 지정합니다. 이 경우 'ESP 웹 서버' 로 설정되어 있지만 , 원한다면 변경할 수 있습니다. 제목은 말 그대로 웹 브라우저의 제목 표시줄에 나타나는 문서의 제목입니다.
<title>ESP Web Server</title>
다음 메타 태그를 사용하면 웹 페이지가 반응형으로 만들어집니다. 반응형 웹 디자인은 다양한 화면 크기와 뷰포트에 자동으로 맞춰집니다.
<meta name="viewport" content="width=device-width, initial-scale=1">
본 프로젝트에서는 웹페이지에 파비콘을 제공하지 않으므로 다음과 같은 메타 태그를 사용합니다.
<link rel="icon" href="data:,">
웹 페이지의 스타일을 지정하는 스타일은 style.css 라는 별도의 파일에 있습니다 . 따라서 HTML 파일에서 다음과 같이 CSS 파일을 참조해야 합니다.
<link rel="stylesheet" type="text/css" href="style.css">
Font Awesome 웹사이트 스타일을 포함시켜 자이로스코프 아이콘과 같은 아이콘을 웹페이지에 추가하세요.
<link rel="stylesheet" href="https://cdnjs.cloudflare.com/ajax/libs/font-awesome/6.5.1/css/all.min.css">
마지막으로 센서의 3D 표현을 생성하기 위해 three.js 라이브러리 를 포함해야 합니다 .
<script src="https://cdnjs.cloudflare.com/ajax/libs/three.js/107/three.min.js"></script>
Body
<body> 태그와 </body> 태그는 본문의 시작과 끝을 표시합니다. 이 태그들 사이에 포함된 모든 내용이 페이지에 표시되는 콘텐츠입니다.
상단 바
<div class="topnav">
<h1><i class="far fa-compass"></i> MPU6050 <i class="far fa-compass"></i></h1>
</div>콘텐츠 그리드
다른 모든 콘텐츠는 content라는 <div> 태그 안에 배치됩니다.
<div class="content">
우리는 CSS 그리드 레이아웃을 사용하여 서로 정렬된 상자(카드)에 측정값을 표시합니다. 각 상자는 그리드 셀 하나에 해당합니다. 그리드 셀은 그리드 컨테이너 안에 위치해야 하므로, 상자들은 다른 <div> 태그 안에 배치되어야 합니다. 이 새로운 태그는 cards 클래스명을 가집니다.
<div class="cards">
CSS 그리드 레이아웃에 대해 자세히 알아보려면 이 글을 추천합니다: 그리드에 대한 완벽한 가이드. 자이로스코프 측정값 카드는 다음과 같습니다:
<div class="card">
  <p class="card-title">GYROSCOPE</p>
  <p><span class="reading">X: <span id="gyroX"></span> rad/s</span></p>
  <p><span class="reading">Y: <span id="gyroY"></span> rad/s</span></p>
  <p><span class="reading">Z: <span id="gyroZ"></span> rad/s</span></p>
</div>
카드에는 카드 이름이 적힌 제목이 있습니다:
<p class="card-title">GYROSCOPE</p>
그리고 자이로스코프 값을 X, Y, Z축에 표시하는 세 단락이 있습니다.
<p><span class="reading">X: <span id="gyroX"></span> rad/s</span></p>
<p><span class="reading">Y: <span id="gyroY"></span> rad/s</span></p>
<p><span class="reading">Z: <span id="gyroZ"></span> rad/s</span></p>
각 단락에는 다음과 같은 내용이 있습니다.고유한 태그ID이는 나중에 JavaScript를 사용하여 측정값을 올바른 위치에 삽입하기 위해 필요합니다. 사용된 ID는 다음과 같습니다.
gyroX 자이로스코프 X 판독값의 경우;
gyroY 자이로스코프 Y축 판독값의 경우;
gyroZ 자이로스코프 Z축 판독값의 경우.
가속도계 측정값을 표시하는 카드는 비슷하지만, 각 측정값마다 고유한 ID가 다릅니다.
<div class="card">
  <p class="card-title">ACCELEROMETER</p>
  <p><span class="reading">X: <span id="accX"></span> ms<sup>2</sup></span></p>
  <p><span class="reading">Y: <span id="accY"></span> ms<sup>2</sup></span></p>
  <p><span class="reading">Z: <span id="accZ"></span> ms<sup>2</sup></span></p>
</div>
다음은 가속도계 측정값의 ID입니다.
accX 가속도계 X 판독값의 경우;
accY 가속도계 Y축 판독값의 경우;
accZ 가속도계 Z 값 판독값의 경우.
마지막으로, 다음 줄에는 온도 표시기와 리셋 버튼이 있는 카드가 표시됩니다.
<div class="card">
<p class="card-title">TEMPERATURE</p>
<p><span class="reading"><span id="temp"></span> °C</span></p>
<p class="card-title">3D ANIMATION</p>
<button id="reset" onclick="resetPosition(this)">RESET POSITION</button>
<button id="resetX" onclick="resetPosition(this)">X</button>
<button id="resetY" onclick="resetPosition(this)">Y</button>
<button id="resetZ" onclick="resetPosition(this)">Z</button>
</div>
온도 측정값의 고유 ID는 다음과 같습니다. temp
그다음에는 클릭하면 해당 기능을 호출하는 네 개의 버튼이 있습니다.resetPosition()나중에 자바스크립트 함수가 나옵니다. 이 함수는 ESP32에 위치를 초기화하라는 요청을 보내는 역할을 합니다. 모든 축 또는 개별 축의 위치를 초기화할 수 있습니다. 각 버튼에는 고유 ID가 있어 어떤 버튼이 클릭되었는지 알 수 있습니다.
- reset: to reset the position in all axis;
- resetX: to reset the position on the X axis;
- resetY: to reset the position on the Y axis;
- resetZ: to reset the position on the Z axis.
3D 표현
3D 표현을 표시할 섹션을 만들어야 합니다.
<div class="cube-content">
  <div id="3Dcube"></div>
</div>
3D 객체는 3Dcube ID를 가진 <div>에 렌더링됩니다.
자바스크립트 파일을 참조하세요.
마지막으로, HTML 요소를 처리하고 3D 애니메이션을 생성하는 모든 함수가 포함된 외부 JavaScript 파일( script.js ) 을 사용할 것이므로 다음과 같이 해당 파일을 참조해야 합니다.
<script src="script.js"></script>
CSS 파일 생성
style.css 라는 파일을 만들고 다음 내용을 입력하거나 프로젝트 파일 전체를 다운로드하세요. 이 파일은 웹 페이지의 스타일을 지정하는 역할을 합니다.
/*
  Rui Santos
  Complete project details at https://RandomNerdTutorials.com/esp32-mpu-6050-web-server/

  Permission is hereby granted, free of charge, to any person obtaining a copy of this software and associated documentation files.
  The above copyright notice and this permission notice shall be included in all copies or substantial portions of the Software.
*/

html {
  font-family: Arial;
  display: inline-block;
  text-align: center;
}
p {
  font-size: 1.2rem;
}
body {
  margin: 0;
}
.topnav {
  overflow: hidden;
  background-color: #003366;
  color: #FFD43B;
  font-size: 1rem;
}
.content {
  padding: 20px;
}
.card {
  background-color: white;
  box-shadow: 2px 2px 12px 1px rgba(140,140,140,.5);
}
.card-title {
  color:#003366;
  font-weight: bold;
}
.cards {
  max-width: 800px;
  margin: 0 auto;
  display: grid; grid-gap: 2rem;
  grid-template-columns: repeat(auto-fit, minmax(200px, 1fr));
}
.reading {
  font-size: 1.2rem;
}
.cube-content{
  width: 100%;
  background-color: white;
  height: 300px; margin: auto;
  padding-top:2%;
}
#reset{
  border: none;
  color: #FEFCFB;
  background-color: #003366;
  padding: 10px;
  text-align: center;
  display: inline-block;
  font-size: 14px; width: 150px;
  border-radius: 4px;
}
#resetX, #resetY, #resetZ{
  border: none;
  color: #FEFCFB;
  background-color: #003366;
  padding-top: 10px;
  padding-bottom: 10px;
  text-align: center;
  display: inline-block;
  font-size: 14px;
  width: 20px;
  border-radius: 4px;
}
이 프로젝트의 목표와 관련이 없으므로 CSS 작동 방식에 대해서는 설명하지 않겠습니다.
자바스크립트 파일 생성
script.js 라는 파일을 만들고 다음 내용을 입력하거나 프로젝트 파일 전체를 다운로드하세요 .
/*
  Rui Santos
  Complete project details at https://RandomNerdTutorials.com/esp32-mpu-6050-web-server/

  Permission is hereby granted, free of charge, to any person obtaining a copy of this software and associated documentation files.
  The above copyright notice and this permission notice shall be included in all copies or substantial portions of the Software.
*/

let scene, camera, rendered, cube;

function parentWidth(elem) {
  return elem.parentElement.clientWidth;
}

function parentHeight(elem) {
  return elem.parentElement.clientHeight;
}

function init3D(){
  scene = new THREE.Scene();
  scene.background = new THREE.Color(0xffffff);

  camera = new THREE.PerspectiveCamera(75, parentWidth(document.getElementById("3Dcube")) / parentHeight(document.getElementById("3Dcube")), 0.1, 1000);

  renderer = new THREE.WebGLRenderer({ antialias: true });
  renderer.setSize(parentWidth(document.getElementById("3Dcube")), parentHeight(document.getElementById("3Dcube")));

  document.getElementById('3Dcube').appendChild(renderer.domElement);

  // Create a geometry
  const geometry = new THREE.BoxGeometry(5, 1, 4);

  // Materials of each face
  var cubeMaterials = [
    new THREE.MeshBasicMaterial({color:0x03045e}),
    new THREE.MeshBasicMaterial({color:0x023e8a}),
    new THREE.MeshBasicMaterial({color:0x0077b6}),
    new THREE.MeshBasicMaterial({color:0x03045e}),
    new THREE.MeshBasicMaterial({color:0x023e8a}),
    new THREE.MeshBasicMaterial({color:0x0077b6}),
  ];

  const material = new THREE.MeshFaceMaterial(cubeMaterials);

  cube = new THREE.Mesh(geometry, material);
  scene.add(cube);
  camera.position.z = 5;
  renderer.render(scene, camera);
}

// Resize the 3D object when the browser window changes size
function onWindowResize(){
  camera.aspect = parentWidth(document.getElementById("3Dcube")) / parentHeight(document.getElementById("3Dcube"));
  //camera.aspect = window.innerWidth /  window.innerHeight;
  camera.updateProjectionMatrix();
  //renderer.setSize(window.innerWidth, window.innerHeight);
  renderer.setSize(parentWidth(document.getElementById("3Dcube")), parentHeight(document.getElementById("3Dcube")));

}

window.addEventListener('resize', onWindowResize, false);

// Create the 3D representation
init3D();

// Create events for the sensor readings
if (!!window.EventSource) {
  var source = new EventSource('/events');

  source.addEventListener('open', function(e) {
    console.log("Events Connected");
  }, false);

  source.addEventListener('error', function(e) {
    if (e.target.readyState != EventSource.OPEN) {
      console.log("Events Disconnected");
    }
  }, false);

  source.addEventListener('gyro_readings', function(e) {
    //console.log("gyro_readings", e.data);
    var obj = JSON.parse(e.data);
    document.getElementById("gyroX").innerHTML = obj.gyroX;
    document.getElementById("gyroY").innerHTML = obj.gyroY;
    document.getElementById("gyroZ").innerHTML = obj.gyroZ;

    // Change cube rotation after receiving the readinds
    cube.rotation.x = obj.gyroY;
    cube.rotation.z = obj.gyroX;
    cube.rotation.y = obj.gyroZ;
    renderer.render(scene, camera);
  }, false);

  source.addEventListener('temperature_reading', function(e) {
    console.log("temperature_reading", e.data);
    document.getElementById("temp").innerHTML = e.data;
  }, false);

  source.addEventListener('accelerometer_readings', function(e) {
    console.log("accelerometer_readings", e.data);
    var obj = JSON.parse(e.data);
    document.getElementById("accX").innerHTML = obj.accX;
    document.getElementById("accY").innerHTML = obj.accY;
    document.getElementById("accZ").innerHTML = obj.accZ;
  }, false);
}

function resetPosition(element){
  var xhr = new XMLHttpRequest();
  xhr.open("GET", "/"+element.id, true);
  console.log(element.id);
  xhr.send();
}
3D 객체 생성
init3D() 함수는 3D 객체를 생성합니다. three.js로 실제로 무언가를 표시하려면 세 가지가 필요합니다: 장면(scene), 카메라(camera), 그리고 렌더러(renderer)입니다. 이를 통해 카메라로 장면을 렌더링할 수 있습니다.
function init3D(){
  scene = new THREE.Scene();
  scene.background = new THREE.Color(0xffffff);

  camera = new THREE.PerspectiveCamera(75, parentWidth(document.getElementById("3Dcube")) / parentHeight(document.getElementById("3Dcube")), 0.1, 1000);

  renderer = new THREE.WebGLRenderer({ antialias: true });
  renderer.setSize(parentWidth(document.getElementById("3Dcube")), parentHeight(document.getElementById("3Dcube")));

  document.getElementById('3Dcube').appendChild(renderer.domElement);
3D 객체를 생성하려면 BoxGeometry가 필요합니다. 박스 지오메트리에서 객체의 치수를 설정할 수 있습니다. 우리는 MPU-6050의 모양을 재현하기 위해 적절한 비율로 객체를 생성했습니다.
const geometry = new THREE.BoxGeometry(5, 1, 4);
기하학적 형태 외에도 물체에 색을 입힐 재질이 필요합니다. 물체에 색을 입히는 방법은 여러 가지가 있는데, 우리는 각 면에 세 가지 다른 색을 선택했습니다.
// Materials of each face
var cubeMaterials = [
  new THREE.MeshBasicMaterial({color:0x03045e}),
  new THREE.MeshBasicMaterial({color:0x023e8a}),
  new THREE.MeshBasicMaterial({color:0x0077b6}),
  new THREE.MeshBasicMaterial({color:0x03045e}),
  new THREE.MeshBasicMaterial({color:0x023e8a}),
  new THREE.MeshBasicMaterial({color:0x0077b6}),
];

const material = new THREE.MeshFaceMaterial(cubeMaterials);
마지막으로 3D 오브젝트를 생성하고 장면에 추가한 다음 카메라를 조정합니다.
cube = new THREE.Mesh(geometry, material);
scene.add(cube);
camera.position.z = 5;
renderer.render(scene, camera);
이 간단한 three.js 튜토리얼을 살펴보시면 작동 방식을 더 잘 이해하실 수 있습니다: Getting Started with three.js – Creating a Scene.
웹 브라우저 창 크기가 변경될 때 객체의 크기를 조정하려면, resize 이벤트 발생 시 onWindowResize() 함수를 호출해야 합니다.
// Resize the 3D object when the browser window changes size
function onWindowResize(){
  camera.aspect = parentWidth(document.getElementById("3Dcube")) / parentHeight(document.getElementById("3Dcube"));
  //camera.aspect = window.innerWidth /  window.innerHeight;
  camera.updateProjectionMatrix();
  //renderer.setSize(window.innerWidth, window.innerHeight);
  renderer.setSize(parentWidth(document.getElementById("3Dcube")), parentHeight(document.getElementById("3Dcube")));
}

window.addEventListener('resize', onWindowResize, false);
3D 표현을 실제로 생성하려면 init3D() 함수를 호출하십시오.
init3D();
이벤트(SSE)
ESP32는 새로운 센서 측정값을 주기적으로 이벤트로 클라이언트(브라우저)에 전송합니다. 우리는 클라이언트가 이러한 이벤트를 수신했을 때 발생하는 상황을 처리해야 합니다.
이 예시에서는 측정값을 해당 HTML 요소에 배치하고 3D 객체의 방향을 그에 맞게 변경하려고 합니다.
새 EventSource 객체를 생성하고 업데이트를 전송하는 페이지의 URL을 지정합니다. 본 예제에서는 /events입니다.
if (!!window.EventSource) {
  var source = new EventSource('/events');
이벤트 소스를 인스턴스화한 후에는 addEventListener()를 사용하여 서버로부터 메시지를 수신 대기할 수 있습니다.
다음은 AsyncWebServer 문서에 표시된 기본 이벤트 리스너입니다.
source.addEventListener('open', function(e) {
  console.log("Events Connected");
}, false);

source.addEventListener('error', function(e) {
  if (e.target.readyState != EventSource.OPEN) {
    console.log("Events Disconnected");
  }
}, false);
새로운 자이로스코프 판독값이 수신되면 ESP32는 이벤트를 전송합니다.자이로 판독값클라이언트에게 전달해야 합니다. 해당 특정 이벤트에 대한 이벤트 리스너를 추가해야 합니다.
source.addEventListener('gyro_readings', function(e) {
자이로스코프 측정값은 JSON 형식의 문자열입니다. 예를 들면 다음과 같습니다.
{
"gyroX" : "0.09",
"gyroY" : "0.05",
"gyroZ": "0.04"
}
JavaScript에는 JSON 형식으로 작성된 문자열을 JavaScript 객체로 변환하는 내장 함수가 있습니다. JSON.parse().
var obj = JSON.parse(e.data);
그만큼객체변수에는 센서 측정값이 자바스크립트 기본 형식으로 저장됩니다. 따라서 다음과 같이 측정값에 접근할 수 있습니다.
- gyroscope X reading: obj.gyroX;
- gyroscope Y reading: obj.gyroY;
- gyroscope Z reading: obj.gyroZ;
다음 줄들은 수신된 데이터를 웹 페이지의 해당 HTML 요소에 삽입합니다.
document.getElementById("gyroX").innerHTML = obj.gyroX;
document.getElementById("gyroY").innerHTML = obj.gyroY;
document.getElementById("gyroZ").innerHTML = obj.gyroZ;
마지막으로, 수신된 측정값에 따라 큐브의 회전 방향을 다음과 같이 변경해야 합니다.
cube.rotation.x = obj.gyroY;
cube.rotation.z = obj.gyroX;
cube.rotation.y = obj.gyroZ;
renderer.render(scene, camera);
참고: 저희의 경우, 축이 앞서 설명한 대로 바뀌어 있습니다(회전 X축 → 자이로 Y축, 회전 Z축 → 자이로 X축, 회전 Y축 → 자이로 Z축). 센서 방향에 따라 이 값을 변경해야 할 수도 있습니다.
가속도계 측정값 및 온도 이벤트의 경우, 해당 데이터를 HTML 페이지에 단순히 표시합니다.
source.addEventListener('temperature_reading', function(e) {
  console.log("temperature_reading", e.data);
  document.getElementById("temp").innerHTML = e.data;
}, false);

source.addEventListener('accelerometer_readings', function(e) {
  console.log("accelerometer_readings", e.data);
  var obj = JSON.parse(e.data);
  document.getElementById("accX").innerHTML = obj.accX;
  document.getElementById("accY").innerHTML = obj.accY;
  document.getElementById("accZ").innerHTML = obj.accZ;
}, false);
마지막으로, 우리는 다음을 만들어야 합니다.resetPosition()이 함수는 리셋 버튼에 의해 호출됩니다.
function resetPosition(element){
  var xhr = new XMLHttpRequest();
  xhr.open("GET", "/"+element.id, true);
  console.log(element.id);
  xhr.send();
}
이 함수는 눌린 버튼에 따라 다른 URL로 서버에 HTTP 요청을 보내는 간단한 함수입니다.요소 ID).
xhr.open("GET", "/"+element.id, true);
- RESET POSITION button –> request: /reset
- X button –> request: /resetX
- Y button –> request: /resetY
- Z button –> request: /resetZ
아두이노 스케치
마지막으로 서버(ESP32)를 구성해 보겠습니다. 다음 코드를 Arduino IDE에 복사하거나 프로젝트 파일 전체를 다운로드하세요 .
/*********
  Rui Santos & Sara Santos - Random Nerd Tutorials
  Complete project details at https://RandomNerdTutorials.com/esp32-mpu-6050-web-server/
  Permission is hereby granted, free of charge, to any person obtaining a copy of this software and associated documentation files.
  The above copyright notice and this permission notice shall be included in all copies or substantial portions of the Software.
*********/
#include <Arduino.h>
#include <WiFi.h>
#include <AsyncTCP.h>
#include <ESPAsyncWebServer.h>
#include <Adafruit_MPU6050.h>
#include <Adafruit_Sensor.h>
#include <Arduino_JSON.h>
#include "LittleFS.h"

// Replace with your network credentials
const char* ssid = "REPLACE_WITH_YOUR_SSID";
const char* password = "REPLACE_WITH_YOUR_PASSWORD";

// Create AsyncWebServer object on port 80
AsyncWebServer server(80);

// Create an Event Source on /events
AsyncEventSource events("/events");

// Json Variable to Hold Sensor Readings
JSONVar readings;

// Timer variables
unsigned long lastTime = 0;
unsigned long lastTimeTemperature = 0;
unsigned long lastTimeAcc = 0;
unsigned long gyroDelay = 10;
unsigned long temperatureDelay = 1000;
unsigned long accelerometerDelay = 200;

// Create a sensor object
Adafruit_MPU6050 mpu;

sensors_event_t a, g, temp;

float gyroX, gyroY, gyroZ;
float accX, accY, accZ;
float temperature;

//Gyroscope sensor deviation
float gyroXerror = 0.07;
float gyroYerror = 0.03;
float gyroZerror = 0.01;

// Init MPU6050
void initMPU(){
  if (!mpu.begin()) {
    Serial.println("Failed to find MPU6050 chip");
    while (1) {
      delay(10);
    }
  }
  Serial.println("MPU6050 Found!");
}

void initLittleFS() {
  if (!LittleFS.begin()) {
    Serial.println("An error has occurred while mounting LittleFS");
  }
  Serial.println("LittleFS mounted successfully");
}

// Initialize WiFi
void initWiFi() {
  WiFi.mode(WIFI_STA);
  WiFi.begin(ssid, password);
  Serial.println("");
  Serial.print("Connecting to WiFi...");
  while (WiFi.status() != WL_CONNECTED) {
    Serial.print(".");
    delay(1000);
  }
  Serial.println("");
  Serial.println(WiFi.localIP());
}

String getGyroReadings(){
  mpu.getEvent(&a, &g, &temp);

  float gyroX_temp = g.gyro.x;
  if(abs(gyroX_temp) > gyroXerror)  {
    gyroX += gyroX_temp/50.00;
  }

  float gyroY_temp = g.gyro.y;
  if(abs(gyroY_temp) > gyroYerror) {
    gyroY += gyroY_temp/70.00;
  }

  float gyroZ_temp = g.gyro.z;
  if(abs(gyroZ_temp) > gyroZerror) {
    gyroZ += gyroZ_temp/90.00;
  }

  readings["gyroX"] = String(gyroX);
  readings["gyroY"] = String(gyroY);
  readings["gyroZ"] = String(gyroZ);

  String jsonString = JSON.stringify(readings);
  return jsonString;
}

String getAccReadings() {
  mpu.getEvent(&a, &g, &temp);
  // Get current acceleration values
  accX = a.acceleration.x;
  accY = a.acceleration.y;
  accZ = a.acceleration.z;
  readings["accX"] = String(accX);
  readings["accY"] = String(accY);
  readings["accZ"] = String(accZ);
  String accString = JSON.stringify (readings);
  return accString;
}

String getTemperature(){
  mpu.getEvent(&a, &g, &temp);
  temperature = temp.temperature;
  return String(temperature);
}

void setup() {
  Serial.begin(115200);
  initWiFi();
  initLittleFS();
  initMPU();

  // Handle Web Server
  server.on("/", HTTP_GET, [](AsyncWebServerRequest *request){
    request->send(LittleFS, "/index.html", "text/html");
  });

  server.serveStatic("/", LittleFS, "/");

  server.on("/reset", HTTP_GET, [](AsyncWebServerRequest *request){
    gyroX=0;
    gyroY=0;
    gyroZ=0;
    request->send(200, "text/plain", "OK");
  });

  server.on("/resetX", HTTP_GET, [](AsyncWebServerRequest *request){
    gyroX=0;
    request->send(200, "text/plain", "OK");
  });

  server.on("/resetY", HTTP_GET, [](AsyncWebServerRequest *request){
    gyroY=0;
    request->send(200, "text/plain", "OK");
  });

  server.on("/resetZ", HTTP_GET, [](AsyncWebServerRequest *request){
    gyroZ=0;
    request->send(200, "text/plain", "OK");
  });

  // Handle Web Server Events
  events.onConnect([](AsyncEventSourceClient *client){
    if(client->lastId()){
      Serial.printf("Client reconnected! Last message ID that it got is: %u\n", client->lastId());
    }
    // send event with message "hello!", id current millis
    // and set reconnect delay to 1 second
    client->send("hello!", NULL, millis(), 10000);
  });
  server.addHandler(&events);

  server.begin();
}

void loop() {
  if ((millis() - lastTime) > gyroDelay) {
    // Send Events to the Web Server with the Sensor Readings
    events.send(getGyroReadings().c_str(),"gyro_readings",millis());
    lastTime = millis();
  }
  if ((millis() - lastTimeAcc) > accelerometerDelay) {
    // Send Events to the Web Server with the Sensor Readings
    events.send(getAccReadings().c_str(),"accelerometer_readings",millis());
    lastTimeAcc = millis();
  }
  if ((millis() - lastTimeTemperature) > temperatureDelay) {
    // Send Events to the Web Server with the Sensor Readings
    events.send(getTemperature().c_str(),"temperature_reading",millis());
    lastTimeTemperature = millis();
  }
}
코드를 업로드하기 전에 다음 변수에 네트워크 자격 증명을 입력했는지 확인하십시오.
// Replace with your network credentials
const char* ssid = "REPLACE_WITH_YOUR_SSID";
const char* password = "REPLACE_WITH_YOUR_PASSWORD";
코드 작동 방식
쓰기 싫어서 코드 작동 방식은 생략하려다가 다시 또 습니다. 상세 설명은 문서 마지막에 있는 링크를 참고하세요. 그래서 완전히 지우는 게 아니라 설명은 남겨 놓지만 예쁘게 만들지 않는다는 의미입니다. ^^
코드 작동 방식을 알아보려면 계속 읽거나 다음 섹션으로 이동하세요.
라이브러리
먼저, 이 프로젝트에 필요한 모든 라이브러리를 가져옵니다.
#include <Arduino.h>
#include <WiFi.h>
#include <AsyncTCP.h>
#include <ESPAsyncWebServer.h>
#include <Adafruit_MPU6050.h>
#include <Adafruit_Sensor.h>
#include <Arduino_JSON.h>
#include "LittleFS.h"
네트워크 자격 증명
다음 변수에 네트워크 자격 증명을 입력하십시오. 현재 운영중인 데트워크에 접속해야 합니다.
// Replace with your network credentials
const char* ssid = "REPLACE_WITH_YOUR_SSID";
const char* password = "REPLACE_WITH_YOUR_PASSWORD";
AsyncWebServer 및 AsyncEventSource
생성AsyncWebServer80번 포트의 객체입니다.
AsyncWebServer server(80);
다음 줄은 새 이벤트 소스를 생성합니다./이벤트.
AsyncEventSource events("/events");
변수 선언
읽기값 변수는 센서 측정값을 JSON 형식으로 저장하기 위한 JSON 변수입니다.
JSONVar readings;
이 프로젝트에서는 자이로스코프 판독값을 10밀리초마다, 가속도계 판독값을 200밀리초마다, 그리고 온도 판독값을 1초마다 전송할 것입니다. 따라서 각 판독값에 대한 보조 타이머 변수를 생성해야 합니다. 지연 시간은 원하는 대로 변경할 수 있습니다.
// Timer variables
unsigned long lastTime = 0;
unsigned long lastTimeTemperature = 0;
unsigned long lastTimeAcc = 0;
unsigned long gyroDelay = 10;
unsigned long temperatureDelay = 1000;
unsigned long accelerometerDelay = 200;
MPU-6050
Adafruit_MPU5060 객체를 mpu라는 이름으로 생성하고, 센서 판독값에 대한 이벤트를 생성하며 판독값을 저장할 변수를 생성합니다.
// Create a sensor object
Adafruit_MPU6050 mpu;

sensors_event_t a, g, temp;

float gyroX, gyroY, gyroZ;
float accX, accY, accZ;
float temperature;
자이로스코프 오프셋 - 컬리브레이션이 필요합니다.
모든 축의 자이로스코프 센서 오프셋을 조정하십시오.
//Gyroscope sensor deviation
float gyroXerror = 0.07;
float gyroYerror = 0.03;
float gyroZerror = 0.01;
센서 오프셋을 얻으려면 파일 > 예제 > Adafruit MPU6050 > basic_readings로 이동하십시오. 센서를 정지 상태로 두고 자이로스코프 X, Y, Z 값을 확인하십시오. 그런 다음 해당 값을 gyroXerror, gyroYerror 및 gyroZerror 변수에 추가하십시오.
MPU-6050 초기화
// Init MPU6050
void initMPU(){
  if (!mpu.begin()) {
    Serial.println("Failed to find MPU6050 chip");
    while (1) {
      delay(10);
    }
  }
  Serial.println("MPU6050 Found!");
}
LittleFS를 초기화합니다
initLittleFS() 함수는 ESP32 파일 시스템을 초기화하여 LittleFS에 저장된 파일(index.html, style.css 및 script.js)에 접근할 수 있도록 합니다.
void initLittleFS() {
  if (!LittleFS.begin()) {
    Serial.println("An error has occurred while mounting LittleFS");
  }
  Serial.println("LittleFSmounted successfully");
}
Wi-Fi 초기화
initWiFi() 함수는 ESP32를 로컬 네트워크에 연결합니다.
// Initialize WiFi
void initWiFi() {
  WiFi.mode(WIFI_STA);
  WiFi.begin(ssid, password);
  Serial.print("Connecting to WiFi ..");
  while (WiFi.status() != WL_CONNECTED) {
    Serial.print('.');
    delay(1000);
  }
  Serial.println(WiFi.localIP());
}
자이로스코프 판독값 가져오기
getGyroReadings() 함수는 새로운 자이로스코프 측정값을 가져와 X, Y, Z 축의 현재 각도 방향을 JSON 문자열로 반환합니다.
자이로스코프는 현재 각속도를 반환합니다. 각속도는 라디안/초(rad/s) 단위로 측정됩니다. 물체의 현재 위치를 구하려면 각속도에 경과 시간(10밀리초)을 곱한 후 이전 위치를 더하면 됩니다.
current angle (rad) = last angle (rad) + angular velocity (rad/s) * time(s)
gyroX_temp 변수는 현재 자이로스코프 X 값을 일시적으로 저장합니다.
float gyroX_temp = g.gyro.x;
센서의 미세한 진동을 방지하기 위해( 자이로스코프 오프셋 참조 ), 먼저 센서 값이 오프셋보다 큰지 확인합니다.
if(abs(gyroX_temp) > gyroXerror) {
현재 값이 오프셋 값보다 크면 유효한 측정값으로 간주합니다. 따라서 이전 공식을 적용하여 현재 센서의 각도 위치를 구할 수 있습니다.자이로엑스).
gyroX += gyroX_temp / 50.0;
참고: 이론적으로는 현재 각속도에 경과 시간(10밀리초 = 0.01초 (gyroDelay))을 곱하거나 100으로 나누어야 합니다. 그러나 실험 결과, 50.0으로 나누는 것이 센서 반응이 더 좋다는 것을 확인했습니다. 사용 중인 센서가 다를 수 있으므로 값을 조정해야 할 수도 있습니다.
우리는 유사한 절차를 따라 Y값과 Z값을 얻습니다.
float gyroX_temp = g.gyro.x;
if(abs(gyroX_temp) > gyroXerror) {
  gyroX += gyroX_temp/50.00;
}

float gyroY_temp = g.gyro.y;
if(abs(gyroY_temp) > gyroYerror) {
  gyroY += gyroY_temp/70.00;
}

float gyroZ_temp = g.gyro.z;
if(abs(gyroZ_temp) > gyroZerror) {
  gyroZ += gyroZ_temp/90.00;
}
마지막으로, 측정값들을 JSON 변수에 연결합니다.(읽기) 그리고 JSON 문자열을 반환합니다.(jsonString).
readings["gyroX"] = String(gyroX);
readings["gyroY"] = String(gyroY);
readings["gyroZ"] = String(gyroZ);

String jsonString = JSON.stringify(readings);
return jsonString;
가속도계 측정값 가져오기
getAccReadings() 함수는 가속도계 측정값을 반환합니다.
String getAccReadings(){
  mpu.getEvent(&a, &g, &temp);
  // Get current acceleration values
  accX = a.acceleration.x;
  accY = a.acceleration.y;
  accZ = a.acceleration.z;
  readings["accX"] = String(accX);
  readings["accY"] = String(accY);
  readings["accZ"] = String(accZ);
  String accString = JSON.stringify (readings);
  return accString;
}
온도 측정값을 얻으세요
getTemperature() 함수는 현재 온도 측정값을 반환합니다.
String getTemperature(){
  mpu.getEvent(&a, &g, &temp);
  temperature = temp.temperature;
  return String(temperature);
}
setup( ) 함수
setup() 함수에서 시리얼 모니터, Wi-Fi, LittleFS 및 MPU 센서를 초기화합니다.
void setup() {
  Serial.begin(115200);
  initWiFi();
  initLittleFS();
  initMPU();
요청 처리
ESP32가 루트 URL로 요청을 받으면 LittleFS에 저장된 HTML 파일( index.html )의 내용을 응답으로 보내려고 합니다 .
server.on("/", HTTP_GET, [](AsyncWebServerRequest *request){
  request->send(LittleFS, "/index.html", "text/html");
});
send() 함수의 첫 번째 인수는 파일이 저장되는 파일 시스템으로, 이 경우 LittleFS에 저장됩니다. 두 번째 인수는 파일이 위치한 경로입니다. 세 번째 인수는 콘텐츠 유형(HTML 텍스트)을 나타냅니다.
HTML 파일에서 style.css 와 script.js 파일을 참조합니다. 따라서 브라우저에서 HTML 파일이 로드되면 해당 CSS 및 JavaScript 파일을 요청하게 됩니다. 이 파일들은 동일한 디렉터리(LittleFS)에 저장된 정적 파일입니다. 루트 URL에서 요청이 들어오면 해당 디렉터리에 있는 정적 파일을 제공하도록 다음 코드를 간단히 추가할 수 있습니다. 이렇게 하면 CSS 및 JavaScript 파일이 자동으로 제공됩니다.
server.serveStatic("/", LittleFS, "/");
리셋 버튼이 눌렸을 때의 동작도 처리해야 합니다. RESET POSITION 버튼을 누르면 ESP32는 /reset 경로에서 요청을 수신합니다. 이때 gyroX, gyroY, gyroZ 변수를 0으로 설정하여 센서의 초기 위치를 복원합니다.
server.on("/reset", HTTP_GET, [](AsyncWebServerRequest *request){
  gyroX=0;
  gyroY=0;
  gyroZ=0;
  request->send(200, "text/plain", "OK");
});
요청이 성공했음을 나타내기 위해 "OK" 응답을 보냅니다.
다른 요청들(X, Y, Z 버튼)에 대해서도 유사한 절차를 따릅니다.
server.on("/resetX", HTTP_GET, [](AsyncWebServerRequest *request){
  gyroX=0;
  request->send(200, "text/plain", "OK");
});

server.on("/resetY", HTTP_GET, [](AsyncWebServerRequest *request){
  gyroY=0;
  request->send(200, "text/plain", "OK");
});

server.on("/resetZ", HTTP_GET, [](AsyncWebServerRequest *request){
  gyroZ=0;
  request->send(200, "text/plain", "OK");
});
다음 줄들은 서버에 이벤트 소스를 설정합니다.
// Handle Web Server Events
events.onConnect([](AsyncEventSourceClient *client){
  if(client->lastId()){
    Serial.printf("Client reconnected! Last message ID that it got is: %u\n", client->lastId());
  }
  // send event with message "hello!", id current millis
  // and set reconnect delay to 1 second
  client->send("hello!", NULL, millis(), 10000);
});
server.addHandler(&events);
마지막으로 서버를 시작하세요.
server.begin();
loop() – 이벤트 전송
loop( ) 함수 내에서 새로운 센서 측정값을 클라이언트에 이벤트로 전송합니다.
다음 코드 블록은 자이로스코프 측정값을 10밀리초 간격(gyroDelay)으로 gyro_readings 이벤트를 통해 전송합니다.
if ((millis() - lastTime) > gyroDelay) {
  // Send Events to the Web Server with the Sensor Readings
  events.send(getGyroReadings().c_str(),"gyro_readings",millis());
  lastTime = millis();
}
이벤트 객체에 send() 메서드를 사용하고, 전송하려는 콘텐츠와 이벤트 이름을 인수로 전달합니다. 이 경우 getGyroReadings() 함수가 반환한 JSON 문자열을 전송하고자 합니다. send() 메서드는 char 형 변수를 받아들이므로 변환을 위해 c_str() 메서드를 사용해야 합니다. 이벤트 이름은 gyro_readings입니다.
가속도계 측정값에 대해서도 유사한 절차를 따르지만, 다른 이벤트(accelerometer_readings)와 다른 지연 시간(accelerometerDelay)을 사용합니다:
if ((millis() - lastTimeAcc) > accelerometerDelay) {
  // Send Events to the Web Server with the Sensor Readings
  events.send(getAccReadings().c_str(),"accelerometer_readings",millis());
  lastTimeAcc = millis();
}
마지막으로 온도 측정값입니다.
if ((millis() - lastTimeTemperature) > temperatureDelay) {
  // Send Events to the Web Server with the Sensor Readings
  events.send(getTemperature().c_str(),"temperature_reading",millis());
  lastTimeTemperature = millis();
}
코드 및 파일 업로드
네트워크 자격 증명을 입력한 후 코드를 저장하세요. Sketch > Show Sketch Folder 로 이동하여 data 라는 폴더를 만드세요 .

아두이노 IDE에서 스케치 폴더를 열어 데이터 폴더를 생성하세요.
해당 폴더 안에 HTML, CSS 및 JavaScript 파일을 저장해야 합니다.
다음으로, 코드를 ESP32 보드에 업로드하세요. 올바른 보드와 COM 포트가 선택되었는지 확인하십시오. 또한, 코드에 네트워크 자격 증명을 추가했는지도 확인하세요.

아두이노 IDE 2 업로드 버튼
코드를 업로드한 후에는 파일을 업로드해야 합니다. Arduino IDE에서 Windows는 [ Ctrl ] + [ Shift ] + [ P ], macOS는 [ ⌘ ] + [ Shift ] + [ P ]를 눌러 명령 팔레트를 엽니다. "Upload LittleFS to Pico/ESP8266/ESP32" 명령을 찾아 클릭합니다.

LittleFS를 Pico ESP8266 ESP32 Arduino IDE에 업로드하세요.
이 옵션이 보이지 않는다면 파일 시스템 업로더 플러그인을 설치하지 않았기 때문입니다. 이 튜토리얼을 참조하세요 .
중요: 파일 시스템에 업로드하기 전에 시리얼 모니터를 닫아 두십시오. 그렇지 않으면 업로드가 실패합니다.
업로드가 성공적으로 완료되면 115200bps의 전송 속도로 시리얼 모니터를 엽니다. ESP32의 EN/RST 버튼을 누르면 ESP32의 IP 주소가 출력될 것입니다.

ESP32의 IP 주소가 아두이노 IDE 시리얼 모니터에 출력되었습니다.
데모
브라우저를 열고 ESP32의 IP 주소를 입력하세요. 센서 측정값을 보여주는 웹 페이지에 접속할 수 있을 것입니다.
센서를 움직여 보면 측정값과 브라우저의 3D 객체가 어떻게 변하는지 확인할 수 있습니다.
ESP32 ESP8266 NodeMCU 웹 서버 데모
참고: 코드에서 몇 가지 조정을 했음에도 불구하고 센서가 X축에서 약간의 오차를 보입니다. 많은 독자분들이 이러한 현상이 해당 MCU에서는 정상적인 것이라고 말씀해 주셨습니다. 오차를 줄이기 위해 일부 독자분들은 보완 필터나 칼만 필터를 사용하는 것을 제안해 주셨습니다.
마무리
MPU-6050은 가속도계, 자이로스코프, 온도 센서가 하나의 모듈에 통합된 제품입니다. 이 튜토리얼에서는 ESP32를 사용하여 MPU-6050 센서에서 측정한 값을 표시하는 웹 서버를 구축하는 방법을 배웠습니다. 서버 전송 이벤트(SEM)를 사용하여 측정값을 클라이언트로 전송했습니다.
three.js JavaScript 라이브러리를 사용하여 자이로스코프 판독값을 기반으로 센서의 각도 위치를 보여주는 3D 모델을 구축했습니다. 이 시스템은 완벽하지는 않지만 센서의 방향을 파악하는 데 도움이 됩니다. 이 분야에 대해 더 잘 아시는 분께서 센서 보정에 대한 조언을 주시면 매우 감사하겠습니다.
이 튜토리얼이 유용했기를 바랍니다. 이 튜토리얼의 원문은 다음 링크를 따라가세요.
토요일인데, 일하다니... 하~ 씨, 짜증난다!!!!!!!!
'ESP32' 카테고리의 다른 글
| 연결이 끊긴 ESP32를 Wi-Fi 네트워크에 다시 연결하는 방법 (0) | 2026.02.24 |
|---|---|
| ESP32 MPU-6050 가속도계 및 자이로스코프 웹 서버 (0) | 2026.02.17 |
| ESP32 ADXL345 Accelerometer Interfacing (0) | 2026.02.17 |
| GY-291 ADXL345 i2c SPI 가속도 센서 (인터럽트 기능) - ESP32, ESP8266, STM32 및 아두이노 호환 (1) | 2026.02.17 |
| ESP32-P4 vs. C3: 어떤 Elecrow HMI 디스플레이가 당신에게 더 적합할까요? (0) | 2026.02.09 |
| ESP32 웹 업데이터: 브라우저를 통해 코드 업데이트(OTA) (0) | 2026.02.03 |
| ESP32와 PIR 모션 센서 사용, 인터럽트 및 타이머 (0) | 2026.01.30 |
| Wit.ai를 사용하여 ESP32 텍스트 음성 변환 (0) | 2026.01.30 |
취업, 창업의 막막함, 외주 관리, 제품 부재!
당신의 고민은 무엇입니까? 현실과 동떨어진 교육, 실패만 반복하는 외주 계약,
아이디어는 있지만 구현할 기술이 없는 막막함.
우리는 알고 있습니다. 문제의 원인은 '명확한 학습, 실전 경험과 신뢰할 수 있는 기술력의 부재'에서 시작됩니다.
이제 고민을 멈추고, 캐어랩을 만나세요!
코딩(펌웨어), 전자부품과 디지털 회로설계, PCB 설계 제작, 고객(시장/수출) 발굴과 마케팅 전략으로 당신을 지원합니다.
제품 설계의 고수는 성공이 만든 게 아니라 실패가 만듭니다. 아이디어를 양산 가능한 제품으로!
귀사의 제품을 만드세요. 교육과 개발 실적으로 신뢰할 수 있는 파트너를 확보하세요.
캐어랩


